

Do you want to know how to optimize images in WordPress and get more organic traffic from image search?
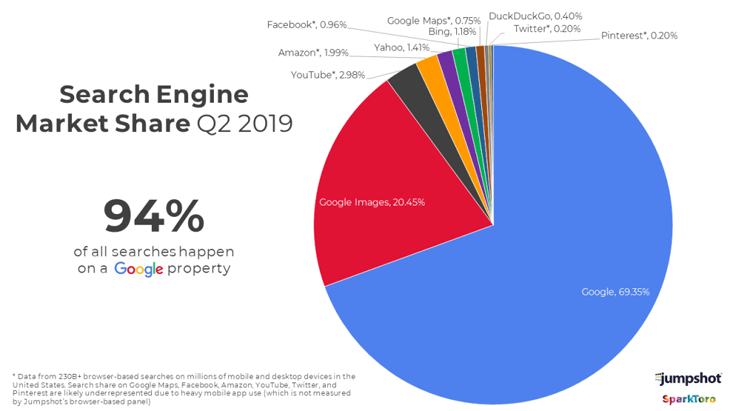
Every day more than 1 billion searches are made on Google Images, making them a great opportunity to help you rank and gain more visibility in search.
That’s why we decided to create a list of tips on how to best optimize your images in WordPress to improve rankings and drive more traffic to your website.
Since this is a comprehensive list, you can click on these quick links to jump straight to different sections:
- What Is Image SEO?
- How to Optimize Your Images in WordPress
- 1. Use the Right Image SEO Tool
- 2. Use Descriptive Image File Names
- 3. Write SEO-Friendly Alt Text
- Adding Alt Text in WordPress Block Editor
- 4. Use Image Caption When Needed
- Adding Image Captions in WordPress Block Editor
- 5. Consider Your SEO Title and Description
- 6. Disable Attachment Pages
- 7. Define Your Image Dimensions
- 8. Choose the Right Image Format
- 9. Create an Image Sitemap
- 10. Use Image Structured Data to Rank for Rich Snippets
- 11. Add Facebook Thumbnails and Twitter Cards
- 12. Compress Your Images to Reduce File Size
- 13. Lazy Load Your Images
- 14. Use Responsive Images
- 15. Install a Cache Plugin
- 16. Serve Your images Via an Image CDN
- 17. Make Your Website Mobile-Friendly
- 18. Prepare for Google Lens Visual Search
What Is Image SEO?
Image SEO, also called image optimization, is the process of optimizing the images on your website to make it easy for Google to find and rank your images.
In other words, it helps Google and other search engines to understand your content and show your images in the image search results.
And to make this happen, you’ve to optimize your images for the web, which we’ll show you how to do. But first, let’s take a look at why you should use images in your content, to begin with.
Why Should You Use Images in Your Content?
First things first: Why should you use images in your content?
You should use images because they add value to your content and grab people’s attention.
If used properly, images can spike people’s interest and make them click through to your site, increasing your rankings in search results.
In fact, image search represents about 20.45% of all searches on Google and other popular sites.
This should make you realize why adding images to your content and optimizing them for SEO is a good idea.
The first thing you need to think about is whether your images are relevant to the topic of your page. More importantly, if they’re adding value to your content.
Also, you should place the most important image on top of your page and try using original photographs that are unique to your blog or website.
But there’s more to it than that…
…there are more things you need to do if you want to be featured in Google’s image search and improve your rankings, and that’s what we’ll show you next.
How to Optimize Your Images in WordPress
To optimize your images in WordPress, you’ve to make sure you add additional information about your images, so search engines can understand what they’re about.
Search engines are getting smarter every day. They can recognize and categorize images quite well. But they need you to provide context to the image and optimize your images to rank for image search.
1. Use the Right Image SEO Tool
One of the first steps to ensuring you nail your image SEO is to use the right image SEO tool.
And it doesn’t get better than All In One SEO (AIOSEO).

AIOSEO is a powerful WordPress SEO plugin trusted by over 3 million websites. Savvy marketers use it to help drive traffic and rank high on SERPs. With AIOSEO, you get access to all the advanced SEO tools you’ll need to take your SEO efforts to the next level without having to be an SEO expert.
One of the plugin’s most loved features is the Image SEO module. This is a powerful module that makes optimizing your images way easier. For example, you can optimize your image metadata by:
- Setting a format (similar to the SEO title/description formats)
- Stripping punctuation
- Converting the casing
- And more
To use this feature, go to your AIOSEO dashboard » Search Appearance » Image SEO.

You can then optimize the image metadata by clicking on the relevant tab (Title, Alt Tag, Caption, Description, or Filename). You can also choose the pages you want to implement these optimizations on:

Optimizing your images this way makes it easier for search engines to understand what your image is about as it helps add context. It also enhances the user experience.
Check out this installation guide for detailed instructions on installing AIOSEO on your site.
2. Use Descriptive Image File Names
You should always name your images with as descriptive file names as possible.
Here’s what Google says about image filenames:
“[…] the filename can give Google clues about the subject matter of the image. For example, my-new-black-kitten.jpg is better than IMG00023.jpg.”
To give you another example, here’s a photo of a playful black kitten. Instead of naming it IMG00021.jpg, we’ve named it playful-black-kitten.jpg, which is a better description of the image.

Try to be specific. For instance, big-eyed-playful-black-kitten.jpg is better than just black-kitten.jpg.
Also, consider the keywords that users would type on Google to find your image.
3. Write SEO-Friendly Alt Text
Alt text or alternative text is crucial for image SEO. It helps Google understand what the image is about. It’s an HTML attribute added to the image tag, which is used to show images on a page.
It can look like this in plain HTML code:
<img src="img_playful-black-kitten.jpg" alt="Playful black kitten" width="500" height="600">As mentioned, the alt text is used to describe your image. And if your image can’t be displayed, users can still understand what the image is about by reading the text.
It’s good for people who use screen readers or have low bandwidth connections. Alt texts are also useful as anchor texts if you’re linking images.
Don’t just use one or two words to write your alt text. Instead, imagine how you would describe your image to a blind person.
For example, instead of just ‘chocolate,’ use ‘dark chocolate banana bread muffins’. This will also help Google to rank your image since it uses a combination of alt texts, computer vision algorithms, and the contents of your page to understand what your image is about.
But don’t stuff your alt text with different keywords thinking it’ll help you rank better in image search. In fact, it can result in the opposite, and Google may see your site as spam.
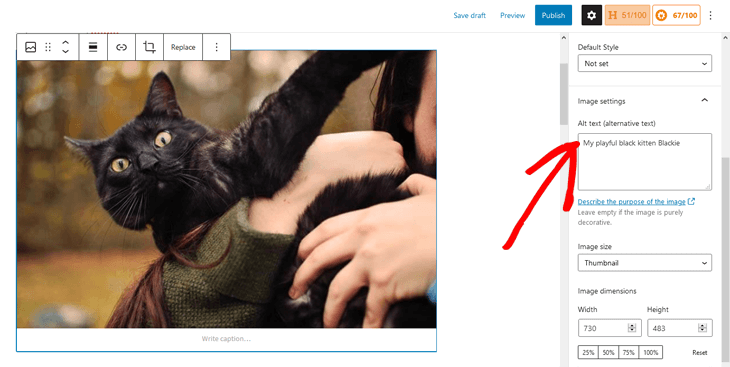
Adding Alt Text in WordPress Block Editor
To add alt text to your images is super easy when using the WordPress block editor.
Simply scroll down in the post or page you’re editing and click on your image so that it gets marked with the blue frame. Then, go to the Image Settings in the right column of your editor and type in your alt text in the Alt Text (alternative text) field.
Alt texts aren’t visible on your site, while captions are shown below your images, which we’ll look at next.
4. Use Image Caption When Needed
Image captions make your content scannable. People tend to scan headings, images, and captions when they’re quickly eying through a page.
However, they can make your content look cluttered and aren’t really necessary since you’re explaining the image in the content itself.
Still, captions can be good for:
- Family or event photos
- Photos that need additional explanation describing a background story
- And product image galleries
Adding Image Captions in WordPress Block Editor
To add your image caption in the WordPress block editor, you simply scroll down in the post or page you’re editing and click on your image, so it gets marked with the blue frame. Next, enter your image caption in the Caption field below the image, and it’s added!

5. Consider Your SEO Title and Description
Google also uses your page’s SEO title and description when deciding what description to show below your image in the search results.
Here’s what Google says:
“Google Images automatically generates a title and snippet to best explain each result and how it relates to the user query… We use a number of different sources for this information, including descriptive information in the title, and meta tags.”
To better illustrate this, here’s an example of the image search results on Google for ‘tasty chocolate muffins‘:

As you can see, all images have descriptions below them. And Google uses your page’s SEO title and description to generate these.
That’s why your images have to relate to your title and description. If you want to know how to easily edit your SEO title, please check out our guide on how to change the SEO title in WordPress.
6. Disable Attachment Pages
WordPress creates a page for all images you upload to your posts and pages. It’s called an attachment page.
The only thing this page does is to show a larger version of your mage, which in fact, can hurt your SEO. Search engines consider pages with little to no text as low-quality or ‘thin content.’
Fortunately, it’s easy to disable the attachment pages on your WordPress site. And the easiest way to do this is by installing and activating the best WordPress SEO plugin in the market, All in One SEO (AIOSEO).
Disabling image attachment pages is also a great way to eliminate unnecessary URL parameters on your site. Eliminating these is an excellent way of increasing crawl efficiency on your site.
Once you’ve activated AIOSEO, it automatically turns off attachment URLs. You can also manually turn them off by visiting All in One SEO » Search Appearance and clicking on the Media tab.

Make sure that the Redirect Attachment URLs option is set to Attachment, and that’s it!
7. Define Your Image Dimensions
You should resize your images to fit the blog content of your page. Even if your website fills up the whole width of the screen, the blog section has a set maximum width. And using larger images will slow down your page loading and negatively affect your SEO.
For example, if your blog’s maximum width is 706px, your images will never be displayed wider than 706px. And if you have a responsive website, the browser will resize images that are wider than 706px to fit them on the screen.
At least this makes your site look good, right?
Well, there’s one problem…
…when using large images, the browser still has to load your image in its full size. Even worse, large images are heavy in file size and will reduce your page loading speed.
That’s why you should resize and upload your images to the maximum width of your blog or page. Fortunately, it’s easy to check this.
To get started, go to the Web Developer settings in your browser and click on the Inspector tool. Then, you simply hover over the column you want to check, and a black box with the dimensions will appear.

As you can see, AIOSEO’s blog width is 706px, which is the maximum width our images should be uploaded in not to slow down our page loading.
8. Choose the Right Image Format
As we just explained, images often make your website big in file size and too heavy. Your site won’t load fast enough for visitors to wait around for it.
Instead, they’ll choose another site that’s loading faster, and you’ll lose out on traffic and potential customers. This will also hurt your rankings in search engines since your bounce rate will increase.
Depending on what image format you use, your image file size will be larger or smaller. It’ll also impact the quality of your images.
The most common image file types are JPG, PNG, and GIF. Each of them serves its purpose depending on what images you’re creating or uploading to your site:
- JPG is best for website graphics that have many shades of colors
- PNG is best when you want top-quality and size isn’t an issue
- GIF is for animations or moving images
JPGs are generally smaller in file size than PNG’s and GIFs. However, PNG is better for high-quality images, such as screenshots, drawings, and images with text where you need to keep the image quality.
9. Create an Image Sitemap
You can help Google index and crawl your images faster by creating an image sitemap.
When using AIOSEO, creating an XML image sitemap is as easy as a walk in the park. In fact, all images on your website are automatically included in the XML sitemap. And this function is what’s called an Image Sitemap.
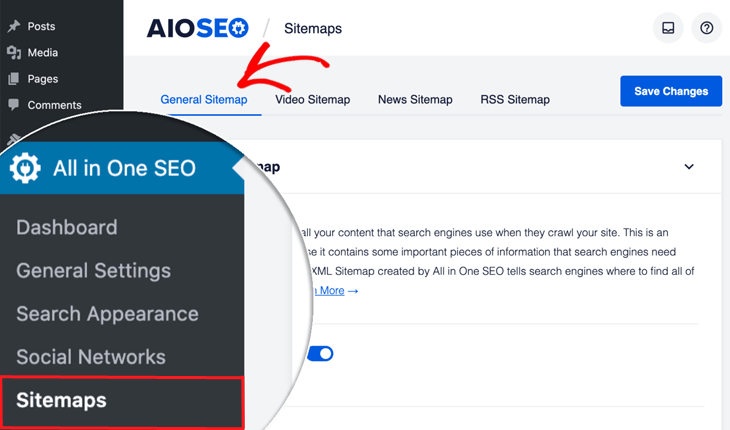
All you need to do is activate AIOSEO, and it automatically creates a sitemap for you. You can check so that it’s enabled by navigating to Sitemaps in the All in One SEO menu and clicking on the General Sitemap tab.
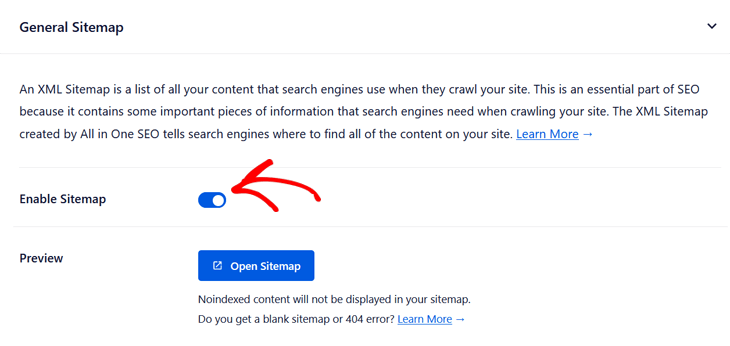
This will open the General Sitemap window, where you can see that Enable Sitemap is set to on.
As simple as that!
If you want to know how to customize your sitemap and exclude certain images or content, you can check out our guide on how to create a sitemap in WordPress.
Also, make sure your images aren’t blocked by your robots.txt file. If you don’t want Google to crawl your images, you can disallow them using robots.txt. For more details, please visit our guide on how to easily edit a robots.txt file in WordPress.
10. Use Image Structured Data to Rank for Rich Snippets
If you add schema markup or structured data to your site, Google Images can show your images as rich results with a prominent badge of what your page is about.
Here’s an example of when Recipe schema markup is added to your site:
As you can see, it shows a prominent badge with a fork and knife indicating that it’s a recipe. This gives users more information about your page, which will increase your CTR (Click-Through-Rate) and drive more organic traffic to your site.
Google Images supports schema markup for:
- Products
- Videos
- Recipes
You can easily add schema markup to your site and get these nice looking rich results using AIOSEO. To learn how to do this, you can check out our guide on how to add rich snippets to WordPress.
11. Add Facebook Thumbnails and Twitter Cards
Another way of driving more traffic to your site is by utilizing your social media profiles. And a first step is to make sure the right images are shown when shared on social media.
With AIOSEO, you can optimize your images and control how they look when your content is shared on Twitter and Facebook. You can easily do this by adding Twitter Cards and Facebook thumbnails to your site.
For example, here’s what one of our posts looks like after choosing which thumbnail’s used when it’s shared on Facebook:
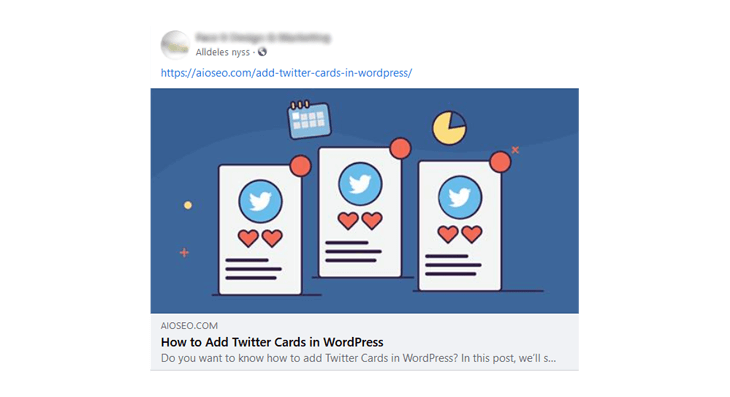
And here’s a Twitter Card when OptinMonster’s post is shared on Twitter:

Check out how to easily set this up by visiting how to fix the wrong Facebook thumbnail and how to add Twitter Cards in WordPress.
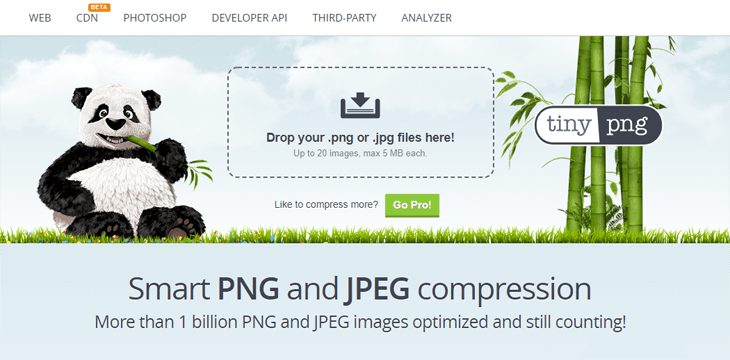
12. Compress Your Images to Reduce File Size
As mentioned, site speed is crucial for SEO. Google has confirmed that it’s a ranking factor on both desktop and mobile. And this is also true for image search.
Starting May 2021, Google will make website loading speed a part of its Core Web Vitals. These are factors that Google considers important for giving users the best experience when visiting your site. For instance, it’ll look at your site speed, responsiveness, and how quickly different elements like images and fonts load.
The first step in optimizing your images for site speed is to compress them. And you can use free services, such as:
- TinyPNG for PNG & JPG files
- CompressJPEG for JPG files
- Optimizilla for PNG & JPG files
This can reduce your image file size by 70% or more, positively impacting your site speed.
13. Lazy Load Your Images

If you have a lot of images and content on your site, it’s always good to use lazy loading.
Lazy loading shows the images on your page only when they’re visible to the user as they scroll down your content. This makes the communication between your site and the server more efficient, which makes your page load faster.
Here’s what Google says about lazy-loading:
“Lazy loading can significantly speed up loading on long pages that include many images below the fold by loading them either as needed or when the primary content has finished loading and rendering.”
Guess what…
…if you’re using WordPress 5.4 and newer versions, it will lazy load your images by default. So you don’t have to worry about installing a lazy load plugin.
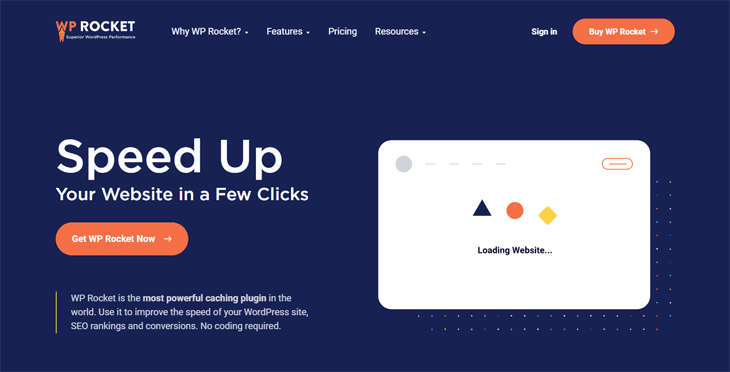
However, if you want to add lazy loading for other HTML elements such as iframes, videos, and background images, you can use a lazy load plugin like WP Rocket to speed up your page loading even more.
14. Use Responsive Images
Using responsive images lets your site show a larger, higher resolution image on your desktop. It also enables mobile sites to show a zoomed-in image on mobile and makes the image size smaller, increasing a page’s load speed.
If you’re using WordPress, you don’t have to worry about this. WordPress automatically makes your images responsive after uploading them and shows them in different sizes on your site.
That said, if you want to know how your images affect your site speed, you can test this using Google’s PageSpeed Insights tool.
15. Install a Cache Plugin
Browser caching can help speed up your website by storing some of the larger files on your site, including images, locally in the user’s web browser.
A cache plugin makes a copy of your page after the first-page load,s and then serves that cached version to other users.
For example, WP Rocket offers a comprehensive set of tools to help speed up your website, such as page caching and preloading.
If you want to know more options, you can check out our post on the best WordPress cache plugins we recommend.
16. Serve Your images Via an Image CDN

If you want to speed up your site, even more, you should use an image CDN (Content Delivery Network).
It picks a cached version of your image from the server closest to your geographical location. This will speed up your website since it limits the number of internet hops it takes to display your image from your original server (your web hosting provider).
To learn more about CDN and how to connect your site, you can check out WPBeginner’s guide on how to install and set up WordPress CDN.
17. Make Your Website Mobile-Friendly
Why is this important for image SEO, you may think?
Because the rise of mobile devices has made failure to look after mobile SEO a death sentence. Google won’t show your content in image search if your site isn’t optimized for mobile. In fact, Google now has a mobile-first index and ranks mobile-friendly sites higher.
The easiest way to make your site mobile-friendly is to use a responsive WordPress theme that adapts to different screen sizes and devices. To find a responsive theme, please visit WPBeginner’s post on the 44 best responsive WordPress themes.
18. Prepare for Google Lens Visual Search

If you’re running, for example, an eCommerce store or a restaurant, you need to prepare for visual search by Google Lens.
Google Lens is Google’s new image-recognition tool. It lets users tap and hold an image in the Google app or Chrome browser on Android to find where they can buy a product or order a meal.
This feature will soon be added to the Google app on iOS as well. So it can be a good idea to optimize your images for Google Lens.
Now, did this make you feel overwhelmed?
It’s actually easier than it seems…
…if you use all these tips to optimize your images in WordPress, you’ll be long on your way.
We hope this post helped you understand why image SEO is important and how you can leverage image SEO to improve rankings on Google Images and drive more traffic to your site.
You may also want to check out our ultimate WordPress SEO guide or blog post SEO checklist to learn how to boost rankings even more.
Want to Try AIOSEO for Free?
Enter the URL of your WordPress website to install AIOSEO Lite.
Disclosure: Our content is reader-supported. This means if you click on some of our links, then we may earn a commission. We only recommend products that we believe will add value to our readers.
