Do you want to know how to set up Google Analytics on a WordPress site?
Google Analytics is a vital tool for every website owner or administrator. It shows how your audience interacts with your website and gives you invaluable data to help power your SEO efforts.
Getting audience insights is important as it helps you optimize your website for engagement and conversions.
That’s why you need to know how to set up Google Analytics on a WordPress site. We’ll show you how to do that the easy way.
3 Reasons Why Installing Google Analytics on a WordPress Site is Important
If you’re running or managing a website, one of the most important additions you should make to your toolset is Google Analytics (GA).
Why is it so important?
Gives You Insight into Who Visits Your Site
GA is an invaluable tool that lets you know who visits your website. It shows you, among many other audience factors, the geographical location of your visitor and the browser used.
Google Analytics also shows you how people find your website. This is usually via sources like search engines, direct traffic (from emails, for example), referral links from other websites, and more. Knowing where your traffic comes from is crucial to optimizing your acquisition channels.
Shows You Audience Interactions
Knowing what your visitors do when they land on your site is important. Engagement metrics are important to track as they show you:
- Posts that drive the most traffic and revenue
- Posts and pages that have the highest bounce rates
- The kind of content users are looking for
- Links that get the most clicks
All this data is critical to helping you improve conversion rates, decrease bounce rates, and grow your business more efficiently. It can also help you craft better content and optimized marketing campaigns.
Know Which Pages Drive the Most Revenue
If you’re running a revenue-generating website, it’s crucial to understand which pages drive the most revenue. You can get this data from GA. You can also see how customers move through the checkout process and engage with your content. This will help you build more efficient buyer journeys.
You can do a whole lot more with GA on your website. That’s why you must know how to set it up on your website.
How to Set Up Google Analytics on a WordPress Site: Start by Creating a Google Analytics Account
As promised, we’re going to show you how to set up Google Analytics on a WordPress site — the easy way.
However, before we get to that, you must first create a GA account if you don’t have one already.
Creating a Google Analytics Account
To create a GA account, you’ll need a Gmail address. You can easily create it if you don’t have one.
Once you have a Gmail address, you can head to the Google Analytics signup page and create your account. Here’s how:
Step 1: Setting Up Your Google Analytics Account
Using your Gmail credentials, sign in to Google Analytics and follow the prompts to set up your account. One of the first steps in this stage is to fill in your information, including the account name. The account name will be used internally, so you can use any name that makes sense to you, like your business/website name.
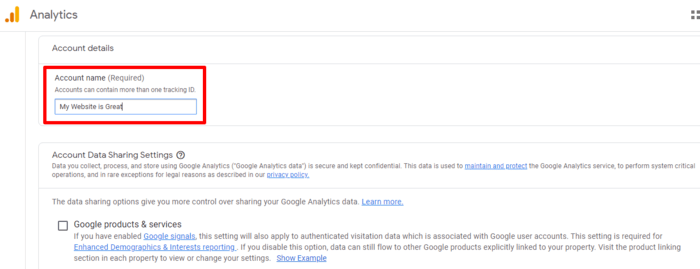
You’ll also be asked to name your property (website) and fill in other information about your business. The business information includes what you want to track with GA.
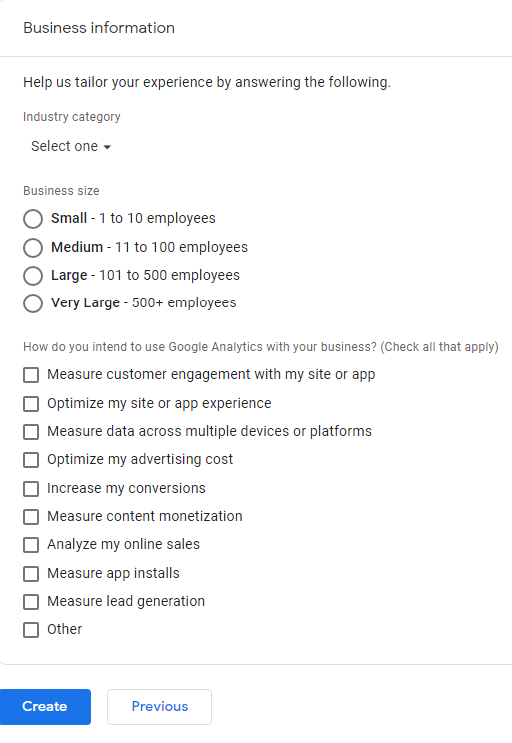
Once you’ve ticked all the appropriate boxes, you can then click “Create.” Doing so will take you to a page where you’ll be requested to agree to the Google Analytics terms of service.
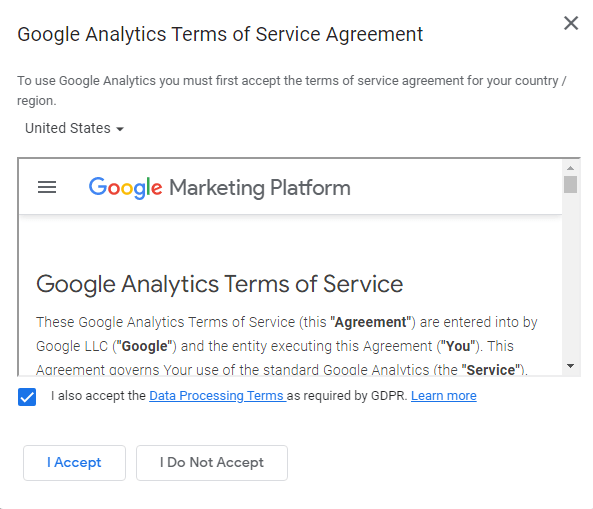
After this, a window will open and you’ll be required to select your email newsletter preferences. Next, you’ll be taken to your Google Analytics admin dashboard.
Step 2: Determine The Type of Web Asset You Want to Track
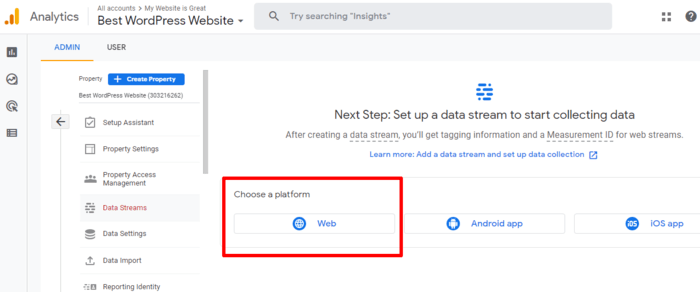
One of the first steps to take once on the admin dashboard is to select the kind of web asset you’ll be tracking. In this case, you’ll choose “Web”. Once you do that, you’ll be prompted to set up a data stream:
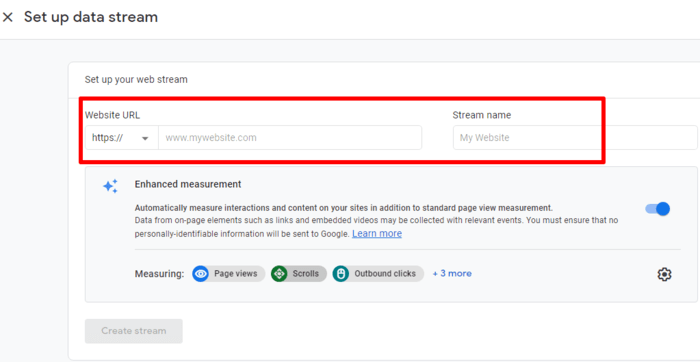
Next, the setup wizard will present you with your web stream details and the Google Analytics tracking code to paste on your website.
No coding skills?
Don’t worry. As promised, we’ll show you how to set up Google Analytics on a WordPress site — the easy way.
How to Set Up Google Analytics on a WordPress Site (Easy Way): Using MonsterInsights
Using a plugin is the easiest way to set up Google Analytics on a WordPress site. In this regard, no plugin beats MonsterInsights.
Remember the tracking code you got in the last stage of setting up GA?
Typically, you would have to inject that into your website’s code. However, with MonsterInsights, you don’t have to fiddle with any code. This makes MonsterInsights an excellent tool for both experts and novices alike.
To get started with MonsterInsights, you must first download and activate the plugin. Doing so requires you to log into your MonsterInsights account and download the plugin zip file. Once you’ve done that, go to your WordPress Dashboard, navigate to the “Upload Plugin” option, and select “Upload”.

You’ll then be prompted to select the file you want to upload.
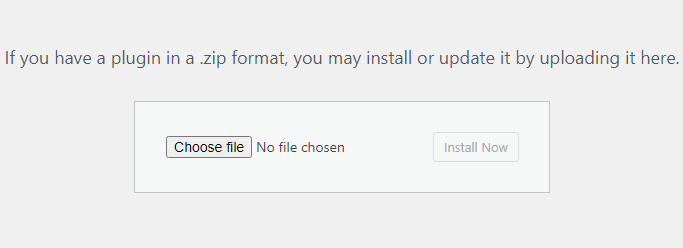
Select the zip file you just downloaded, then click “Install Now.” Doing so will upload the file and install MonsterInsights on your site. Once the plugin has been uploaded, click the “Activate” button to activate the plugin. The setup wizard will guide you on how to complete the process.
Setting Up MonsterInsights
The first step to setting up MonsterInsights is to select the type of website you’re connecting to. You have three options — Business website, Publisher (Blog), and eCommerce. Select the most applicable option, then click “Save and Continue.” Next, you’ll be taken to a page where you’ll be asked to enter your license key.
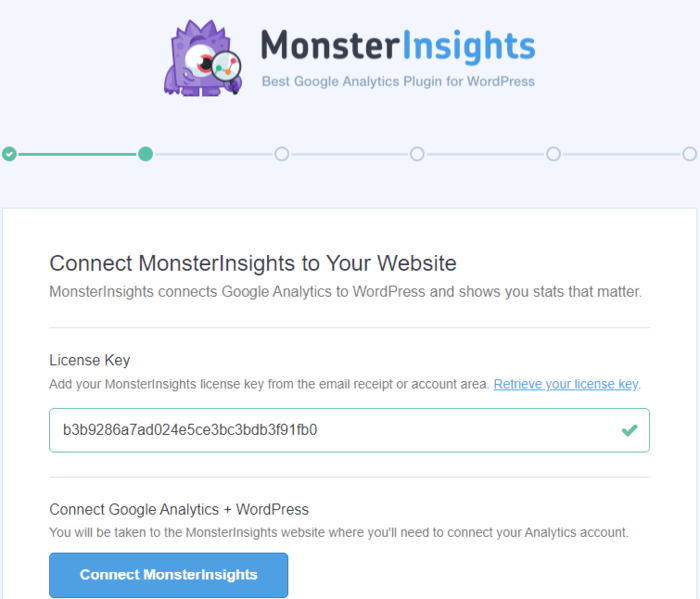
Once the license key is verified, click the “Connect MonsterInsights” button. You’ll then be prompted to choose the Google Account you used to create your GA account. Doing so will take you to a page where you’ll grant MonsterInsights the proper permissions to access your analytics data.
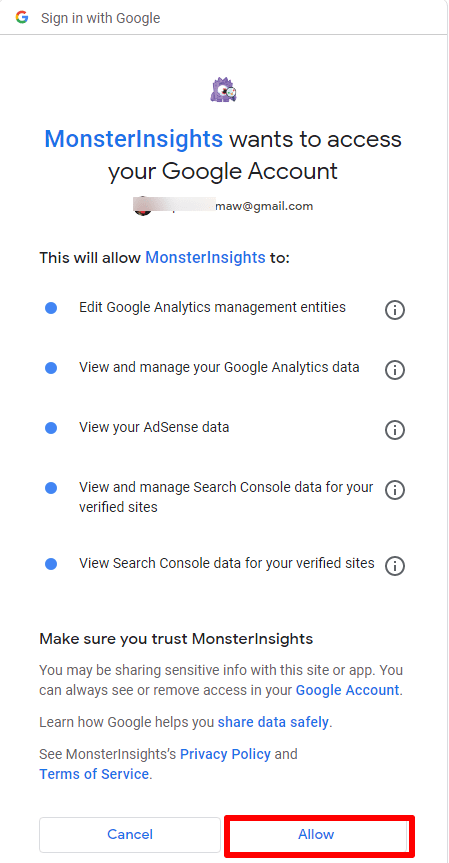
Click “Allow,” and the setup wizard will take you to a page where you’re to select the profile you want to connect to GA. If you have many web properties, make sure to pick the right one.
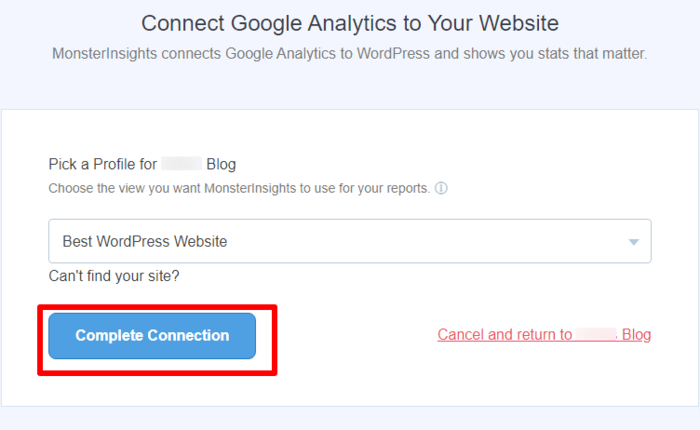
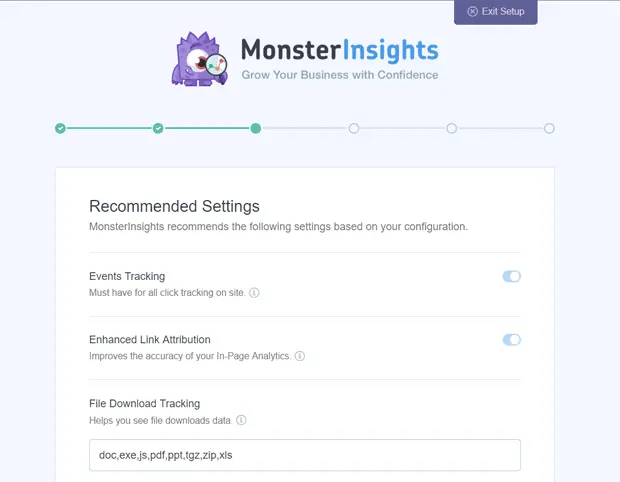
Click “Complete Connection.” The plugin will perform a final authentication. Once this is complete, you’ll be taken back to the MonsterInsights setup page. Here, you’ll be presented with recommended settings (enabled by default), which include:
- Events Tracking
- Enhanced Link Attribution
- File Download Tracking
You’ll also find more advanced settings that you have to enable if they apply to your website type and goals. At the very bottom, you have the option to allow auto-updates of the plugin. We recommend you set this to on, making it easier for you to keep the plugin updated.
Review and configure your settings, then click “Save and Continue.”
The next page will show you addons you can install to make MonsterInsights more versatile in the data it tracks.
Install the addons you need and click “Save and Continue,” and you’ll be taken to the final step of the setup.

Click “Finish Setup and Exit Wizard,” and you’re all done. You’ve just set up Google Analytics on a WordPress site. You can now see your website’s performance metrics right from your WordPress dashboard. To do that, click on the “Insights” option in your WordPress dashboard and select “Reports.”
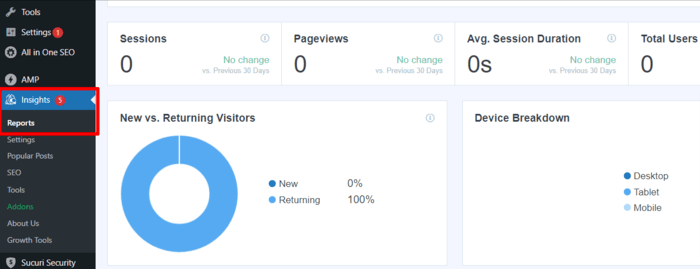
You can view different reports by clicking on the tabs at the top of the report page.
While you can get tons of valuable insights using MonsterInsights Lite, you’ll need the Pro version to unlock advanced features. These include tracking your e-commerce store’s performance, insights into where your traffic comes from, your top landing pages, and more.
How to Set Up Google Analytics on a WordPress Site Using the Insert Header and Footers Plugin
Another easy way of setting up GA on your WordPress site is by using the Insert Header and Footers plugin by WPBeginner. The plugin enables you to inject code into your WordPress website without doing the coding yourself. The only caveat is that, unlike the MonsterInsights way, you won’t be able to view your analytics data in your WordPress dashboard.
You’ll first have to install and activate the Insert Header and Footers plugin to use this method.
Next, head over to your GA account and copy your tracking code. You’ll find this by going to the “Admin” section then selecting the “Data Streams” option. Doing so will open a page displaying your web properties.
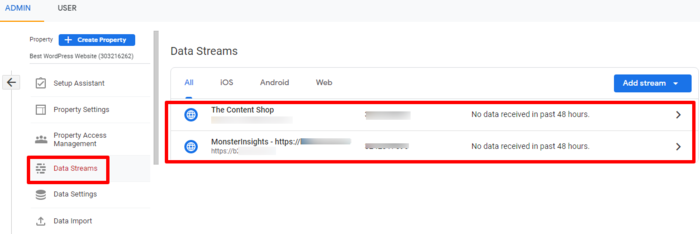
Selecting the web property whose code snippet you need will open up its streaming details. Then, on the “web stream details” page, click on the “global site tag” option under the “Tagging Instructions” section. Doing so will expand the section to show your GA code snippet.
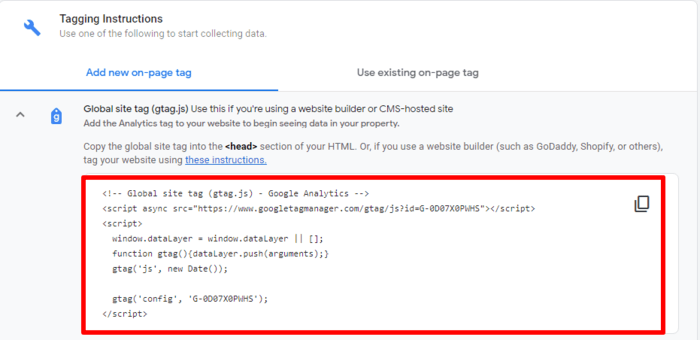
This is the code you’ll have to paste in your website’s header to enable GA to track analytics on your website. Copy this code and head over to your WordPress dashboard.
Once in WordPress, select the “Settings” option and click on “Header and Footer.”
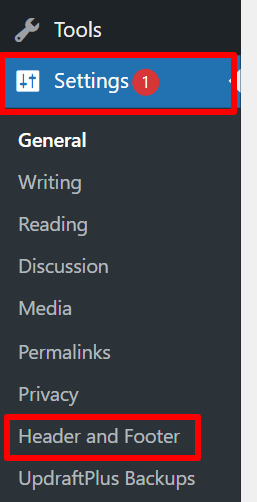
This will lead to a window that gives you many options to paste your code.
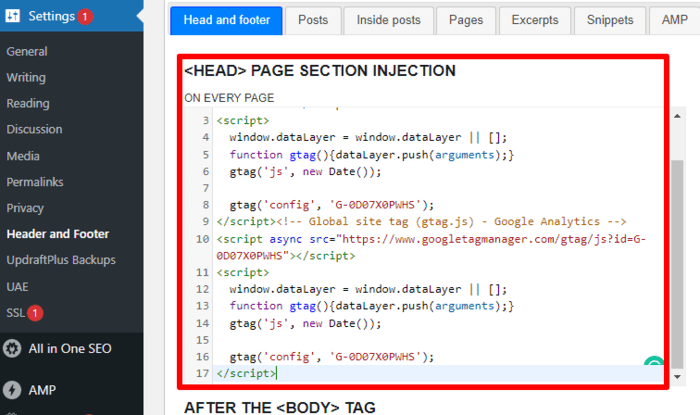
Paste your code in the <Head> Page Section Injection space and click “Save.”
That’s it! You’ve set up Google Analytics on your site.
Google Analytics: An Invaluable Resource for Every Web Admin
Understanding what’s happening on your WordPress website is critical to improving your engagement and conversions.
That’s why setting up Google Analytics is essential.
Targeted tracking will help you understand your audience better, thereby enabling you to create content tailored to their needs. The wealth of data that GA provides is helpful for monitoring SEO performance. It’s also valuable for helping you improve your SEO strategy.
That’s why setting up GA on your site must be a priority. It’s as important as installing an SEO plugin like AIOSEO. AIOSEO is one of the best SEO plugins on the market. It automates the SEO tasks you need to perform on your website.
As you set up Google Analytics on your WordPress website, make sure to download AIOSEO too.
Disclosure: Our content is reader-supported. This means if you click on some of our links, then we may earn a commission. We only recommend products that we believe will add value to our readers.


Plugin from Google integration support (Site kit) also Ad sense Optimize, tag manager and Googles search in one, and for free!
Hi Harrie,
Thank you for the comment. Indeed Site kit does help with setting up Google Analytics on a WordPress website. You can check out this post on how Site Kit compares to MonsterInsights.