

Configurar el SEO en un sitio nuevo puede ser estresante.
Tienes un panel lleno de configuraciones y, a menudo, poca o ninguna dirección. Es como si los plugins esperaran que ya supieras cómo hacer SEO, lo que anula el propósito por el cual lo descargaste en primer lugar.
Quiero decirte que no deberías tener que adivinar. Y definitivamente no deberías tener que contratar una agencia o desarrollador SEO solo para configurar lo básico.
Solo necesitas el plugin SEO adecuado.
All in One SEO ha perfeccionado el proceso de configuración de SEO para WordPress, brindándote un plan completo desde la "instalación" hasta la "optimización completa".
En este artículo, te mostraré exactamente cómo es este proceso, para que puedas empezar rápidamente y comenzar a clasificar.
En este artículo
- Part 1: The WordPress SEO Setup Wizard
- Paso 1: Categoriza tu sitio web y establece la base
- Paso 2: Agrega información de soporte del sitio
- Paso 3: Personaliza tus funciones de SEO
- Paso 4: Optimiza la apariencia de tu búsqueda
- Paso 5: Configura el Analizador de Sitios
- Paso 6: Conéctate a Google Search Console
- Paso 7: Agrega tu clave de licencia de AIOSEO
- Part 2: Your Personalized SEO Checklist
- ¿Más allá de la configuración: ¿Qué sigue?
- ¿Listo para empezar?
- FAQs
Parte 1: El asistente de configuración de SEO para WordPress
Después de instalar AIOSEO, te recibe el Asistente de Configuración. Esta parte está diseñada para manejar todos los aspectos básicos de tu SEO y solo toma 10 minutos.
Haz clic en el botón "Empecemos" para iniciar el primer paso.
Paso 1: Categoriza tu sitio web y establece la base
La primera pregunta es sencilla: ¿Qué categoría describe mejor tu sitio web?
Tendrás 6 opciones, como blog, canal nuevo o tienda en línea. También puedes seleccionar "Otro" y escribir una categoría personalizada.

Tu selección influirá en la configuración posterior del plugin y en cómo implementa tu SEO.
En este mismo paso, también se te pedirá que configures el SEO de tu página de inicio.
La página de inicio es una de las páginas más importantes de tu sitio web. A menudo es la primera impresión que los usuarios tienen de tu negocio y puede influir drásticamente en tu tasa de rebote.
La tasa de rebote mide el porcentaje de personas que visitan tu sitio y se van después de ver solo una página. Una tasa de rebote alta indica una mala experiencia de usuario, lo que puede perjudicar tus clasificaciones en Google.
Optimizar el SEO de tu página de inicio es fundamental para una experiencia de usuario positiva y para que los motores de búsqueda comprendan fácilmente qué es o qué hace tu sitio web.
En este paso, configurarás el título SEO y la meta descripción de tu página de inicio.

Me gusta usar las etiquetas inteligentes dinámicas que vienen preconfiguradas en los campos. Estas extraen texto de tu configuración SEO, como el título de tu sitio y el eslogan, directamente a tu página de inicio.
Esto significa que no *tienes* que escribir un nuevo título SEO o meta descripción. (¡Pero si quieres, también puedes hacerlo!)
Una vez que hayas realizado tus cambios, haz clic en "Guardar y Continuar".
Paso 2: Agrega información de soporte del sitio
En este paso, proporcionarás información adicional sobre tu sitio web. Esto ayuda a los motores de búsqueda a comprender el contexto de tu sitio y su contenido.
Primero, elegirás entre Persona u Organización. Tu selección determinará las siguientes preguntas. Por ejemplo, en este tutorial, elegí Organización, y me pide el título y la descripción de mi organización.

A continuación, se te pedirá que añadas tu número de teléfono, logotipo e imagen de compartir social predeterminada (la imagen que aparece en las previsualizaciones sociales cuando no has seleccionado otra imagen para esa publicación).
Si no tienes un número de empresa o algunos de estos activos de marketing, simplemente deja el campo en blanco.

Finalmente, puedes añadir tus perfiles de redes sociales a tu cuenta de WordPress. Las redes sociales son una forma poderosa de conectar con tus clientes y aumentar el tráfico orgánico a tu sitio.

Una vez que hayas añadido tus cuentas, haz clic en "Guardar y Continuar".
¿Quieres saber más sobre marketing en redes sociales? Aquí tienes algunos recursos útiles:
Paso 3: Personaliza tus funciones de SEO
Ahora puedes adaptar las funciones a las necesidades de tu negocio y SEO.
AIOSEO presenta una lista clara y completa de las funciones del plugin, como mapas del sitio y SEO local. También obtienes recomendaciones de plugins complementarios, como MonsterInsights (integra Google Analytics en WordPress).

Notarás que algunas de estas funciones ya están marcadas, pero puedes personalizar toda la lista.
Una vez que estés satisfecho con tus selecciones, pasa al último paso del Asistente de Configuración de WordPress.
Paso 4: Optimiza la apariencia de tu búsqueda
El último paso verifica cómo aparecerá tu sitio web en las páginas de resultados de los motores de búsqueda (SERPs).
Aprecio que obtengas una Vista Previa de SERP, que replica un listado de búsqueda en Google. Esto facilita la visualización de cómo se verá tu sitio web en las SERPs.

Puedes cambiar cualquiera de las configuraciones aquí antes de desplazarte hacia abajo y pasar por las preguntas finales, de las cuales he incluido una captura de pantalla a continuación.

Una vez completado, haz clic en "Guardar y Continuar".
Paso 5: Configura el Analizador de Sitios
A continuación, se te pedirá que configures la función de Recomendaciones Inteligentes.
Si deseas recibir recomendaciones útiles de SEO directamente en tu bandeja de entrada, introduce aquí tu dirección de correo electrónico. Esta es una excelente manera de recibir alertas sobre problemas críticos u oportunidades para mejorar tu SEO sin tener que iniciar sesión constantemente.

Si estás utilizando la versión Lite de AIOSEO, el Asistente de Configuración te preguntará si deseas comprar una licencia Pro en esta etapa. Puedes continuar con la compra (que a menudo incluye un descuento durante la configuración) o hacer clic en el enlace de la parte inferior para omitir este paso y hacerlo más tarde.

Paso 6: Conéctate a Google Search Console
Google Search Console (GSC) es una herramienta gratuita que te ayuda a monitorizar, mantener y solucionar la presencia de tu sitio en los resultados de la Búsqueda de Google. Es esencial para entender cómo ve Google tu sitio.
En este paso, AIOSEO facilita la verificación de tu sitio con Google.

En lugar de manipular registros DNS o subir archivos HTML a tu servidor manualmente, puedes simplemente obtener tu código de verificación de Google y pegarlo directamente en el asistente. AIOSEO se encarga de la verificación técnica por ti.
Nota: Si aún no tienes tu código a mano, siempre puedes hacerlo más tarde en la configuración de Herramientas para Webmasters.
Paso 7: Agrega tu clave de licencia de AIOSEO
Finalmente, si has comprado una cuenta de AIOSEO Pro, puedes añadir tu clave de licencia aquí y hacer clic en “Conectar”. Esto desbloquea las funciones avanzadas como los módulos Gestor de Redirecciones, SEO Local y SEO de Imágenes.
(Si eres usuario Lite, simplemente omite este paso.)

Una vez que finalices la configuración, el asistente guardará todas tus configuraciones.
¡Enhorabuena! Tu configuración inicial de SEO para WordPress está completa. ✅

Has completado con éxito la Parte 1 de este tutorial, y solo te ha llevado 10 minutos.
Ahora, verás una vista previa de lo que sigue.

Cuando estés listo, haz clic en “Ir a la Lista de Tareas SEO”.
Parte 2: Tu Lista de Tareas SEO Personalizada
Para cuando hagas clic en “Finalizar”, tu sitio tendrá una base técnica sólida.
Pero normalmente, aquí es donde otros plugins te dejan colgado. Terminas el asistente, llegas al panel de control y piensas: “Vale, ¿y ahora qué se supone que debo hacer en realidad?”
Para cerrar la brecha entre la configuración básica y la optimización completa, AIOSEO tiene la Lista de Tareas SEO.
Este es tu plan para un mejor SEO. Te muestra exactamente qué necesitas hacer a continuación y el resto de las funciones disponibles para ti.
Desde el Asistente de Configuración Inicial de SEO para WordPress, ya has completado varias de las tareas. Me gusta que haya una barra de progreso que muestra cuánto has logrado ya.

Tu panel de control también tiene una lista de tareas incompletas y completadas.
Para las tareas incompletas, obtendrás la siguiente información:
- Título de la Tarea: Lo que necesitas hacer
- Descripción: Un resumen rápido de la tarea
- Nivel de Prioridad: Bajo, Medio o Alto
- Estimación de tiempo: Cuánto tiempo llevará completar la tarea
- Acciones: Te lleva a donde puedes completar la tarea
La lista de verificación está diseñada para ser práctica. No solo te da una lista genérica de consejos; interactúa con la configuración específica de tu sitio.
Así es como se usa:
Paso 1: Elige una tarea
Revisa tu lista de tareas incompletas. Puedes priorizarlas según el Nivel de prioridad (¡aborda primero las "Altas"!) o según el tiempo que tengas disponible usando la Estimación de tiempo.

Paso 2: Haz clic en el enlace de acción
Una de las cosas que más me gustan de la Lista de verificación de SEO es que no tienes que buscar en los menús para encontrar la configuración correcta. (Esta es una de mis frustraciones personales con los plugins de SEO, y en realidad, con cualquier plugin en general).
Simplemente haz clic en el enlace de acción dentro de la tarea. Te llevará directamente a la página específica en AIOSEO donde se encuentra esa función.

Esto ahorra mucho tiempo y pone los próximos pasos al alcance de tu mano.
Paso 3: Completa la tarea
Una vez que estés en la pantalla correcta, configura la opción o habilita la función.
Para la mayoría de las tareas, el plugin detecta cuándo has terminado y mueve la tarea a la pestaña Completadas automáticamente de tu Lista de verificación de SEO.
Para otras (como revisar la configuración), puedes marcar manualmente la tarea como completada una vez que estés satisfecho.
Paso 4 (Opcional): Descarta lo que no necesitas
El SEO no es igual para todos. Si la lista de verificación sugiere una tarea que no se aplica a tu sitio (como configurar WooCommerce SEO para un blog que no vende productos), simplemente haz clic en Descartar.

Esto marca la tarea como completada sin cambiar ninguna configuración. Tu barra de progreso aumenta y no tienes que preocuparte de que tareas irrelevantes saturen tu lista.
Paso 5: Alcanza el 100% en tu barra de progreso
Seamos sinceros: configurar los ajustes del plugin puede ser aburrido.
Para hacerlo un poco más satisfactorio, AIOSEO añadió esa barra de progreso. A medida que trabajas en la configuración de SEO de tu WordPress —conectando Google Search Console, configurando redirecciones, ajustando tu robots.txt— ves cómo aumenta tu puntuación.
¿Y cuando alcanzas el 100%?
¡AIOSEO celebra con una lluvia de confeti en tu panel! 🎉
Es un pequeño detalle, pero sin duda fue una sorpresa divertida cuando completé mi lista de verificación por primera vez.
¿Más allá de la configuración: ¿Qué sigue?
Una vez que cae el confeti y tu lista de verificación llega al 100%, la configuración de SEO de tu WordPress está técnicamente completa. Pero el SEO no es una tarea de "configúralo y olvídate". Es un hábito.
Ahora que tu base es sólida, puedes centrarte en la parte divertida: crear contenido.
Aquí tienes algunas de mis funciones favoritas de AIOSEO para ayudarte en este proceso:
- Optimización de contenido: Usa TruSEO en tus publicaciones y páginas de blog para asegurar que cada pieza de contenido se clasifique alto.
- Link Building: Usa el Asistente de enlaces para encontrar oportunidades de enlaces internos que podrías haber pasado por alto.
- Auditoría y mantenimiento: Las reglas de SEO cambian. Usa la herramienta Análisis de SEO periódicamente para asegurarte de que tu sitio se mantenga saludable.
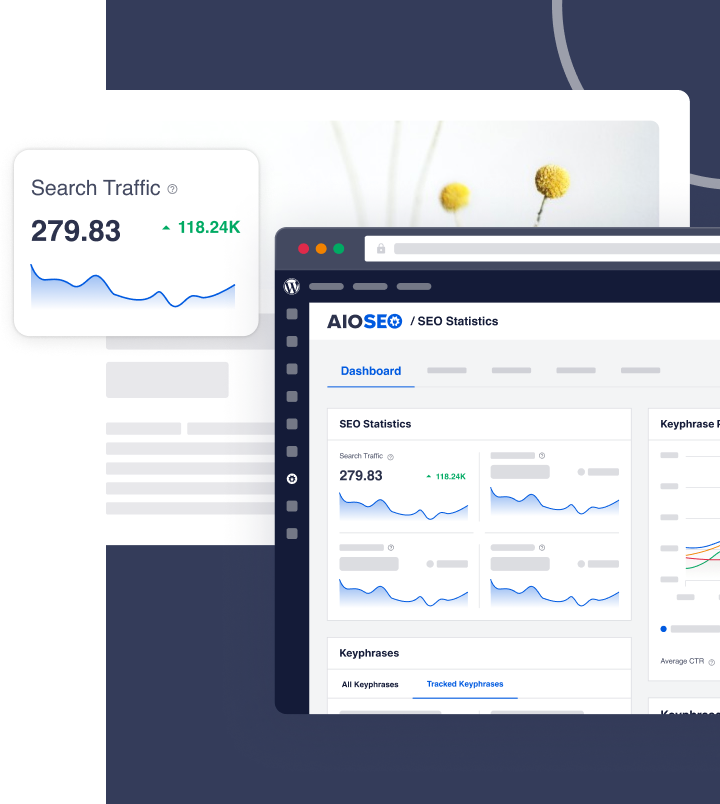
Tambi ilde{Aacute;n me gusta usar Estad ilde{Aacute;sticas de B ilde{Aacute;squeda porque integra tus datos de Google Search Console (GSC) en WordPress. Esto te permite ver si tus esfuerzos de SEO est ilde{Aacute;n dando frutos sin tener que cambiar a diferentes herramientas o pesta ilde{Aacute;as.

¿Listo para empezar?
S ilde{Aacute; que el SEO puede resultar abrumador cuando te enfrentas a un panel en blanco lleno de configuraciones. Esa es exactamente la raz ilde{Aacute;n por la que herramientas como AIOSEO son tan valiosas.
Al automatizar el lado t ilde{Aacute;cnico con el Asistente de Configuraci ilde{Aacute;n y proporcionar una hoja de ruta clara con la Lista de Verificaci ilde{Aacute;n de SEO, el plugin elimina las conjeturas. Puedes tener la seguridad de que tu sitio est ilde{Aacute; configurado correctamente desde el primer d ilde{Aacute;a.
En cuanto a la creaci ilde{Aacute;n de contenido, la buena noticia es que ya no tienes que hacerlo todo t ilde{Aacute; solo. Aqu ilde{Aacute; tienes mis selecciones para los mejores generadores de art ilde{Aacute;culos de blog con IA, que te ayudan a escribir art ilde{Aacute;culos completos en minutos. Tambi ilde{Aacute;n deber ilde{Aacute;as consultar este art ilde{Aacute;culo sobre reutilizaci ilde{Aacute;n de contenido para SEO. Este tutorial te muestra c ilde{Aacute;mo convertir una pieza de contenido en varios formatos, extendiendo tus esfuerzos a trav ilde{Aacute;s de m ilde{Aacute;ltiples canales.
Y para a ilde{Aacute;n m ilde{Aacute;s tutoriales de WordPress, suscr ilde{Aacute;bete a nuestro Canal de YouTube. Tambi ilde{Aacute;n puedes seguirnos en X (Twitter), LinkedIn o Facebook para estar al tanto.
Preguntas frecuentes
ilde{A}Qu ilde{Aacute; es la mejor manera de configurar el SEO de WordPress?
La forma m ilde{Aacute;s eficiente de configurar el SEO de WordPress es utilizando un plugin dedicado como All in One SEO. En lugar de editar manualmente archivos de c ilde{Aacute;digo, el plugin utiliza un Asistente de Configuraci ilde{Aacute;n inteligente para configurar autom ilde{Aacute;ticamente ajustes t ilde{Aacute;cnicos —como sitemaps, marcado schema y URLs can ilde{Aacute;nicas— seg ilde{Aacute;n tu sector.
ilde{A}C ilde{Aacute;mo uso el Asistente de Configuraci ilde{Aacute;n de All in One SEO?
Para usar el Asistente de Configuraci ilde{Aacute;n de WordPress, simplemente instala y activa All in One SEO. El asistente se inicia autom ilde{Aacute;ticamente tras la activaci ilde{Aacute;n. A partir de ah ilde{Aacute;, sigue los pasos descritos en esta gu ilde{Aacute;a: categoriza tu sitio, a ilde{Aacute;ade la informaci ilde{Aacute;n de tu negocio, selecciona tus funciones y verifica la apariencia de tu b ilde{Aacute;squeda.
ilde{A}Qu ilde{Aacute; es una lista de verificaci ilde{Aacute;n de SEO para WordPress?
Una lista de verificaci ilde{Aacute;n de SEO para WordPress es una hoja de ruta de tareas necesarias para optimizar completamente un sitio web. Si bien puedes encontrar muchas listas de verificaci ilde{Aacute;n gen ilde{Aacute;ricas en PDF en l ilde{Aacute;nea, AIOSEO incluye una versi ilde{Aacute;n interactiva directamente dentro del panel de WordPress. Detecta qu ilde{Aacute; configuraciones ya has completado y proporciona una lista priorizada de tareas incompletas, para que sepas exactamente qu ilde{Aacute; hacer a continuaci ilde{Aacute;n.
ilde{A}Cu ilde{Aacute;nto tiempo se tarda en configurar el SEO en un sitio nuevo?
Usando una herramienta como AIOSEO, la configuraci ilde{Aacute;n inicial suele tardar menos de 10 minutos. El Asistente de SEO se encarga de los ajustes t ilde{Aacute;cnicos complejos al instante. Despu ilde{Aacute;s, puedes usar la Lista de Verificaci ilde{Aacute;n de SEO para abordar optimizaciones m ilde{Aacute;s avanzadas a tu propio ritmo.
ilde{A}Necesito conocimientos de programaci ilde{Aacute;n para configurar el SEO de mi WordPress?
No, no necesitas conocimientos de programaci ilde{Aacute;n para configurar el SEO de tu WordPress. Los plugins de SEO modernos eliminan la necesidad de editar manualmente los archivos del tema o tu archivo robots.txt. AIOSEO, por ejemplo, implementa el marcado schema para los usuarios sin necesidad de tocar una sola l ilde{Aacute;nea de c ilde{Aacute;digo.
¿Quieres probar AIOSEO gratis?
Introduce la URL de tu sitio web de WordPress para instalar AIOSEO Lite.
Descargo de responsabilidad: Nuestro contenido es compatible con los lectores. Esto significa que si haces clic en algunos de nuestros enlaces, podemos ganar una comisión. Solo recomendamos productos que creemos que añadirán valor a nuestros lectores.
