
Have you heard that Google and other search engines want content writers to show that they're experts in what they're writing about?
Search engines use this to determine the quality of content, and content quality is a big factor that determines what's shown in search results.
For example, if you were searching for information about SEO, you'd want search results to show content written by experts on SEO.
All in One SEO can help you by enabling you to add author information that shows your experience and expertise in what you're writing about.
In This Article
- Video Tutorial
- What is E-E-A-T
- Using the Author SEO (E-E-A-T) Feature in AIOSEO
- Completing the Author Information
- Adding Author Experience Topics
- Displaying the Author Excerpt
- Displaying the Author Biography
- Displaying Social Profiles in the Author Excerpt and Bio
- Using the AIOSEO – Author Name Block
- Using AIOSEO – Reviewer Name Block
- How to Display Author SEO Using Shortcodes
- How to Display Author SEO Using PHP Code
Video Tutorial
What is E-E-A-T
To demonstrate first-hand experience in a subject, Google looks for something that they call E-E-A-T. This helps their Quality Raters assess the expertise of content writers.
E-E-A-T stands for Experience, Expertise, Authoritativeness, and Trustworthiness defined as follows:
- Experience means that you can clearly show that you have first-hand experience in the topic.
- Expertise means that you can clearly show that you have the necessary knowledge or skill for the topic.
- Authoritativeness means that you can clearly show that you and your site are an authority on the topic.
- Trustworthiness means that you can clearly show that you and your site are a trusted source on the topic. This is the most important element of E-E-A-T because search engines don't want to show untrustworthy content. Quality Raters determine if content is “accurate, honest, safe, and reliable”.
Google provides some examples of what they consider is content lacking in E-E-A-T:
Low quality pages often lack an appropriate level of E-E-A-T for the topic or purpose of the page. Here are some examples:
Source: Google Search Quality Rater Guidelines
– The content creator lacks adequate experience, e.g. a restaurant review written by someone who has never eaten at the restaurant.
– The content creator lacks adequate expertise, e.g. an article about how to skydive written by someone with no expertise in the subject.
– The website or content creator is not an authoritative or trustworthy source for the topic, e.g. tax form downloads provided on a cooking website.
– The page or website is not trustworthy for its purpose, e.g. a shopping page with minimal customer service information.
Using the Author SEO (E-E-A-T) Feature in AIOSEO
All in One SEO has an addon which you can use to demonstrate E-E-A-T for your content authors.
NOTE:
The Author SEO (E-E-A-T) feature is available to customers with a Plus plan or above for All in One SEO Pro.
Upgrade to All in One SEO Pro today to get Author SEO (E-E-A-T) and many more features!
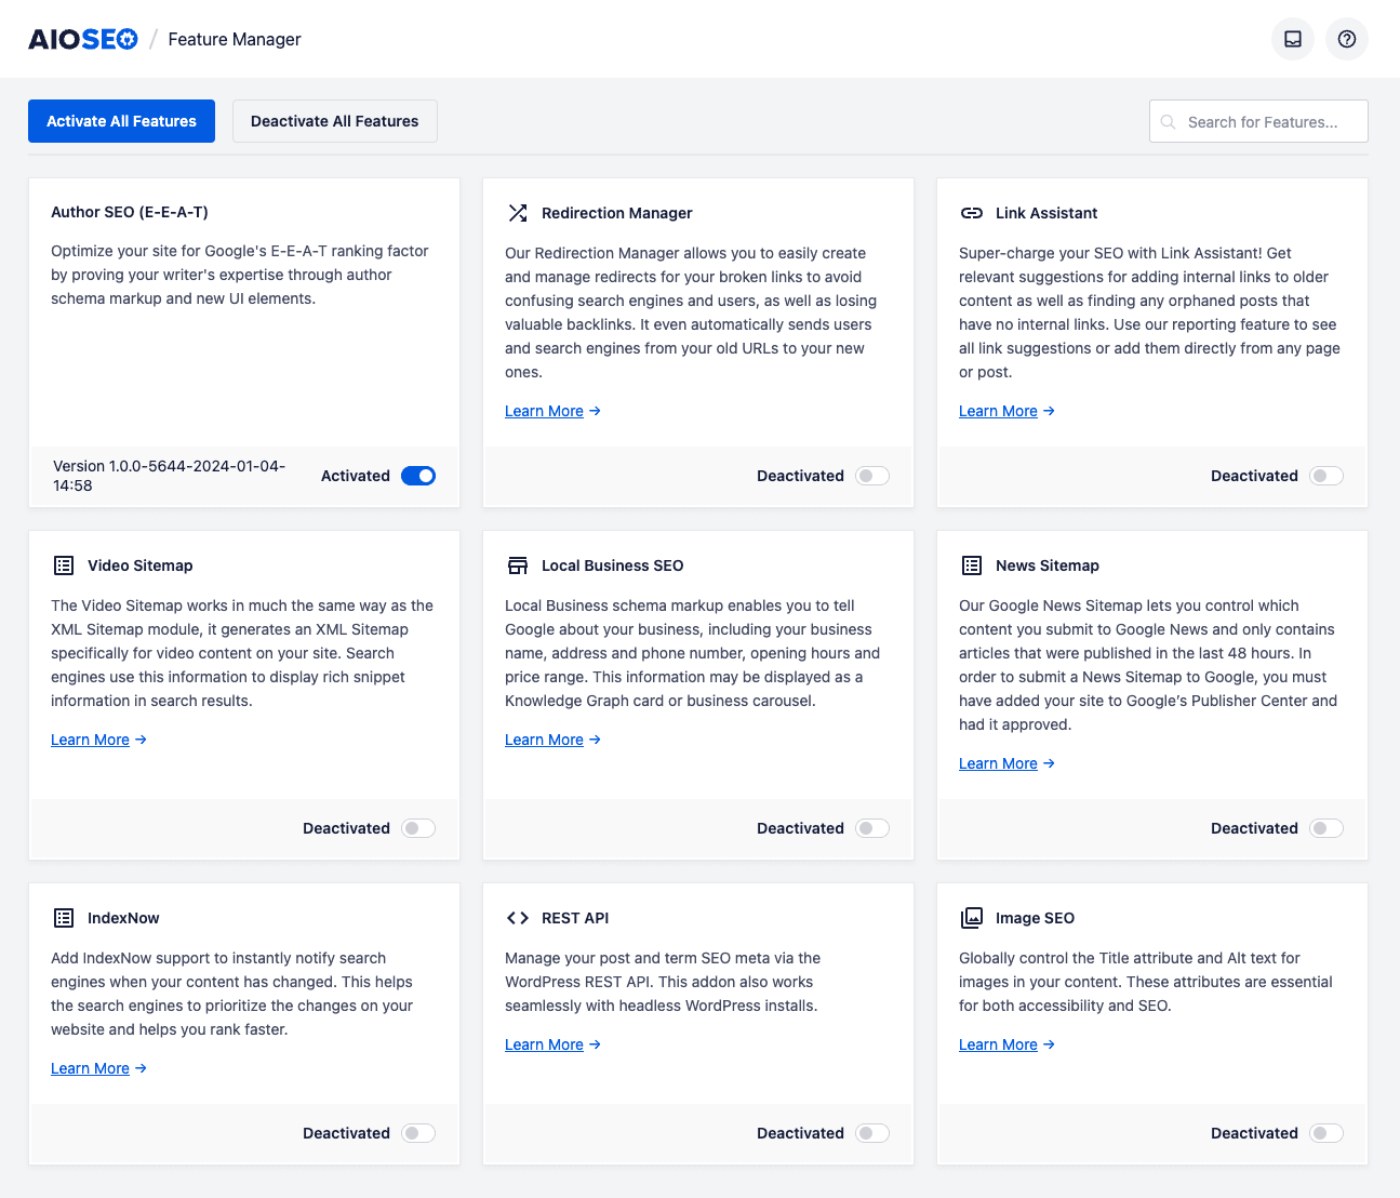
To get started, click on Feature Manager in the All in One SEO menu, and activate the Author SEO (E-E-A-T) feature.
This will add a new Author SEO tab to the Profile screen in WordPress for each user.
Next, click on Search Appearance in the All in One SEO menu and then click on the Author SEO tab.
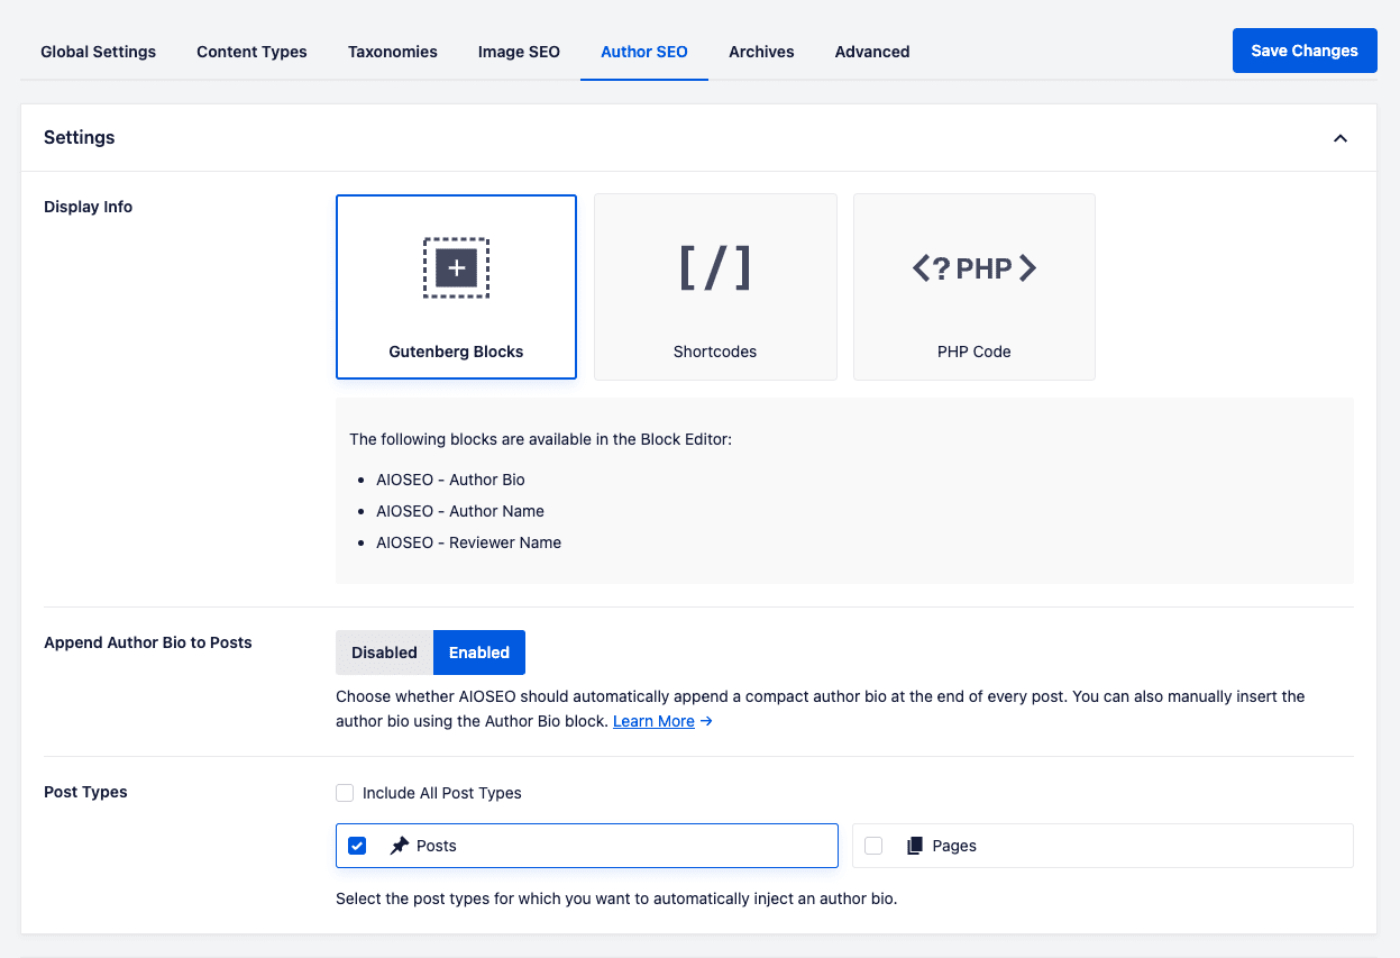
You'll see the first section is Display Info where you can find details of the Blocks that can be used in the default WordPress Block Editor, shortcodes that can be used in page builders and other editors, and PHP code that can be used in your theme template files.
You can learn about each of these methods in the relevant sections below.
The next setting is Append Author Bio to Posts. You can learn more about this in the Automatically Displaying the Author Excerpt section below.
Finally, there's a Post Types setting where you can decide which types of content you want to use the Author SEO features with. The Author SEO features only work with post types that support authors.
Now your content writers can add information that shows their experience, expertise, authoritativeness, and trustworthiness on the subjects they write about.
Completing the Author Information
To complete your author information, click on Profile in the Users menu.
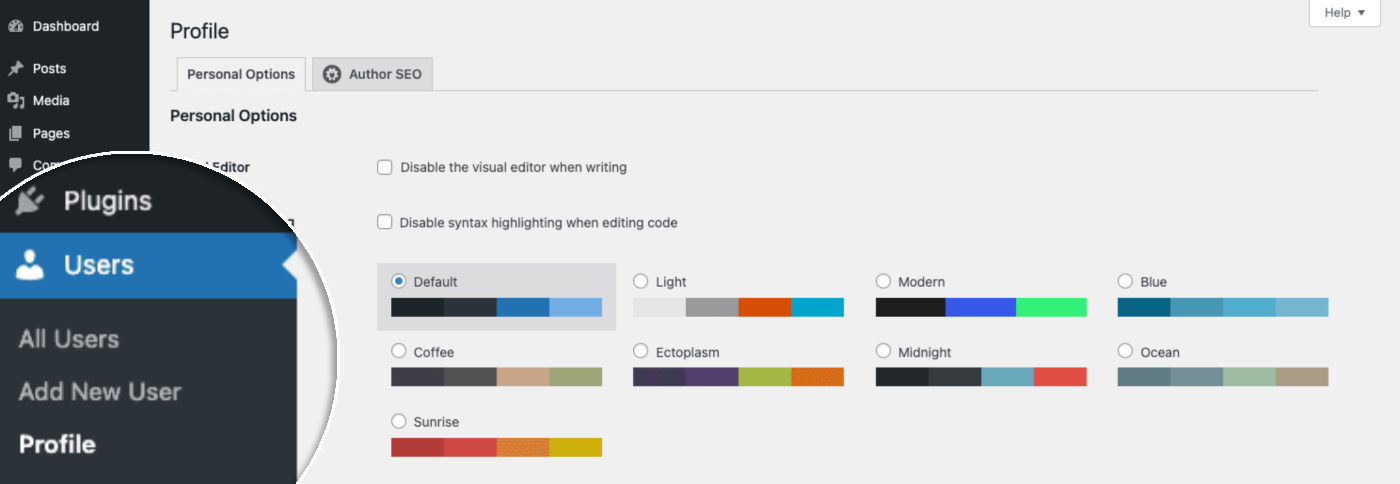
Click on the Author SEO tab to see the Author Info fields.

Enable Author Info
The first setting you'll see (shown above) is the Enable Author Info toggle. You can use this to disable the Author Info features on this specific user.
Alumni Of
The next set of fields are for Alumni information, where you can enter the name of the school, college, or university where you studied, and the URL.

Click the Add Item button to add more rows, allowing you to add more education / alumni information.
Employer
The next field you'll see is for Employer information, where you can enter the name of the organization you currently work for. Just like the Alumni information, this helps you show your experience and expertise.

Job Title
Below the Employer field, you'll see a Job Title field where you can enter your current job title with the employer you entered above.

Knows About
Next, you'll see a Knows About field where you can select from topics that you are an expert in.

These topics need to be entered at the global level by going to All in One SEO > Search Appearance > Author SEO > Author Experience Topics (E-E-A-T) in All in One SEO. To learn about this, go to Adding Author Experience Topics below.
Once you've entered topics under Author Experience Topics in All in One SEO, any user can select them in the Knows About field.
To select a topic, click in the Knows About field and a drop-down list of the topics you added will be displayed. Select a topic from the list. You can repeat this to select more topics.
Awards and Spoken Languages

- Awards: You can input any awards that the author has received or has been nominated for in the past.
- Spoken Languages: Any languages the author uses to communicate or publish content.
NOTE:
Both the Awards and Spoken Languages are not displayed in the author blocks. However, this information is output via schema.
The Awards field uses the Award schema.
The Spoken Languages field outputs the knowsLanguage schema.
Author Image, Author Excerpt, and Author Bio
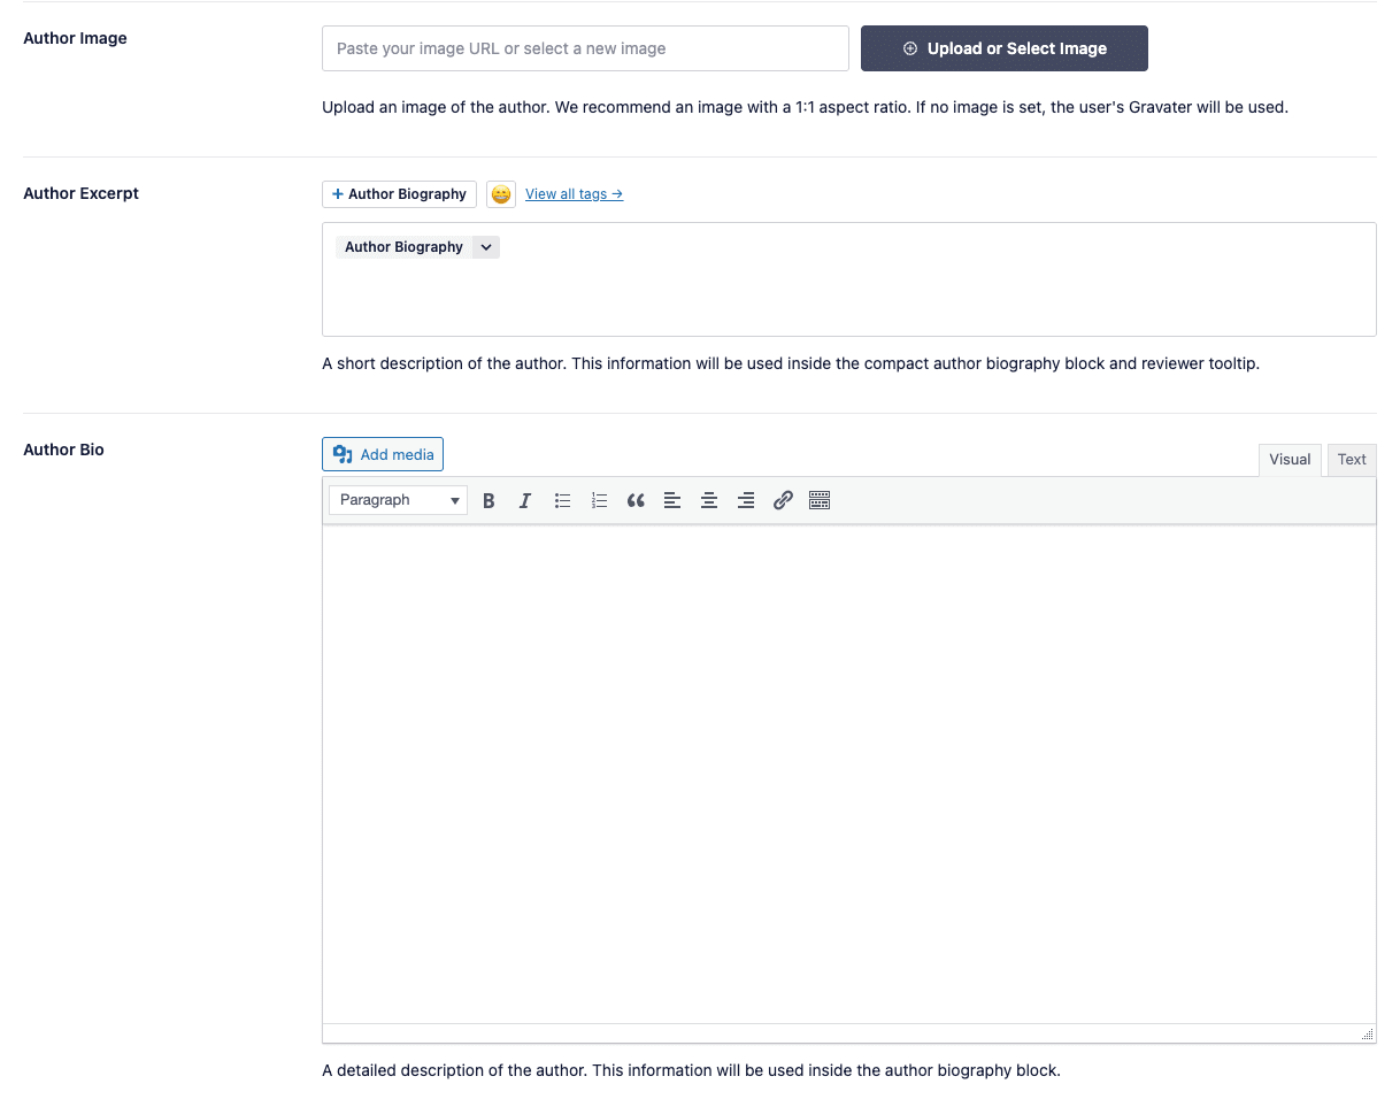
The final set of fields are for author information. These are:
- Author Image: Upload an image such as a headshot. The image should be square. If you don't set an image, then All in One SEO will use your Gravatar if you have one.
- Author Excerpt: Here you can enter a short biography or choose from one of the smart tags provided. By default, All in One SEO will use the Author Biography smart tag which will use whatever is entered in the Biographical Info field on the Personal Options tab of your profile. To learn about this, go to Displaying the Author Excerpt below.
- Author Bio: Here you can enter a detailed biography to show your experience, expertise, authoritativeness, and trustworthiness. To learn about this, go to Displaying the Author Biography below.
Author Bio URL

You can use this field to customize the URL used in the “See Full Bio” link in an author profile:

If left empty, the default author archive page will be used. Alternatively, you can add a custom link to direct users to another page if the author’s profile is available elsewhere.
Append Author Bio to Posts
The last setting you'll see is the Append Author Bio to Posts toggle. It will automatically display the Author Excerpt at the bottom of posts.

If this is enabled, All in One SEO will use the default setting under All in One SEO > Search Appearance > Author SEO.
Click on the toggle if you want to override the default setting for this user. You'll see a second option you can use to do this.

To learn about this, go to Displaying the Author Excerpt below.
Adding Author Experience Topics
You can add topics that content writers on your site are experts in. They can then select these in the Knows About field on their profile.
IMPORTANT:
You'll need to add all topics at the global level under Author Experience Topics in All in One SEO before your content writers can select them in the Knows About field in their user profile.
This is to limit control of topics to Administrators rather than allowing and user to add any topic which might negatively affect E-E-A-T.
To add topics, go to All in One SEO > Search Appearance > Author SEO > Author Experience Topics (E-E-A-T) in All in One SEO. You'll see a table where you can add each topic.
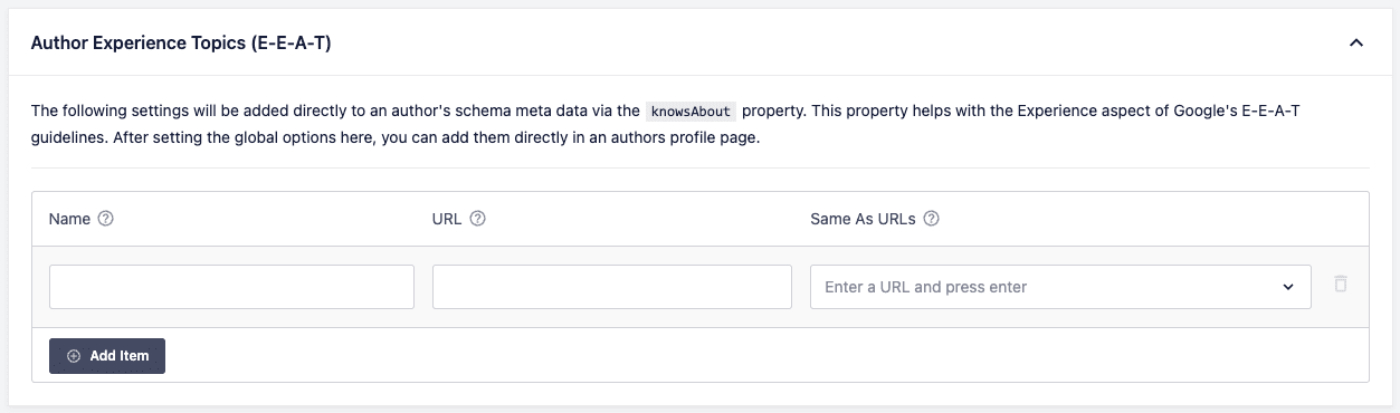
In the Name field, you can enter the name of the topic. In the URL field, you can enter a URL to an authoritative site or page on the topic. In the Same as URLs field, you can enter any additional URLs relevant to the topic. You can enter multiple URLs in the Same as URLs field.
The Name field is the only required field, the others are optional. Here's an example showing how the Author Experience Topics can be completed:
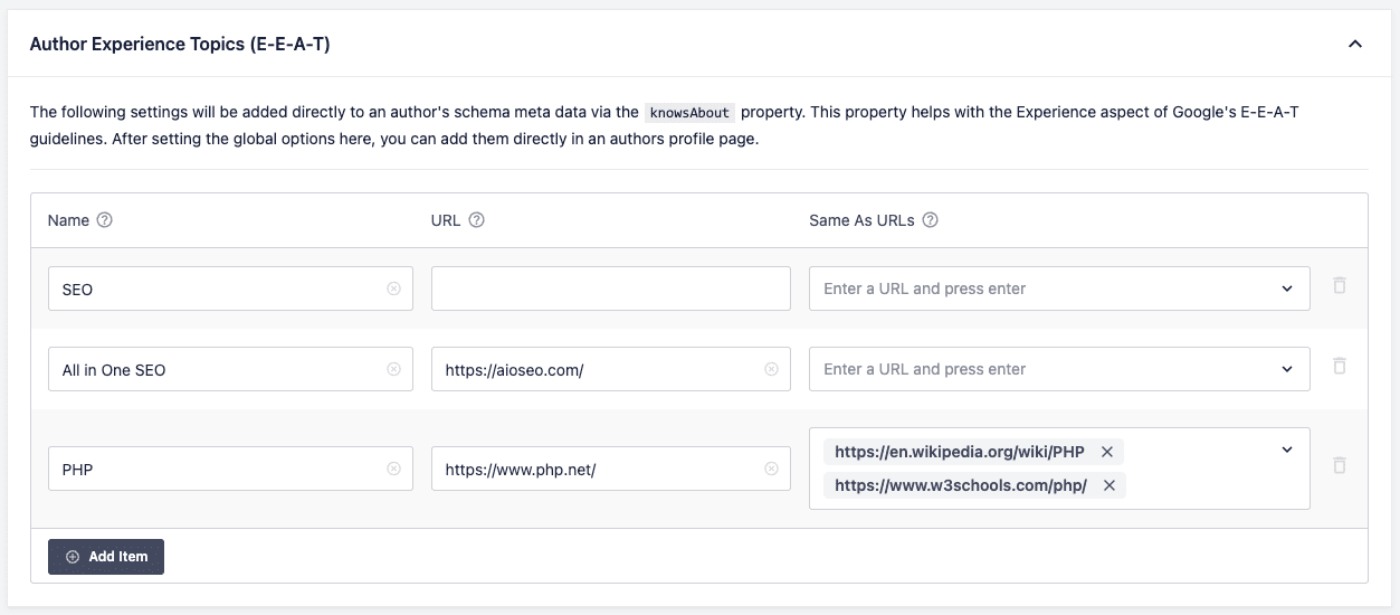
You can click the Add Item button to add more topics. You can click the delete icon to the right of each row to delete that topic. Once you're done, click the Save Changes button.
NOTE:
The topics that are entered in the Author Experience Topics table are used by individual writers on your site. They can select these in the Knows About field on their profile.
You should ensure you add topics that your writers have expertise and experience in. These should all be directly relevant to the content on your site because they show experience, expertise, authoritativeness, and trustworthiness on the content of your site.
Displaying the Author Excerpt
Now that you've set up your profile with your experience and expertise, you'll want to display this in your content so that your visitors and search engines can see it.
As explained above, there are two types of bio's, the Author Excerpt and the Author Bio.
Here's an example of how the Author Excerpt looks when added to the bottom of a post:
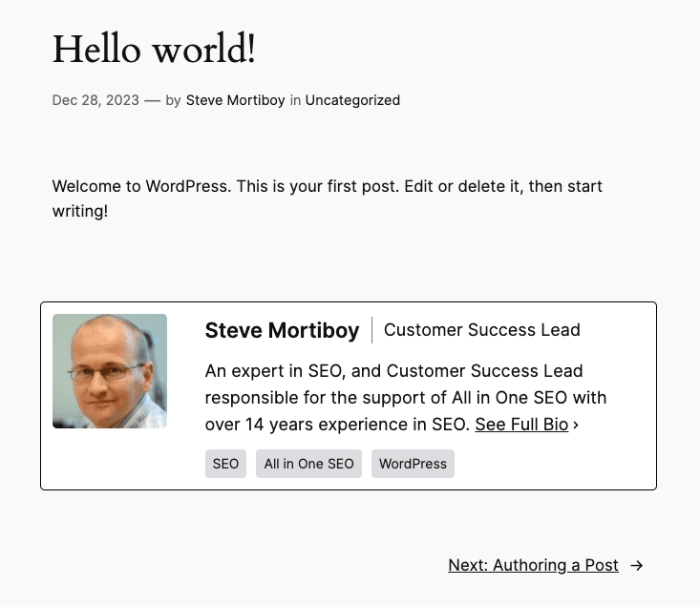
Let's look at how to display the Author Excerpt on your posts.
Automatically Displaying the Author Excerpt
You can choose to have All in One SEO automatically display the Author Excerpt below the content on your posts.
This can be controlled on a global level for all users by going to All in One SEO > Search Appearance > Author SEO.
You'll see the Append Author Bio to Posts setting where you can select whether to enable automatic appending the Author Excerpt below the content on your posts, or disable it.
You can overide on an individual user level by editing the user and scrolling down to the Append Author Bio to Posts setting on the Author SEO tab.
You'll see the Append Author Bio to Posts toggle. If the Use Default Setting is disabled and the second toggle is enabled, All in One SEO will automatically display the Author Excerpt at the bottom of posts. Disable this if you want to manually add the Author Excerpt at the bottom of posts.
Manually Displaying the Author Excerpt
You can also choose to manually display the Author Excerpt anywhere on a post using a block in the Block Editor.
IMPORTANT:
Make sure to disable the Append Author Bio to Posts setting if you're manually displaying the Author Excerpt. This will prevent two Author Excerpts from being displayed.
To do this, edit any post or other content using the default WordPress Block Editor and click the Add Block icon.
You can search for the block by typing AIOSEO in the search field.
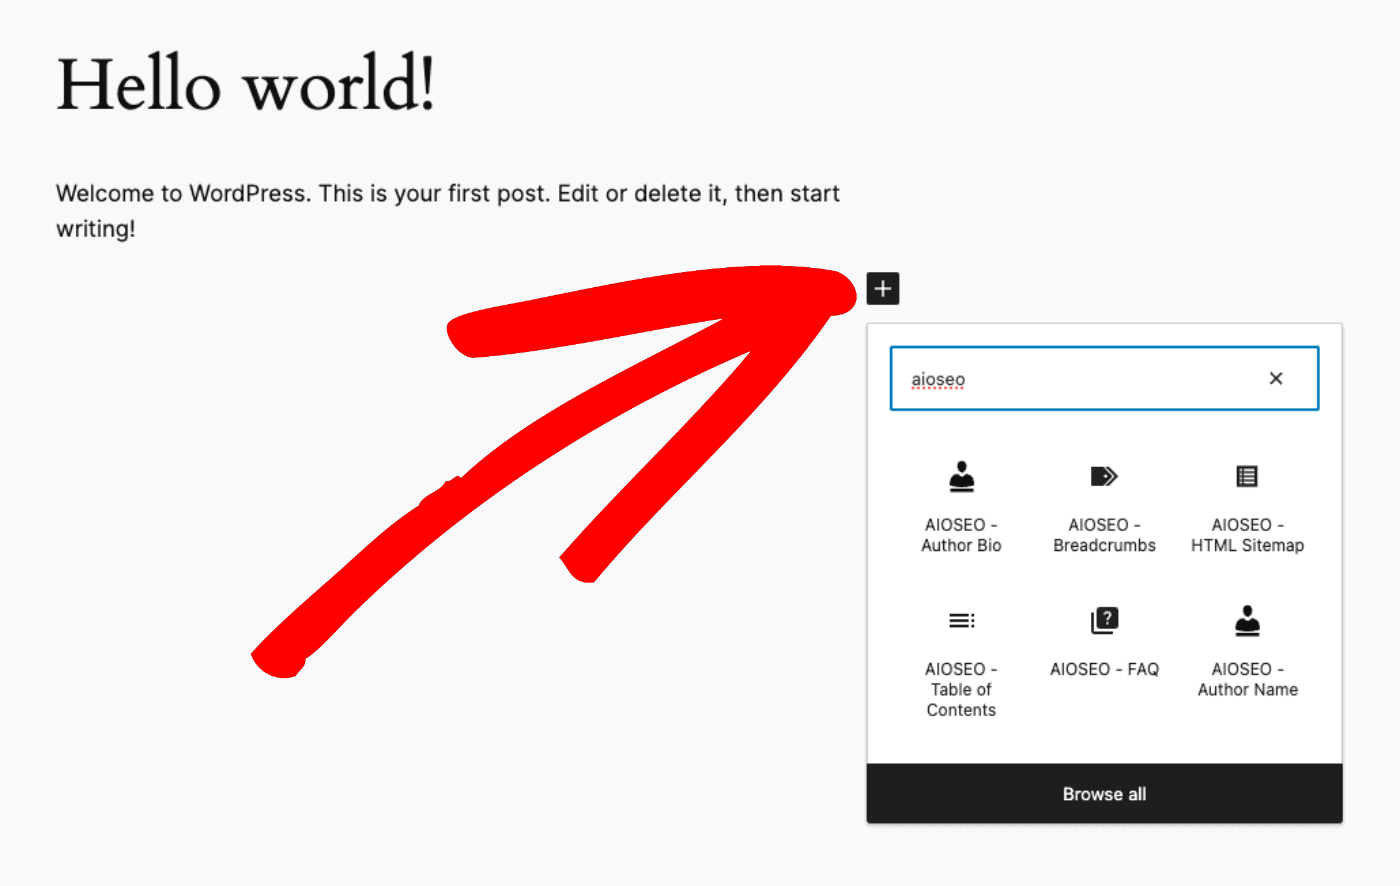
You’ll see the AIOSEO – Author Bio block in the search results. Click on it to add it to your post.
NOTE:
The Author Bio block is available to customers with a Plus plan or above for All in One SEO Pro.
Upgrade to All in One SEO Pro today to get Author SEO (E-E-A-T) and many more features!
The block will be added to your post and the sidebar will show the Block Settings.

You can click on the Show Compact Author Bio toggle in the Block Settings to change this block from displaying the Author Excerpt to displaying the full Author Bio.
If you enable the Compact Author Bio, the Show “See Full Bio” link option will appear and can be enabled or disabled to your preference.
Displaying the Author Biography
To display the full Author Bio on a post, follow the same steps as described above for the Author Excerpt but click the Show Compact Author Bio toggle in the Block Settings to disable the compact bio.
NOTE:
The full Author Bio block is available to customers with a Pro plan or above for All in One SEO Pro.
Upgrade to All in One SEO Pro today to get Author SEO (E-E-A-T) and many more features!

You'll see the full author bio taken from the Author Bio field on the Author SEO tab in the user's profile.
Displaying Social Profiles in the Author Excerpt and Bio
You can display icons for social media networks that link to your profiles in the Author Excerpt and Author Bio blocks as shown in the example below:
To do this, users will need to complete the Social Profiles section on the Author SEO tab of their profile.
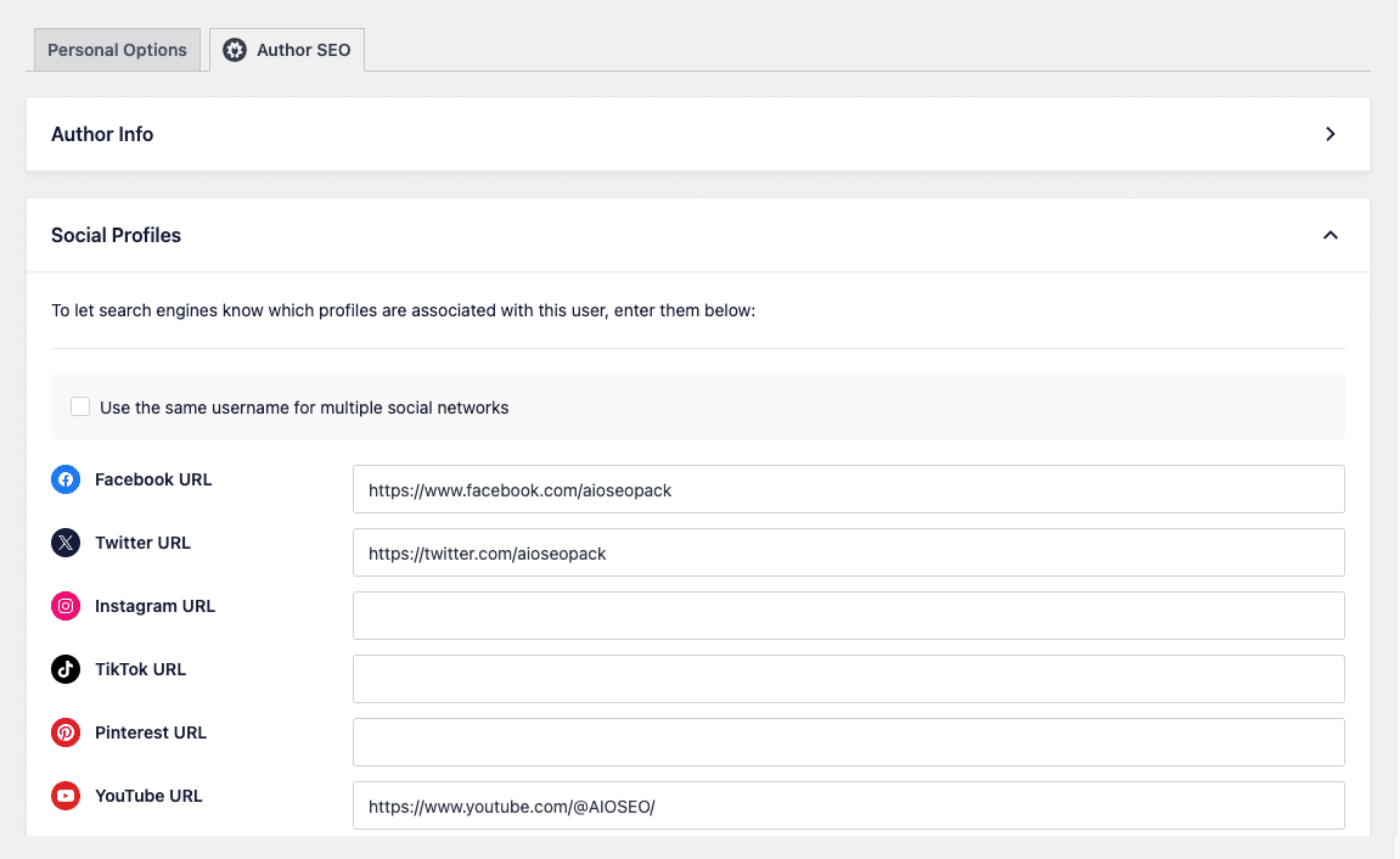
A social icon will be displayed for each profile URL that's entered. When a visitor clicks on the icon, the URL of the social profile will open in a new tab.
Using the AIOSEO – Author Name Block
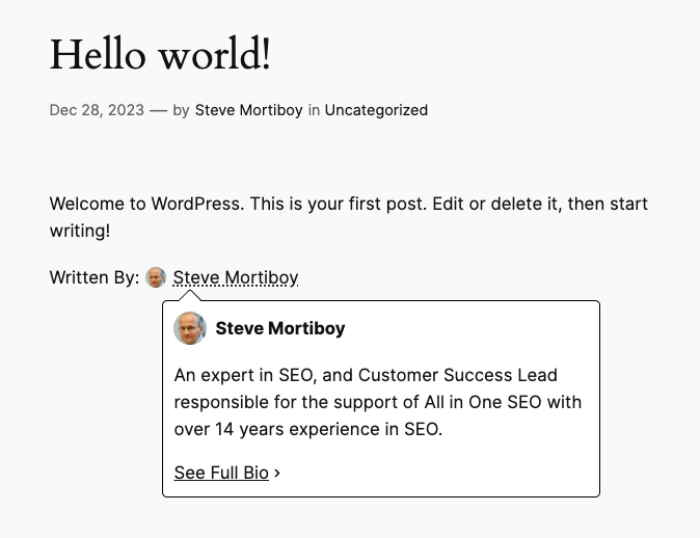
The AIOSEO – Author Name block will display the author's name and image, and when you hover over the name, a popup with the Author Excerpt will be shown as seen below:
To use this block, edit any post or other content using the default WordPress Block Editor and click the Add Block icon.
You can search for the block by typing AIOSEO in the search field.
You’ll see the AIOSEO – Author Name block in the search results. Click on it to add it to your post.
NOTE:
The full Author Name block is available to customers with a Pro plan or above for All in One SEO Pro.
Upgrade to All in One SEO Pro today to get Author SEO (E-E-A-T) and many more features!
The block will be added to your post and the sidebar will show the Block Settings.

There are settings for the following:
- Show Label: Choose whether to show the “Written By:” label or not.
- Show Image: Choose whether to show the author image or not.
- Show Tooltip: Choose whether to display the popup when someone hovers over the name or not.
- Show “See Full Bio” link: Choose whether to display the link to the full author bio or not.
Using AIOSEO – Reviewer Name Block
The second of these additional blocks is the AIOSEO – Reviewer Name block.
This block looks and behaves the same as the Author Name block, except that it uses a Reviewer that you can set for each post.
Setting the Reviewer
To set the Reviewer, edit any post and in the sidebar you'll see a Reviewer drop-down shown below:
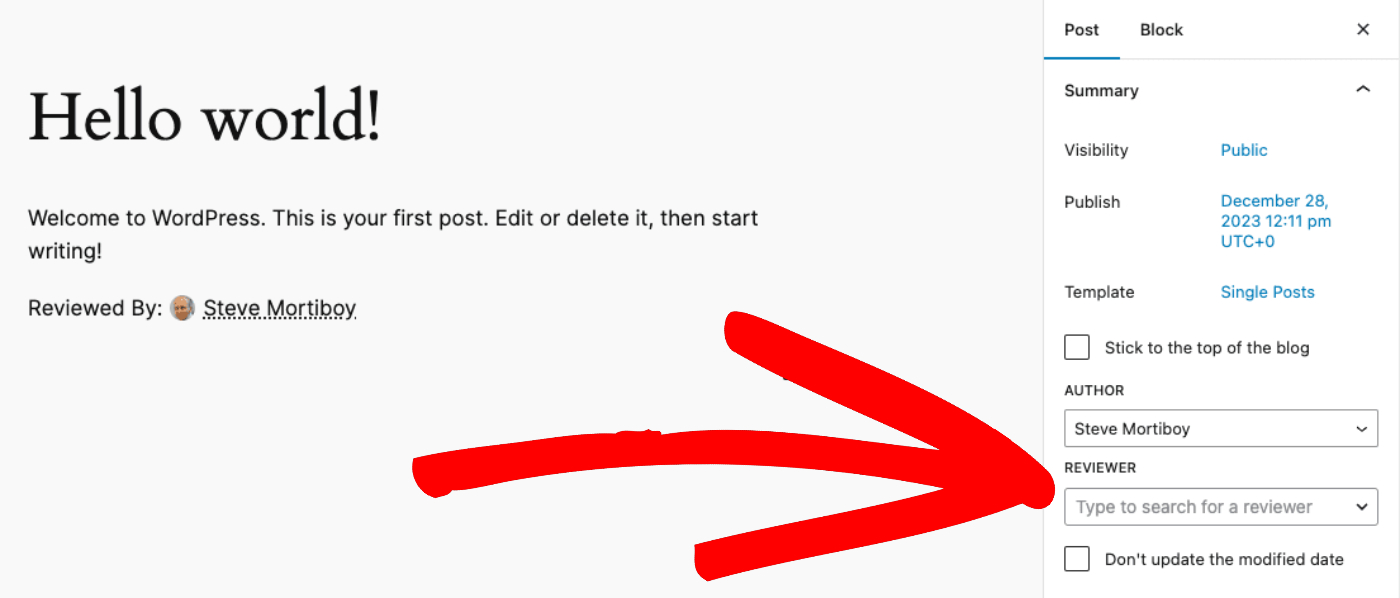
You can click on the Reviewer drop-down to select a user who has reviewed the content of this post.
NOTE:
The Reviewer can help to show that your content is trustworthy because it's been reviewed by another person on your site.
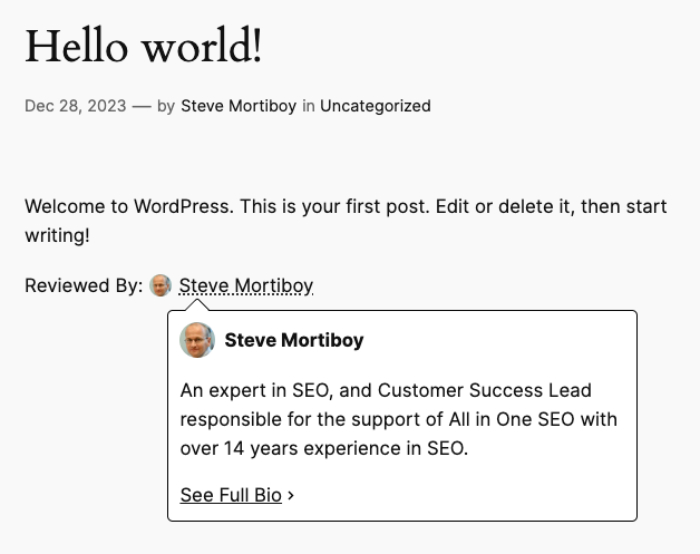
The AIOSEO – Reviewer Name block can now be used to display the reviewer's name and image, and when you hover over the name, a popup with the Author Excerpt for the reviewer will be shown as seen below:
To use this block, edit any post or other content using the default WordPress Block Editor and click the Add Block icon.
You can search for the block by typing AIOSEO in the search field.
Click on Browse all to see the AIOSEO – Reviewer Name block in the search results. Click on it to add it to your post.
NOTE:
The full Author Reviewer Name block is available to customers with a Pro plan or above for All in One SEO Pro.
Upgrade to All in One SEO Pro today to get Author SEO (E-E-A-T) and many more features!
The block will be added to your post and the sidebar will show the Block Settings.

There are settings for the following:
- Show Label: Choose whether to show the “Reviewed By:” label or not.
- Show Image: Choose whether to show the reviewer's image or not.
- Show Tooltip: Choose whether to display the popup when someone hovers over the name or not.
- Show “See Full Bio” link: Choose whether to display the link to the full author bio or not.
How to Display Author SEO Using Shortcodes
In addition to using blocks to display author information on your site, you can also use shortcodes if you're not using the WordPress Block Editor.
The shortcodes are:
Author Excerpt Shortcode
Use the shortcode below to display the Author Excerpt.
[aioseo_eeat_author_bio compact="true"]Author Bio Shortcode
Use the shortcode below to display the Author Bio.
[aioseo_eeat_author_bio compact="false"]Author Name Shortcode
Use the shortcode below to display the Author Name.
[aioseo_eeat_author_tooltip show-label="true" show-image="true" show-tooltip="true"]The attributes for this shortcode are:
- show-label: Choose whether to show the “Written By:” label or not.
- show-image: Choose whether to show the author image or not.
- show-tooltip: Choose whether to display the popup when someone hovers over the name or not.
Reviewer Name Shortcode
Use the shortcode below to display the Reviewer Name.
[aioseo_eeat_reviewer_tooltip show-label="true" show-image="true" show-tooltip="true"]The attributes for this shortcode are:
- show-label: Choose whether to show the “Reviewed By:” label or not.
- show-image: Choose whether to show the reviewer's image or not.
- show-tooltip: Choose whether to display the popup when someone hovers over the name or not.
How to Display Author SEO Using PHP Code
In addition to using blocks or shortcodes to display author information on your site, you can also use PHP code.
Here's the code to use in your theme templates:
Author Excerpt Code
Use the code below to display the Author Excerpt.
<?php aioseo_eeat_author_bio( $compact = true ); ?>Author Bio Code
Use the code below to display the Author Bio.
<?php aioseo_eeat_author_bio( $compact = false ); ?>Author Name Code
Use the code below to display the Author Name.
<?php aioseo_eeat_author_tooltip( $showLabel = true, $showImage = true, $showTooltip = true ); ?>Reviewer Name Code
Use the code below to display the Reviewer Name.
<?php aioseo_eeat_reviewer_tooltip( $showLabel = true, $showImage = true, $showTooltip = true); ?>All of the code listed above needs to run inside the WordPress loop; otherwise All in One SEO will not be able to determine the context of the current page. If the function is called outside of the loop, nothing will be rendered.