First of all, thank you for subscribing to All in One SEO!
We're excited to help you create forms the easy way. We'll be sharing all the best tips, techniques, and resources to help you make the most of All in One SEO to save you time and help grow your business.
But before we do that, we want to make sure that you can receive all of our emails.
Quick Links
- Why Allow Emails from All in One SEO?
- Overview: How to Allow Emails from All in One SEO
- How to Allowlist All in One SEO in Gmail
- How to Allowlist All in One SEO in Yahoo
- How to Allowlist All in One SEO in Apple Mail
- How to Allowlist All in One SEO in Microsoft Outlook
- How to Allowlist All in One SEO in Hotmail
Why is this important?
Many email and internet service providers have put in aggressive programs and filtering system to block unwanted emails (also known as spam).
All in One SEO applauds their intention to protect all of us from spam, but everyone agrees that the current system is far from perfect.
Often these programs block emails that you actually want to get. Here's how you can help the system prevent “false positives” and join the fight against spam.
Solution: Allow Emails from All in One SEO
An “allowlist” is a list of email addresses of people who you want to receive emails from (and the system will never block those).
It's a way for you tell your email provider that Ben from All in One SEO is my friend, and I actually want to learn from him.
When you do this, email providers actually use your list to make adjustments to their overall filtering system which in turn helps the entire world!
How to allow All in One SEO emails before your delivery is interrupted
Of course, every email system is different. Below are instructions for some of the more popular ones. If yours isn't here, please contact your ISP's customer service folks for their instructions.
Also if you forward us their answer, then we will add it on this page for others.
Gmail:
1. In your inbox, find an email from [email protected] (for example, your welcome email)
2. Drag this email to the “primary” tab of your inbox.
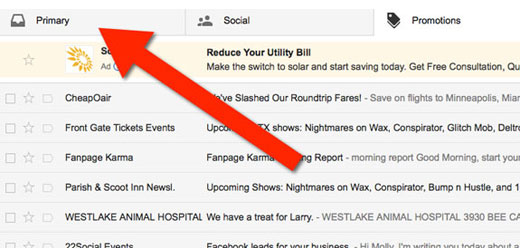
3. Add us to your contacts, so we can be friends.

4. You'll see that all our emails will go to your primary folder in the future!
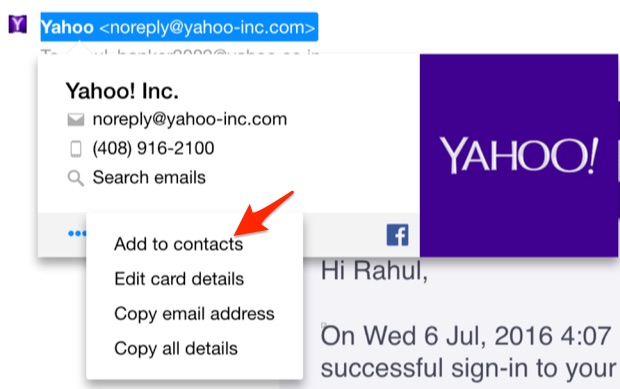
Yahoo! Mail
Hover over the sender's email. Select “Add to contacts”. That's it! You're done!
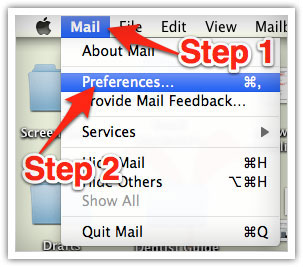
Apple Mac Mail
Select “Mail” and “Preferences” from the top menu.
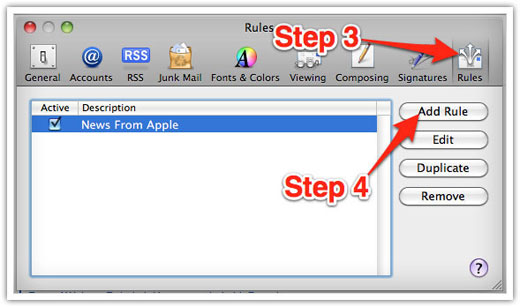
In the “Preferences” window, click the “Rules” icon.
Click the “Add Rule” button.
In the “Rules” window, type a name for your rule in the “Description” field.
Use the following settings: “If any of the following conditions are met: From Contains.”
Type our email address ([email protected]) in the text field beside “Contains.”
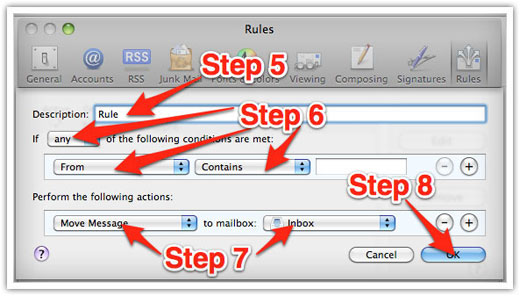
Select “Move Message” and “Inbox” from the drop-down menus. Click “Ok” to save the rule.
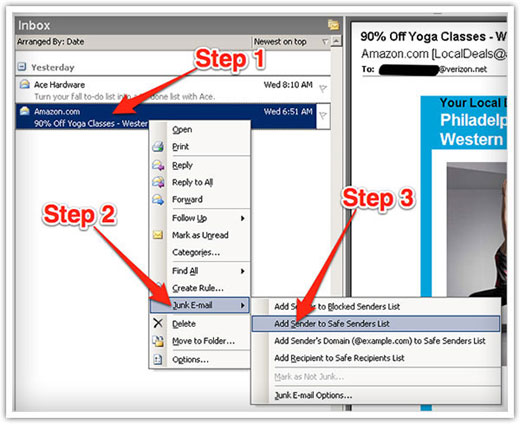
Outlook 2003 & Later
Right-click on the message in your inbox.
Select “Junk E-mail” from the menu.
Click “Add Sender to Safe Senders List.”
Hotmail
1. Click “Options” in the upper right hand corner.
2. At the top of the page, click on the “Junk E-mail Protection” Link
3. Next, click on “Safe List”, which is down near the bottom
4. Copy and paste [email protected] where it says “Type an address or domain”
5. Click the “Add” button