

If you've ever published a WordPress post and wondered why Google still hasn't picked it up, your sitemap (or lack thereof) might be the problem.
I've audited dozens of WordPress sites in my 6+ years as an SEO specialist, and sitemaps are often overlooked by small business owners. And I get it. When you’re balancing content creation and day-to-day operations, technical files are rarely top of mind.
But without a proper sitemap, search engines have to work much harder to find everything on your site. That means your content can sit in the dark for weeks.
The good news is that creating a WordPress sitemap takes less than 5 minutes.
In this guide, I'll show you 3 ways to create a sitemap in WordPress and help you pick the best one for you. You'll also learn how to submit your sitemap to popular search engines, like Google and Bing.
What We'll Cover:
- What Is a WordPress Sitemap?
- Why You Need a Sitemap for SEO
- Does WordPress Create a Sitemap Automatically?
- Method 1: Create a WordPress Sitemap With a Plugin (Recommended)
- Method 2: Use WordPress's Built-In Sitemap
- Method 3: Create a WordPress Sitemap With Yoast SEO
- How to Submit Your WordPress Sitemap to Google
- How to Submit Your WordPress Sitemap to Bing
- Create Your WordPress Sitemap in Minutes
- FAQs
What Is a WordPress Sitemap?
A WordPress sitemap is a file that lists all the important URLs on your site—posts, pages, images, videos, and more—in a format that search engines can easily read. Think of it as a directory you hand to Google so it always knows what's on your site and where to find it.
When you publish new content, your sitemap is one of the first places search engines check. It tells them not just what pages exist, but also when each page was last updated and how often your content changes. That helps search engines crawl your site more efficiently and index your content faster.
XML Sitemaps vs. HTML Sitemaps
There are 2 types of sitemaps, and they serve very different purposes.
An XML sitemap is a behind-the-scenes file written in extensible markup language (XML). It's designed for search engines, not people. You won't see it on your site's front end—it lives at a URL like yoursite.com/sitemap.xml and is read by crawlers like Googlebot to help them index your content.
An HTML sitemap is a page on your website that lists all your content in a human-readable format. It's designed for visitors, not search engines. Some websites include an HTML sitemap in their footer to help users navigate to additional pages that aren't in the main menu. (We do this at AIOSEO, which you can see below.)

For SEO purposes, the XML sitemap is what matters most. That's what this guide focuses on. HTML sitemaps are optional and most sites don't need one unless they have a large, complex content library.
Want to learn more? Check out this in-depth comparison of XML vs. HTML sitemaps.
Why You Need a Sitemap for SEO
Sitemaps don't directly boost your search rankings. But they do make it much easier for search engines to find and index your content, which is the first step to ranking at all.
Here's where a sitemap makes a real difference:
- New websites. If your site doesn't have many backlinks yet, search engines rely on your sitemap to discover your content. Without one, pages can go unindexed for weeks.
- Large websites. The more content you have, the harder it is for crawlers to find everything. A sitemap ensures no page gets missed.
- Sites with lots of media. Image and video sitemaps help Google surface your media in image and video search results, which can drive additional traffic.
- Frequently updated content. A sitemap tells search engines how often your content changes, so they know to come back and re-crawl it.
- Isolated pages. If a page has few or no internal links pointing to it, a sitemap is often the only way search engines will find it. (In SEO, we call these orphan pages.)
Quick note: Adding a sitemap to Google Search Console also lets you monitor indexing status and catch errors early. I'll show you how to do that later in this guide.
Does WordPress Create a Sitemap Automatically?
Yes, but it's pretty basic.
Since WordPress 5.5, every WordPress site automatically generates a sitemap at yoursite.com/wp-sitemap.xml. It includes your posts, pages, and custom post types, and it's available to search engines without any setup on your end.
That sounds great, but there's a catch. The default WordPress sitemap has some significant limitations:
- No customization. You can't choose which content to include or exclude without writing PHP code.
- No control over no-indexed content. It can include pages you've marked as no-index, which can cause errors in Google Search Console.
- No automatic search engine notifications. WordPress doesn't ping Google or Bing when you publish or update content.
- No support for image, video, or news sitemaps. If you want those, you'll need a plugin.
For a simple personal site, the built-in sitemap might be enough. But if you're running a business website and care about SEO, a plugin gives you far more control. Let's look at the one I use next.
Method 1: Create a WordPress Sitemap With a Plugin (Recommended)
The easiest and most powerful way to create a WordPress sitemap is with an SEO plugin.
My personal favorite is All in One SEO (AIOSEO). it's the plugin I recommend to every WordPress site owner I work with, and it's what I'll use to demonstrate this method.

To get started, install and activate AIOSEO on your WordPress site. If you haven't done that yet, you can follow our step-by-step guide on how to install AIOSEO.
Once it's active, here's how to set up your WordPress sitemap.
Step 1: Open Your Sitemap Settings
In your WordPress dashboard, navigate to All in One SEO → Sitemaps. This opens the General Sitemap settings page.

The first thing you'll notice is that the sitemap is already enabled by default. You can click Open Sitemap to view it in your browser. It will be live at yoursite.com/sitemap.xml.

Step 2: Configure Your General Sitemap Settings
Under Sitemap Settings, you'll see a few options to review:
- Enable Sitemap Indexes: This splits your sitemap into separate sub-sitemaps by content type (one for posts, one for pages, and so on). Leave this enabled if your site has more than a few hundred URLs. For smaller sites, you can disable it.
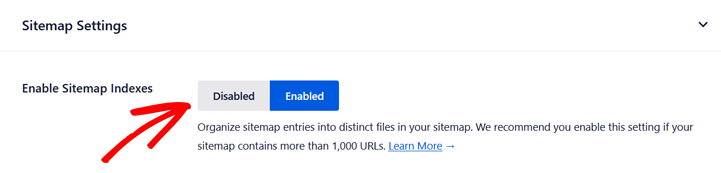
- Links Per Sitemap: This controls how many URLs appear in each sub-sitemap. The default setting works for most sites, so leave this as-is unless you have a specific reason to change it.

Step 3: Choose Your Post Types & Taxonomies
Scroll down to the Post Types and Taxonomies sections. Here you can choose exactly what content gets included in your sitemap.
By default, Include All Post Types and Include All Taxonomies are both checked. That's fine for most sites.

If you want to exclude specific content (like a custom post type that has no SEO value), uncheck the box. This will open a list of all content post types and taxonomies and you can select only what you want to include.

Note: Any content you've marked as no-index in Sitemap Settings is automatically excluded from this list. You don't need to manually remove it.
Finally, you'll see options for Date Archives and Author Archives. I recommend leaving both disabled. They add little SEO value and can create duplicate content issues.

Step 4: Set Up a Video Sitemap (Optional)
If your site includes video content, a video sitemap helps Google show your content in video search results. This can drive additional traffic beyond standard organic search.
To enable it, click the Video Sitemap tab at the top of the Sitemaps page and toggle it on. AIOSEO will automatically detect and include video content from your posts and pages.

Step 5: Set Up a News Sitemap (Optional)
If you run a news website or publish time-sensitive content, a news sitemap helps Google News discover and index your articles fast. Sometimes, it's within minutes of publishing.
Click the News Sitemap tab and toggle it on. You can then choose which post types to include and set your publication name to match what's registered with Google News.

Note: A news sitemap is only useful if your site has been approved for Google News. If you're not a news publisher, skip this step.
Step 6: Let AIOSEO Notify Search Engines Automatically
One of my favorite AIOSEO features is IndexNow. It automatically notifies search engines like Bing and Yandex every time you publish, update, or delete content on your site.
That means your sitemap is always current and search engines don't have to wait for their next scheduled crawl to find your latest content.
To activate this feature, go to your Feature Manager (available in Pro plans) and toggle the button for IndexNow on.

From here, go to All in One SEO → General Settings → Webmaster Tools and locate IndexNow. You can automatically generate an API key and host it on your site.

That's it! IndexNow is set up and working.
In a later section, I'll show you how to submit your WordPress sitemap to Google Search Console to give your indexing a head start.
Method 2: Use WordPress's Built-In Sitemap
If you're not ready to install a plugin, WordPress has a basic sitemap built in.
To check if yours is active, open a new browser tab and type your domain name followed by /wp-sitemap.xml. If you see an XML file listing your content, you're good to go.
That said, this method comes with limitations. The default WordPress sitemap:
- Can't exclude no-indexed content
- Doesn't support image or video sitemaps
- Won't automatically notify search engines when you publish new content
For these reasons, I prefer to use a specialized WordPress sitemap plugin.
My Recommendation: Use the built-in sitemap only if your site is brand new or very small and you're not yet focused on SEO. The moment SEO becomes a priority, which for most business owners is right away, a plugin like AIOSEO gives you significantly more control without added complexity.
Method 3: Create a WordPress Sitemap With Yoast SEO
If you're already using Yoast SEO on your WordPress site, you don't need to switch plugins just to get a sitemap. Yoast generates one automatically, and it takes less than a minute to confirm it's active.
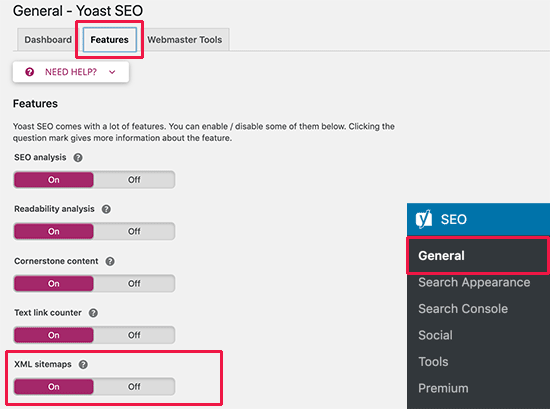
Step 1: Check That XML Sitemaps Are Enabled
In your WordPress dashboard, go to SEO → General and click the Features tab. Scroll down to XML Sitemaps and make sure the toggle is turned on.
If it's already on, your sitemap is live.
Step 2: Find Your Sitemap URL
Click the question mark icon next to the XML Sitemaps toggle, then click See the XML sitemap to open it in a new tab.
Your Yoast sitemap will be at yoursite.com/sitemap_index.xml.

That's all there is to it.
From here, you can submit your sitemap URL to Google Search Console. I'll show you how next.
How to Submit Your WordPress Sitemap to Google
Creating your sitemap is only half the job. (Don't worry, this part is easy too.)
Now, you need to submit your WordPress sitemap to Google Search Console (GSC). This tells Google exactly where your sitemap lives and lets you monitor how your content is being indexed.
It's a step I always take right after setting up a sitemap on any new site.
If you haven't added your site to GSC yet, you'll need to do that first. Check out our guide on how to verify your site with search Console for step-by-step instructions.
Once you're in GSC, here's how to submit your sitemap:
Step 1: In the left-hand menu, click Sitemaps under the Indexing section.
Step 2: In the Add a new sitemap field, enter your sitemap URL. Depending on which method you used, that'll be:
- AIOSEO: yoursite.com/sitemap.xml
- WordPress default: yoursite.com/wp-sitemap.xml
- Yoast SEO: yoursite.com/sitemap_index.xml

Step 3: Click Submit. Google will begin processing your sitemap right away.
Once submitted, you'll see your sitemap listed with a status of “Success” and a count of how many URLs were discovered. If you see any errors or warnings, click on the sitemap to get more details.
Using AIOSEO? IndexNow automatically notifies Google and Bing every time you publish or update content, so your sitemap is always current. Submitting to GSC is still worth doing for the indexing reports and error monitoring, but you won't need to resubmit manually every time your content changes.
How to Submit Your WordPress Sitemap to Bing
Google gets most of the attention, but Bing is the second-largest search engine and drives real traffic. Submitting your sitemap to Bing takes less than 2 minutes, so there's no reason to skip it.
If you haven't added your site to Bing Webmaster Tools yet, head to bing.com/webmasters and sign in with a Microsoft account. You can import your site directly from Google Search Console, which makes setup quick.
Once you're in, here's how to submit your WordPress sitemap:
Step 1: In the left-hand menu, click Sitemaps.
Step 2: Click Submit Sitemap and enter your sitemap URL.
Step 3: Click Submit. Bing will start processing your sitemap immediately.

That's it. Just like with GSC, you'll see a confirmation once your sitemap is accepted, along with a URL count and any errors to review.
Using AIOSEO? Since IndexNow notifies both Google and Bing automatically, your new and updated content gets flagged to both search engines the moment you hit publish. No manual resubmission needed.
Create Your WordPress Sitemap in Minutes
A WordPress sitemap is one of the simplest things you can do to help search engines find and index your content. And as you've seen in this guide, setting one up takes just a few minutes.
To recap, here are the 3 methods we covered:
- AIOSEO: The most powerful option, with full customization, automatic search engine notifications via IndexNow, and support for image, video, and news sitemaps.
- WordPress's Built-In Sitemap: A no-frills option that works for very small sites but lacks flexibility.
- Yoast SEO: A solid choice if you're already using Yoast and don't need advanced sitemap features.
Whichever method you choose, don't forget to submit your sitemap to Google and Bing. It's a quick step that can make a real difference in how fast your content gets indexed.
If you found this guide helpful, you might also want to check out these related posts:
- The Ultimate WordPress SEO Guide
- What Is Technical SEO? (Plus Checklist)
- The Best Sitemap Generators for WordPress
Ready to take your WordPress SEO further? Install AIOSEO today and get your sitemap (and entire website) optimized in just a few clicks.
And for more simple WordPress tutorials and SEO tips, subscribe to our YouTube Channel. You can also follow us on X (Twitter), LinkedIn, or Facebook to stay in the loop.
FAQs
What is a WordPress sitemap?
A WordPress sitemap is a file that lists all the important URLs on your site (posts, pages, images, and videos) in a format search engines can easily read. It helps search engines like Google discover and index your content faster, which is especially useful for new sites or sites with lots of pages.
Does WordPress automatically create a sitemap?
Yes. Since WordPress 5.5, every WordPress site automatically generates a basic sitemap at yoursite.com/wp-sitemap.xml. However, the default sitemap is limited. It can't exclude no-indexed content, doesn't support image or video sitemaps, and won't notify search engines when you publish new content. Most site owners use an SEO plugin like AIOSEO for more control.
How do I find my sitemap URL in WordPress?
Your sitemap URL depends on how it was created. With AIOSEO, it's yoursite.com/sitemap.xml. With WordPress's built-in sitemap, it's yoursite.com/wp-sitemap.xml. With Yoast SEO, it's yoursite.com/sitemap_index.xml. If you're not sure which one you're using, try each URL in your browser until you find one that loads an XML file.
Do I need a sitemap plugin for WordPress?
You don't need one, but I strongly recommend using one. WordPress's built-in sitemap works for very basic sites, but a plugin like AIOSEO gives you far more control. You can exclude specific content, add image and video sitemaps, and automatically notify search engines whenever your content changes.
How do I submit my sitemap to Google?
Log in to Google Search Console, click Sitemaps in the left-hand menu, enter your sitemap URL, and click Submit. Google will begin processing your sitemap right away. If you're using AIOSEO, IndexNow automatically notifies Google every time you publish or update content, so you don't need to resubmit manually.
What's the difference between an XML sitemap and an HTML sitemap?
An XML sitemap is a behind-the-scenes file designed for search engines. It lists all your site's URLs in a machine-readable format and helps crawlers index your content. An HTML sitemap is a page on your website designed for human visitors. it lists your content in a readable format to help users navigate your site. For SEO, the XML sitemap is what matters most.
Want to Try AIOSEO for Free?
Enter the URL of your WordPress website to install AIOSEO Lite.

Disclosure: Our content is reader-supported. This means if you click on some of our links, then we may earn a commission. We only recommend products that we believe will add value to our readers.

I’m getting more and more frustrated with this plug in. I have tried several times to leave a support ticket only to get a message that reads “Invalid Form.” I have no idea what this means as I’m simply filling out the form as indicated. There are problems with my account (I’m a paid Pro user even) and there is no phone number to call, nor email to send a ticket to if the web page isn’t working for some reason. Really disappointed with the level of customer service I’ve received since the company changed hands.
Hi Curtis,
We’re not seeing any issue with our contact form. Please try it here https://aioseo.com/contact/ and click on the Complete a Form button rather than the Support Ticket button.