Want to learn how to optimize your site with WordPress SEO but don’t know how to get started?
Search engine optimization (SEO) can be complex and time-consuming. However, if you can get it right, the rewards are worth it, as your site and content will rank high on search engine results pages (SERPs).
It also results in more traffic to your site and a boost in revenue.
In this article, we’ll show you some of the top SEO best practices to help you outperform your competitors and dominate SERPs.
Feel free to use our table of contents below to navigate through this jam-packed WordPress SEO guide:
In This Article
- What Is WordPress SEO?
- Getting the WordPress SEO Basics Down
- 1. Are You Using the Right SEO Plugin?
- 2. Is Your Website Indexed?
- 3. Is Your Website WWW or non-WWW?
- 4. Have You Optimized Your Robots.txt File?
- 5. Are Your WordPress URLs SEO-friendly?
- 6. Is Your Website Secure?
- 7. Have You Generated and Optimized An XML Sitemap?
- 8. Avoid 404 Errors By Implementing Effective Redirects
- How to Optimize Your Blog Posts
- The Ultimate WordPress SEO Guide: Your FAQS Answered
Let’s get started with the basics: what is SEO, and why is it important?
What Is WordPress SEO?
SEO or Search Engine Optimization is the practice of optimizing your web pages to drive free organic traffic from search engines like Google.
Therefore, WordPress SEO is the practice of optimizing your WordPress pages and posts to rank high on SERPs. This will result in high-quality targeted traffic being driven to your site.
With SEO, your goal is to follow WordPress SEO best practices on your site. Doing so helps search engines easily discover your content and display it in the search results.
There are 3 things search engines do to find and display your content to their users:
- Crawling: Discover content on the internet by scanning each URL they find
- Indexing: Organize the content they found during crawling so they can quickly list it in search results for relevant queries
- Ranking: Ordering the indexed content in search results in such a way that the most relevant content appears at the top
Daily, Google processes over 5.5 billion searches… Imagine how much more traffic you could get with a high ranking!
To put it simply, SEO brings your website to life. It’s not an overnight strategy, but the results are worth it.
Not to mention, there are guides out there (like this one) to jumpstart your WordPress SEO strategy.
Getting the WordPress SEO Basics Down
Before you start, ensure your website is set up for SEO. Answering the following questions will help you kick everything into gear.
1. Are You Using the Right SEO Plugin?
One of the first steps to winning at SEO is to use the right SEO plugin. For WordPress users, it doesn’t get better than All In One SEO (AIOSEO).
AIOSEO is a powerful yet easy-to-use SEO plugin that boasts over 3 million active users. Millions of smart bloggers and marketers use AIOSEO to help them boost their search engine rankings and drive qualified traffic to their blogs. The plugin has many powerful features and modules to help you properly configure your SEO settings. Examples include:
- Search Statistics: This powerful Google Search Console integration lets you track your keyword rankings and see important SEO metrics with 1-click, and more.
- Next-gen Schema generator: This no-code schema generator enables users to generate and output any schema markup on your site.
- Redirection Manager: Helps you manage redirects and eliminate 404 errors, making it easier for search engines to crawl and index your site.
- Link Assistant: Powerful internal linking tool that automates building links between pages on your site. It also gives you an audit of outbound links.
- SEO Preview: This gives you an overview of your search and social snippets and general SEO so you can improve your optimization.
- IndexNow: For fast indexing on search engines that support the IndexNow protocol (like Bing and Yandex).
- Sitemap generator: Automatically generate different types of sitemaps to notify all search engines of any updates on your site.
- And more.
AIOSEO also has other powerful tools to help you master your on-page SEO, off-page SEO, and even technical SEO. The best part about AIOSEO is that it’s a no-code SEO plugin. This means you can use it to perform most SEO tasks even if you don’t have any technical or coding knowledge.
For step-by-step instructions on how to install AIOSEO, check out our installation guide.
2. Is Your Website Indexed?
The first thing you need to do is to ensure your website can be indexed by search engines.
You can think of “index” as another word for database. When Google indexes a website, it stores its information in its database.
If your website isn’t in Google’s index, users won’t find your website over search. It’s critical to make sure your site is indexed.
You can see if your site allows indexing on your WP dashboard. Head to Settings » Reading on your dashboard.
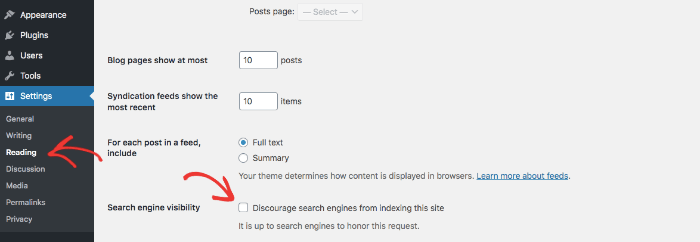
Uncheck the box next to Search engine visibility to allow indexing.
You can speed up the indexing process using our IndexNow feature.
IndexNow is a protocol that automatically notifies search engines like Bing, Yandex, and others when you publish new content or update your old content. You can access this powerful feature by going to your AIOSEO settings and then General Settings » Webmaster Tools.
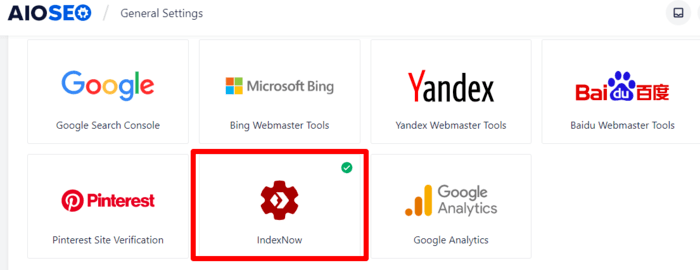
You can get detailed instructions on activating IndexNow here.
Plus, you can easily use AIOSEO to check the index status of your posts and pages.
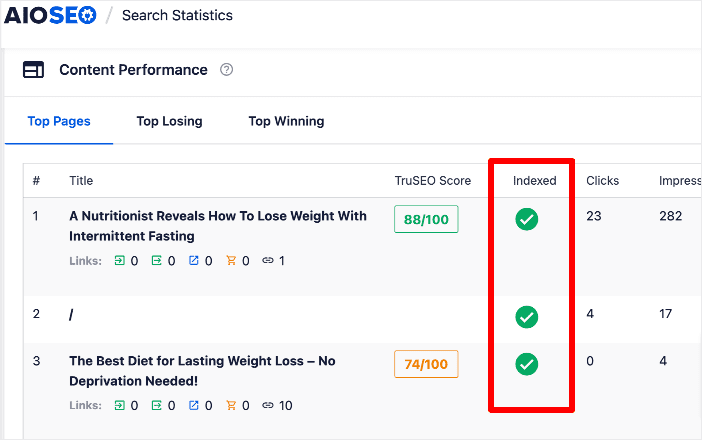
This will help you easily keep tabs on the index status of your pages.
3. Is Your Website WWW or non-WWW?
Wait… you can choose if your website URL has WWW or not?
That’s right. Your site address will look like one of the following:
https://www.samplewebsite.com or http://samplewebsite.com
Google will only identify one of these URLs as your website—you can’t choose both.
On another note, there’s a lot of talk about which URL is better… Is WWW better than non-WWW?
It doesn’t matter which one you choose. However, once you do, choose your site address and stick with it. As we mentioned earlier, Google identifies one site address only.
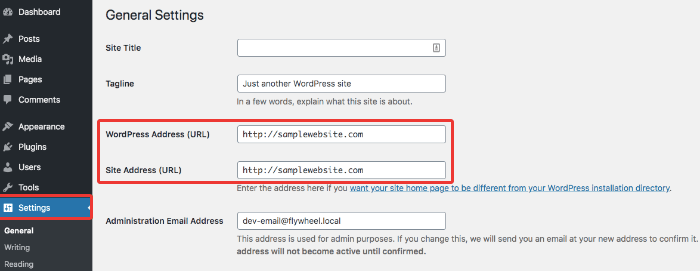
Fortunately, with WordPress, it’s easy to set your URL preference by navigating to Settings » General. Then, insert your preferred URL in both WordPress Address (URL) and Site Address (URL).
4. Have You Optimized Your Robots.txt File?
A robots.txt file is a powerful SEO tool that instructs search engines on how to interact with your site. You can use it to prioritize pages, disallow crawling of URLs, instruct search engines when to crawl your site and more.
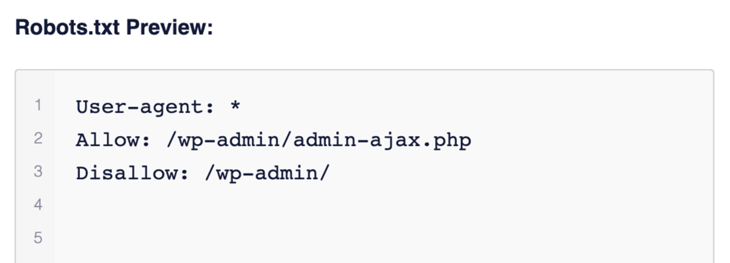
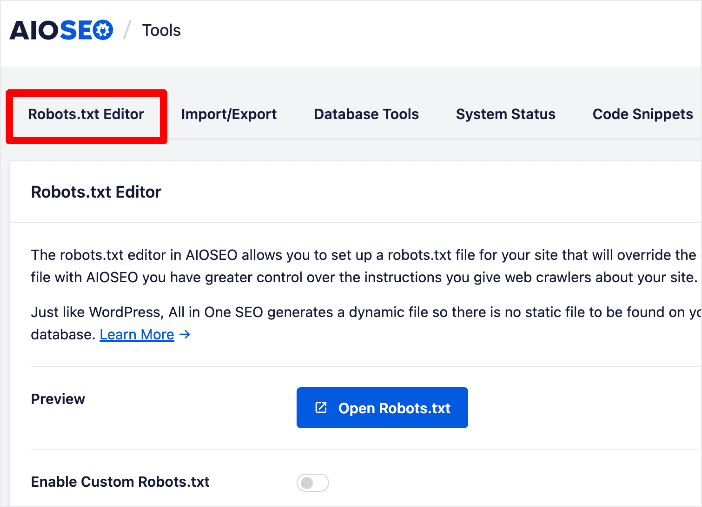
You can easily generate and optimize your robots.txt file using AIOSEO’s robots.txt editor. To access it, go to your AIOSEO menu » Tools » Robots.txt editor.
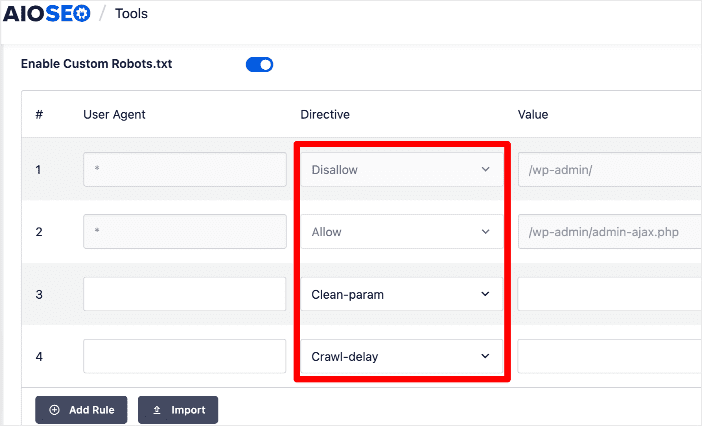
This powerful tool makes optimizing your robots.txt file easy, as it has many useful directives or instructions for search bots. Examples include Allow, Disallow, Clean-param, and Crawl-delay.
You also have the option to import a robots.txt file from another site, saving you a lot of time optimizing yours.
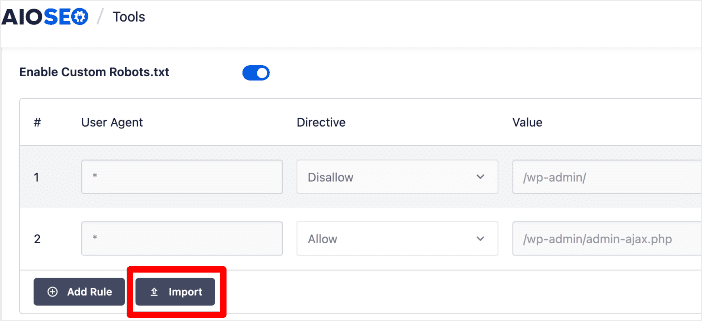
For more details, please visit our post on how to edit a robots.txt file in WordPress.
5. Are Your WordPress URLs SEO-friendly?
An SEO-friendly URL looks like this:
http://www.example.com/how-to-make-a-websiteThis URL is short, organized, and easy to read. Search engines and online users can tell what this webpage is about—how to make a website.
Unoptimized URLs, on the other hand, are disorganized and long. They usually include numbers, letters, and special characters.
https://www.example.com/?p=10467X&UKEwiv9vuz1tXsAhUTo ensure your URLs are SEO friendly, head to Settings » Permalinks and Post name.
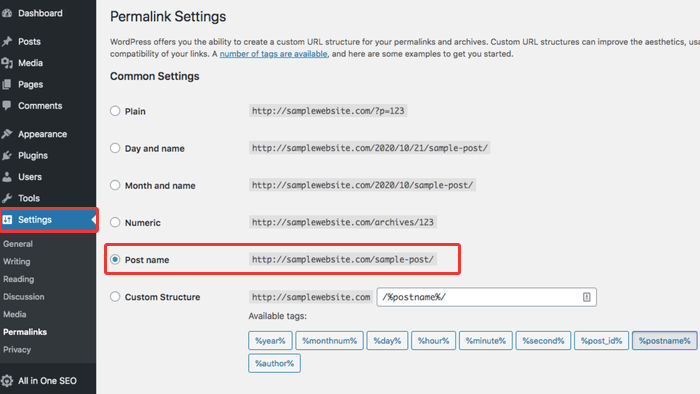
This URL structure is SEO-friendly in most cases, but it doesn’t apply to every website.
For example, a news publication site might need a URL with the day and name. Or, a large site with hundreds of articles might need a custom structure.
You can check out this article to find the best URL structure for your business.
6. Is Your Website Secure?
Website security has always been a top priority for Google. They also want to ensure that websites people access from Google are secure and protect users’ privacy.
And that’s why Google recommends implementing SSL / HTTPS on all websites.
SSL is an industry-standard security measure that creates an encrypted link between each visitor’s browser and your website. This adds an additional security layer to your WordPress site.
Once you install SSL on your site, a padlock sign will appear in the address bar, showing your visitors that they’re on a secure page. In addition, your website address will begin with HTTPS instead of just HTTP.
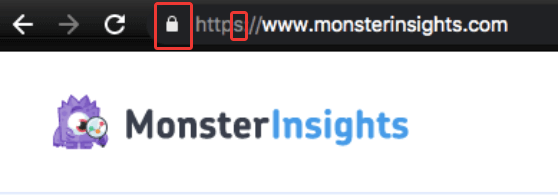
MonsterInsights, for example, has a lock next to its URL and an ‘s’ after HTTP. This means their site is encrypted.
So, when an online user logs into your site or buys a product, the SSL certificate will better protect their information.
You can get a free SSL certificate through a WordPress hosting site or WordPress SSL plugin.
You can also check out this post to learn more about keeping WordPress secure.
7. Have You Generated and Optimized An XML Sitemap?
An XML sitemap is a list of every important URL on your site. When you submit a sitemap, Google can understand and index your content.
If you don’t upload an XML sitemap, Google will have trouble identifying your web pages.
With All in One SEO, you can easily create your sitemap and send it to all popular search engines. To generate a sitemap, go to All in One SEO » Sitemaps.
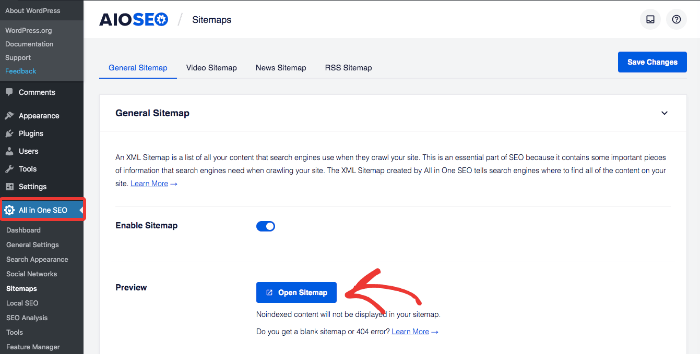
When you scroll down, you’ll notice a list of Sitemap settings. These settings let you choose what pages you’d like to add.
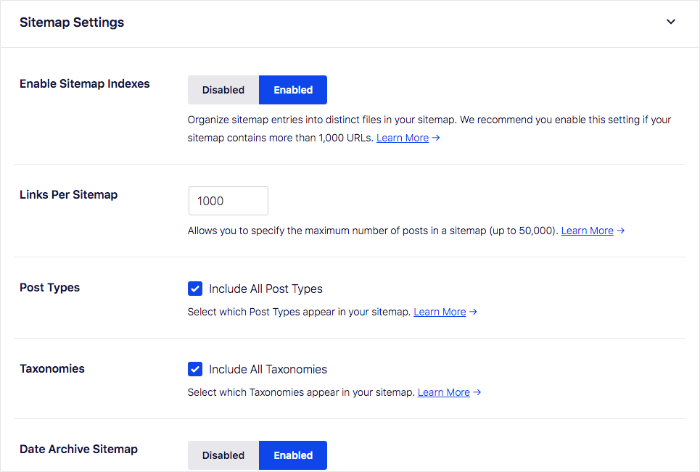
Make sure to set the toggle to Enable Sitemap Indexes option.
For more details, check out our article on XML sitemaps vs. All in One SEO.
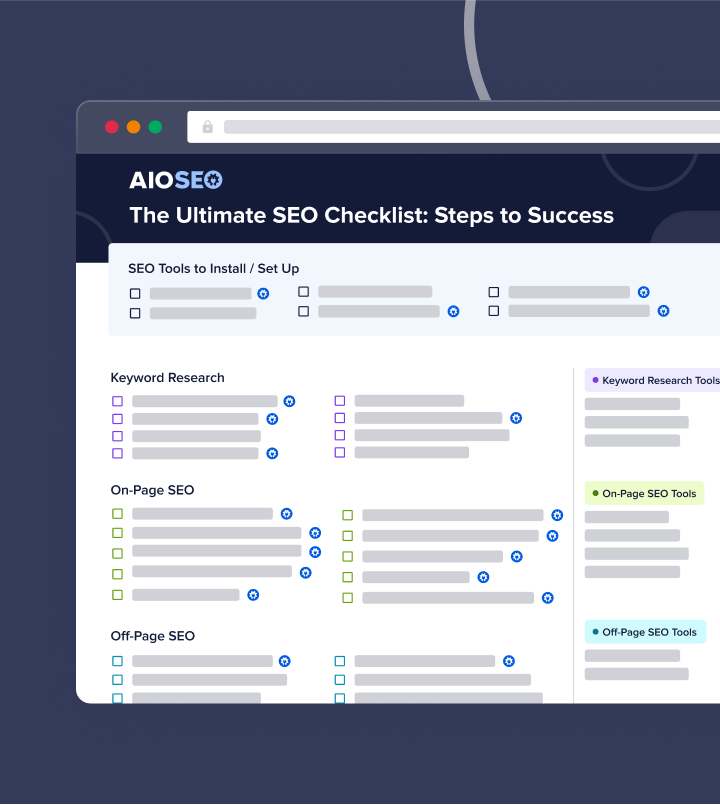
Download A Free SEO Checklist
Access our comprehensive SEO Checklist with a single click. We’ll deliver it straight to you, putting actionable items with SEO tools and tutorials right at your fingertips.
Enter your name and email to download a free SEO checklist.
8. Avoid 404 Errors By Implementing Effective Redirects
As your website grows and evolves, you may change some pages and delete others. If this process is not handled properly, it could result in 404 errors on your site.
404 errors in WordPress mean that the URL or web page a user is trying to visit is broken or the page doesn’t exist anymore. Too many 404 errors on your website can negatively impact your rankings.
Fortunately, if you’re an AIOSEO user, you can easily avoid 404 errors on your WordPress site. And this is automated by our Slug Monitor. Whenever the Slug Monitor detects a change in a URL, it prompts you to add a redirect.
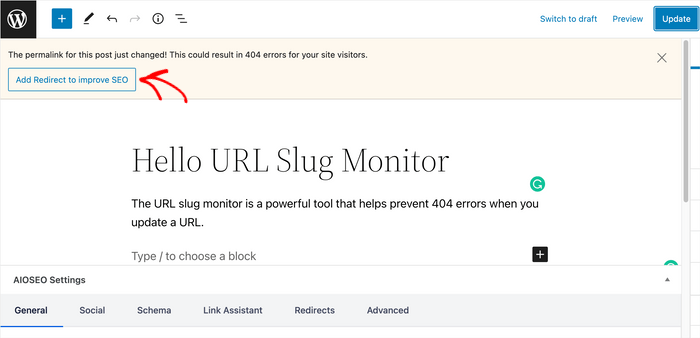
Clicking the “Add Redirect to Improve SEO” button will open a modal where you can add a redirect from the old URL to the new URL automatically. You can also avoid 404 errors by:
Scheduling Redirects
Scheduling your redirects is another great way of avoiding 404 errors on your site. AIOSEO’s Redirection Manager makes it easy by enabling you to schedule your redirects to be implemented at a particular time. Below is an example of scheduling a permanent (301) redirect:
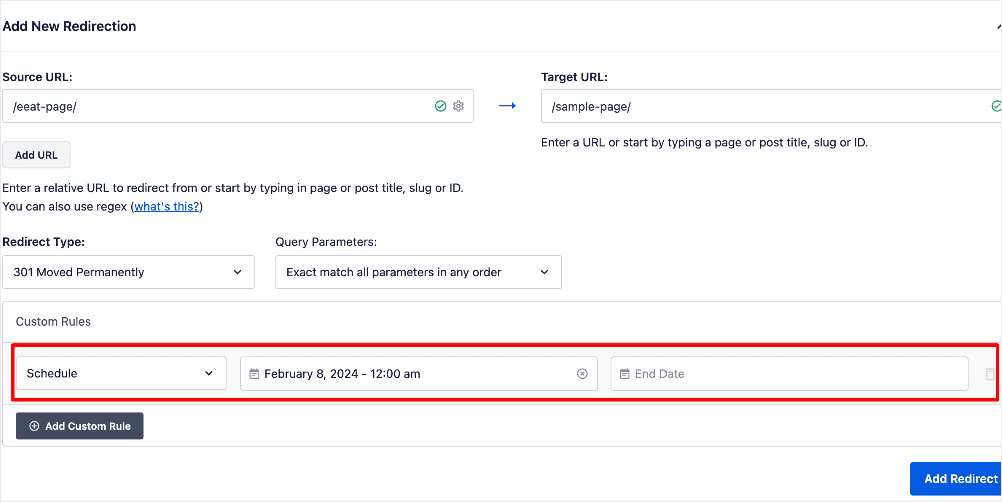
For temporary redirects, you can even schedule when the redirect should be implemented and when the redirect should “expire.” When the redirect expires, the address of the page reverts to the original URL.
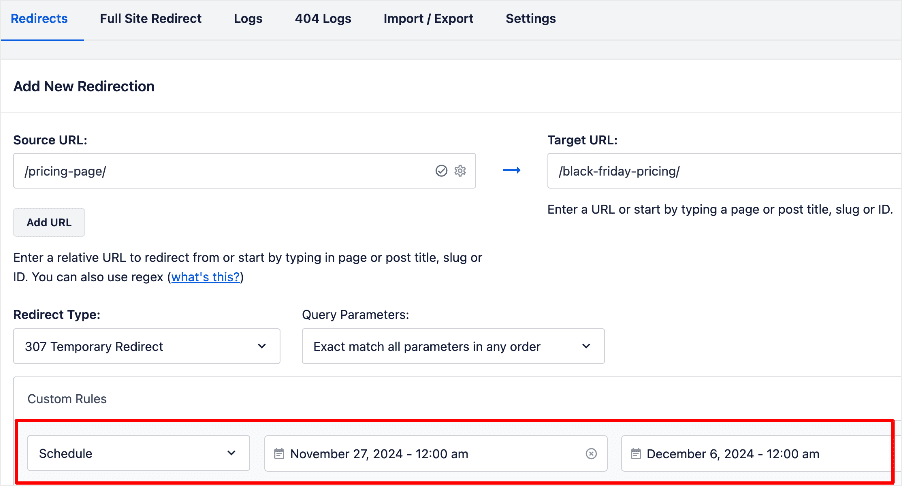
Scheduling redirects this way is an excellent way of setting up automatic redirects. It’s efficient and time-saving.
Automate Redirects
Another way of avoiding 404 errors is automating your redirects. To do this, go to Redirects in the AIOSEO menu and then click on the Settings tab. Next, scroll down until you see the Automatic Redirects section.
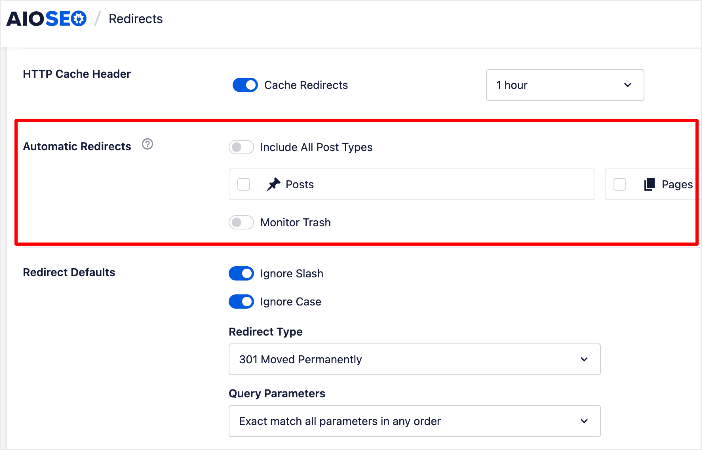
Once you’ve located the Automatic Redirects section, you can then set up automatic redirects.
You can either select the Include All Post Types toggle, or you can select individual post types using the check boxes.
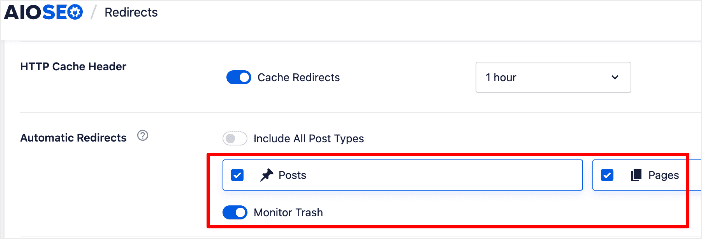
A
You can also set the default settings for your automatic redirects:
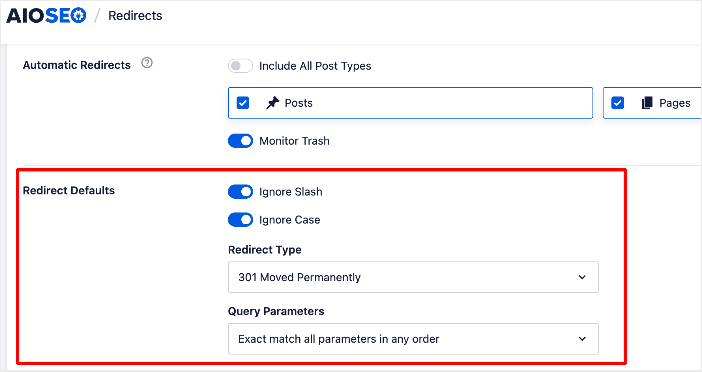
Now, whenever you change the URL for published content in these post types, AIOSEO’s Redirection Manager will automatically create a redirect based on your options and settings.
Alternatively, to avoid 404 errors on your site, you can consider adding automatic redirects to your Homepage.
How to Optimize Your Blog Posts
Now that you know how to configure the basic WordPress SEO settings, it’s time to learn how to optimize your posts for SEO. While you may need some optimization tools, AIOSEO will suffice for most tasks.
9. Keyword Research
Keyword research is a crucial part of impactful SEO and content strategies. It’s the practice of identifying the terms people enter into search engines so you can use them in your posts.
Keywords are an important Google ranking factor that determines whether your post appears in search results.
So, how do you do keyword research? There are a lot of different factors to consider:
- Relevance – Make sure to choose the keywords that are most relevant to the content you’re providing
- High search volume – Choose the keywords that most people are likely to use
- Competition – Ideally, you need to use low-competition keywords so you can easily rank your content for them
We suggest using keyword research tools to find useful and high-volume keywords for your audience. You can also read more about how to do keyword research. You can also use a keyword rank tracker to monitor how you’re performing for your keywords.
10. Add Internal Links
Internal linking is simply linking one page to another page on your site. We call these links “internal” because they’re within your website.
So why are internal links SEO-friendly?
They keep readers interested – When a user reads your blog post, they can click on an internal link to read another blog post, and so on.
For example, let’s say you write a guide about plant health. You could add internal links to other posts about house plants, outdoor plants, and trees.
A reader might think, “Wow! There’s so much information about plant health. I don’t need to go to another source. This website has everything I need.”
When readers are engaged with your content, it can increase your authority and rankings.
They improve site navigation – Internal links help your readers and Google navigate your site. Google has an easier time identifying and ranking your posts for search.
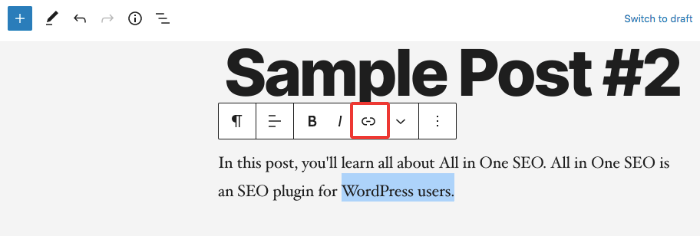
To add an internal link, head to your blog post. Highlight the word you want to link and click on the link icon.
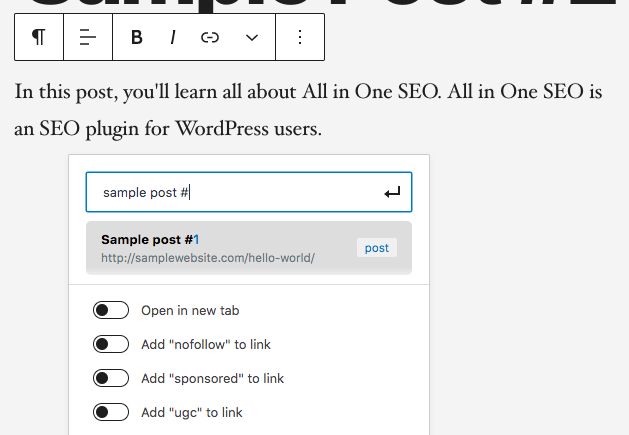
Type in a blog post you’d like to link and hit enter.
But as your website grows, remembering all the articles you can link to becomes next to impossible.
Again, this is where AIOSEO comes to the rescue with its powerful Link Assistant feature.
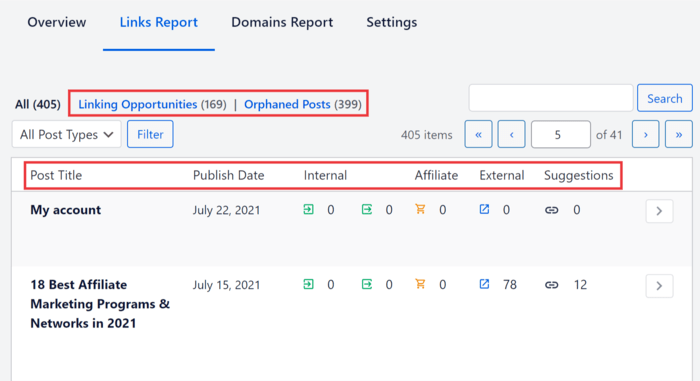
Link Assistant helps you build strategic internal links on autopilot, making the task much easier. In addition, it also shows the orphaned pages on your site. These are pages without any internal links, a problem that can hurt your SEO and user experience (UX).
To make internal linking easy and fast, Link Assistant will suggest which articles to link to in your content and the anchor text to use. You can include all link suggestions at once or add them individually as you vet them.
Using Link Assistant is also super easy. With AIOSEO installed, scroll down to the bottom of your blog post. In AIOSEO Settings, you can click on the Link Assistant tab to see a list of internal link suggestions, including relevant anchor text you can use.
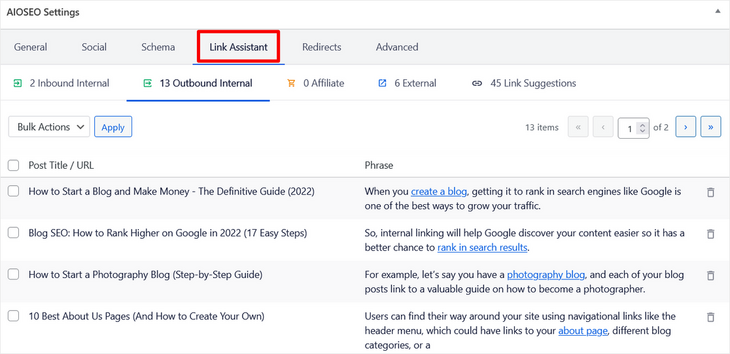
Simply select the link suggestions you want to add to your post and click the Apply button. It’s that simple!
Another way to improve blog post navigation is with anchor links. Anchor links let readers jump around your page. This is especially important for long articles.
Anchor links are commonly used to link a table of contents to the post’s headings and subheadings. This post will teach you how to add anchor links.
Click here to learn more about how to improve internal link building.
11. Build Topic Clusters
Topic clusters are a group of relevant content pieces that comprehensively cover a subject from many angles and are interlinked. They help build topical authority and enhance your semantic SEO, both great ways of getting your site and content to rank in a competitive niche.
Creating a topic cluster requires 2 main components:
Cornerstone Content (Pillar Page)
Your cornerstone content is the hub of the topic cluster. This page covers the main subject in-depth, with each subheading briefly addressing related subtopics.
You can easily mark these using AIOSEO’s Cornerstone Content feature:
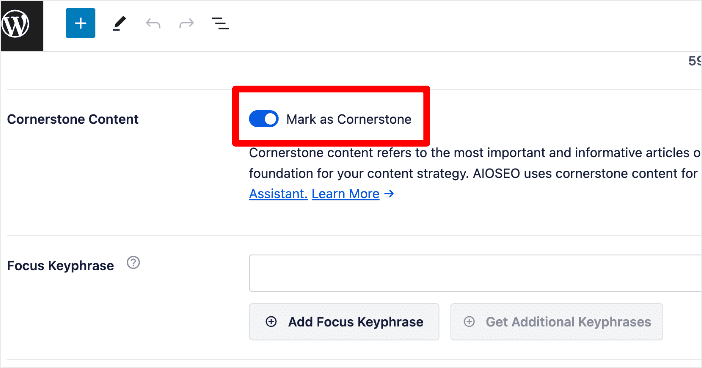
Marking your post/page as cornerstone content also adds it to a new post list filter dedicated to cornerstone content.
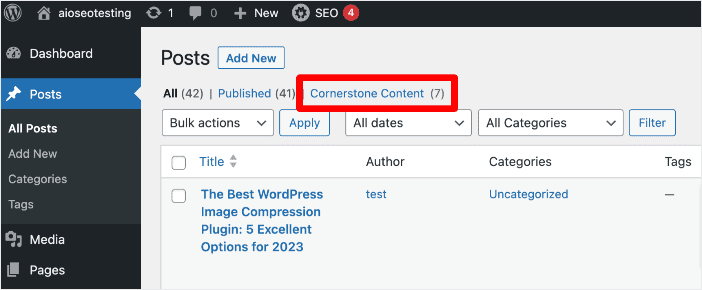
This filter gives you an easy way to see your important pages at a glance, making it easier to create links to them.
Subtopic Pages
Subtopic pages are the pieces of content you create to provide in-depth coverage of a single aspect of the main subject and link to the pillar page.
Once you’ve built your pillar pages and subtopics, create strategic internal links between them. This can be automated by using AIOSEO’s Link Assistant module, where the cornerstone content is denoted by a building icon.
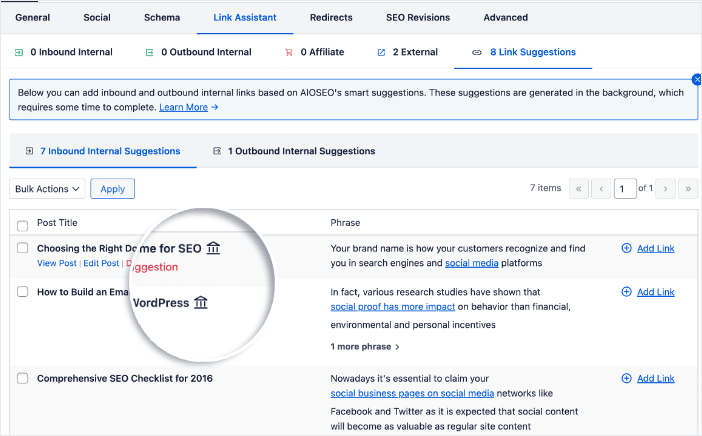
Simply click the Add Link button to add links to your cornerstone content, and Link Assistant will work its magic in the background. You don’t even have to open the pages in editor mode!
12. Edit External Links
It’s common to add external links within your content. Websites externally link to other sites for a few reasons:
- Research
- Affiliate partners
- Recommendations
Linking to valuable sources can make your content more credible. But here’s the thing about external links.
When search engines identify them on your website, they can pass some of your link authority over to those external links.
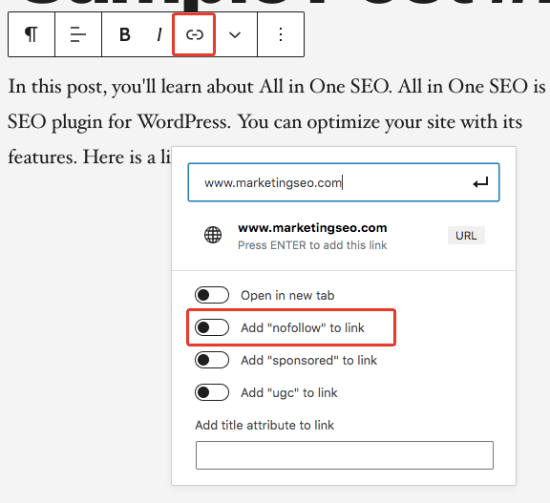
That said, when you link to an outside source, and you don’t want to pass the link juice, add nofollow. This tells Google, “This link isn’t affiliated with my website. Please don’t crawl this link.”
You can add nofollow to your external links with All in One SEO.
Head to your blog post editing page. Select the block containing your link and hit the link icon. Once you insert your external link, click Add “nofollow” link.
13. Optimize Images
While images are a great addition to your content, they can slow down your site. You can avoid this with compressed, high-quality images. This is an important part of image SEO, another powerful.
When you compress a photo, it shrinks its image files without taking away the quality. We suggest compressing images before uploading them to WordPress.
Along with compressing images, you should also add a title and alt text to photos. Alt text stands for “alternative text.”
The alt text and title help Google understand what your images are. This is also a helpful tool for someone with vision loss.
You can add alt text and a title to each image you upload to WordPress.
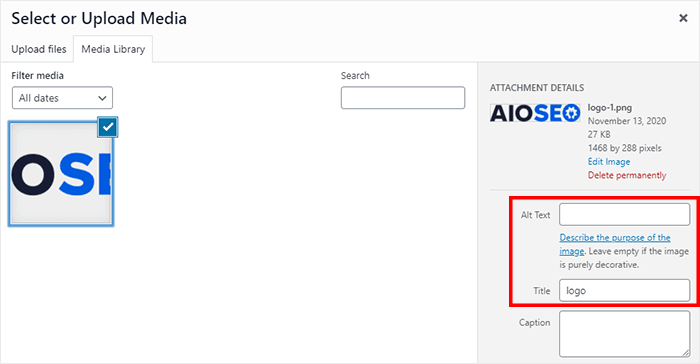
Try to add alt text and a title to each image you upload. If it makes sense, you can add keywords to rank your photos.
14. Add Categories and Tags
Organized content is easy to navigate—categories and tags help with that. Before we explain how categories and tags affect SEO, let’s explain what they are.
We’ll start with categories. Categories organize your posts by topic. For example, let’s say you own a Spain travel blog.
Some categories you might have are:
- Spanish cuisine
- Drinks
- Sightseeing
- Getting around
You can also think of categories as the chapters of a book—each chapter covers a broad topic. In WordPress, every post must be categorized, or else it’ll be labeled as “uncategorized.”
Now, let’s talk about tags. While categories group your blog posts into broad topics, tags describe each blog post with 1 or 2 keywords.
Let’s go back to the Spain travel blog example.
Some tags you might add to blog posts about “Sightseeing” are:
- Architecture
- Statues
- Nature
See how these tags specify the category, sightseeing? So, if you write an article about Spain’s beaches, you would add “Sightseeing” as the category and “Nature” as the tag.
So, how do categories and tags improve WordPress SEO?
Categories and tags improve your site navigation. Readers and Google have an easier time going through your blog posts when they’re organized.
You can optimize your categories and tags with MonsterInsights’ category and tag tracker. This tool analyzes which categories and tags get the most traffic.
15. Optimize for Search Results
Now that your content is SEO-friendly, you can optimize it for search results.
This is one of the best ways to improve clickthroughs of your content in the results so you can possibly drive more traffic.
From your post or page editor, scroll down until you see AIOSEO Settings. Enter the title of your blog post under Post Title.
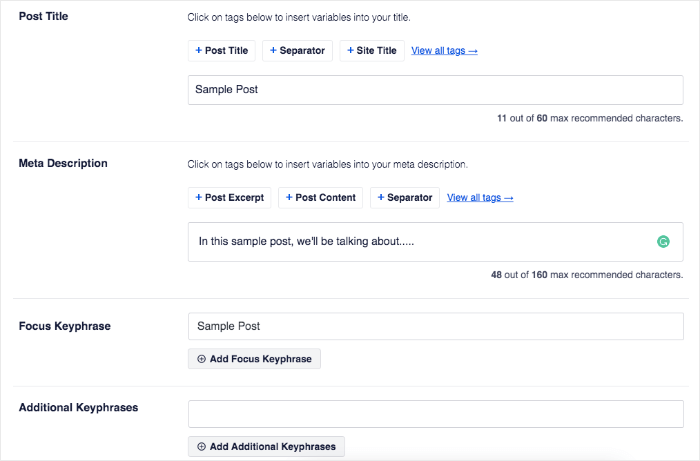
AIOSEO will calculate how long your title tag is. It shouldn’t be any longer than 60 characters.
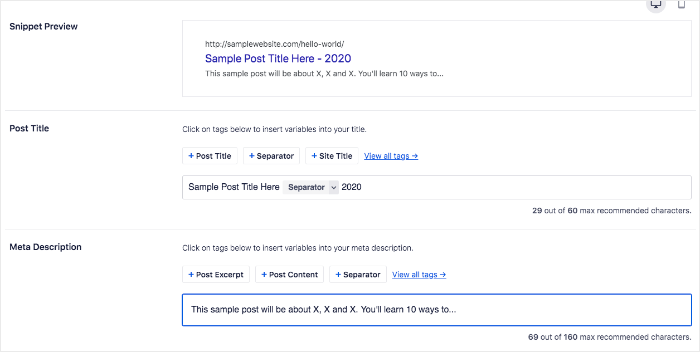
Next is your meta description. Your meta description summarizes your content on search engines. All in One SEO suggests keeping your meta description at 160 characters or less.
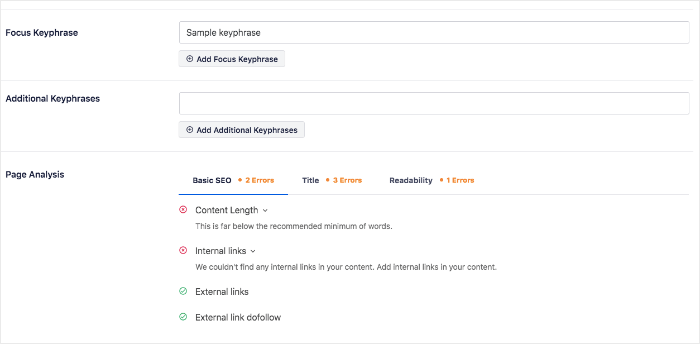
Last are your keywords. When you enter your primary and secondary keywords, AIOSEO will evaluate how well they’re placed.
It can also analyze your on-page SEO—content length, internal links, and external links are a few examples.
Optimizing for search results will help improve your clickthrough rates and, ultimately, your SEO.
Once done, you can use the SEO Preview tool to ensure everything is perfect.
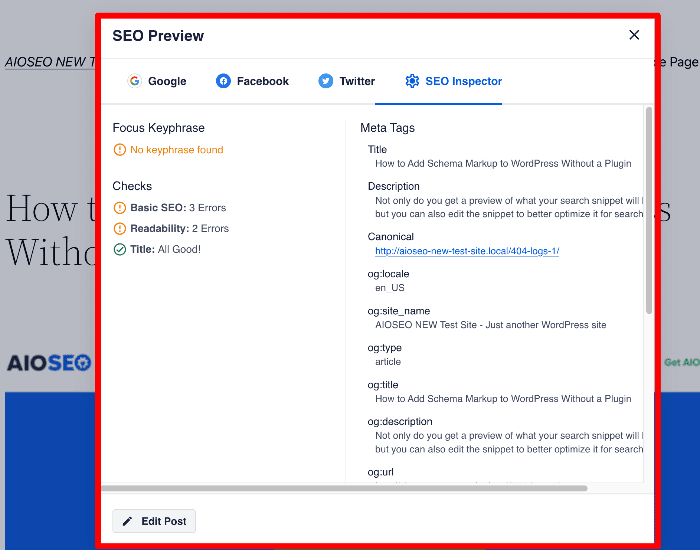
16. Optimize for Multilingual SEO
The internet has helped the world become a global village. As a result, you can get website visitors from every corner of the globe. That’s why a WordPress SEO hack you must employ is optimizing for multilingual SEO. This simply means optimizing your website and its content for discoverability in localized native languages.
With AIOSEO’s translation API, optimizing for multilingual SEO is super easy. That’s because the API was designed to make it easy for your translation plugin to localize important elements of your content. Examples include keywords, metadata, social settings, and much more.
Implementing multilingual SEO will result in your content having a better chance of ranking internationally.
17. Respond to Comments
It’s always encouraging to receive comments from your readers…But sometimes, it can get out of hand.
First things first, get rid of spam comments. Spam comments take up space and add no value to your content. Plus, spam comments used to have bad links, which could sabotage your authority and negatively impact SEO.
A spam filtering service like Akismet will keep those comments out of your site.
Whew, that was an easy fix. But here’s another problem you may come across—a LOT of comments.
While blog post comments boost WordPress SEO (and make you feel good), they can also slow down your site speed.
If this is the case, you’ll have to split your comments into different pages. This post will help you paginate comments, step by step.
18. Analyze Your Site
You won’t know how your WordPress SEO is doing without analyzing your site. You can target critical issues and warnings with AIOSEO’s site analysis feature.
Under All in One SEO, click on SEO Analysis.
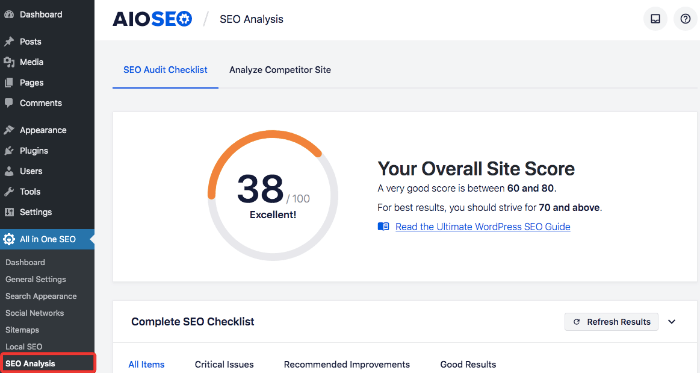
From here, you can check your SEO site score. The general rule of thumb is to aim for a score of 60 and above. If you end up with a low score, then scroll down and look for the recommendation to improve your overall score and ranking.
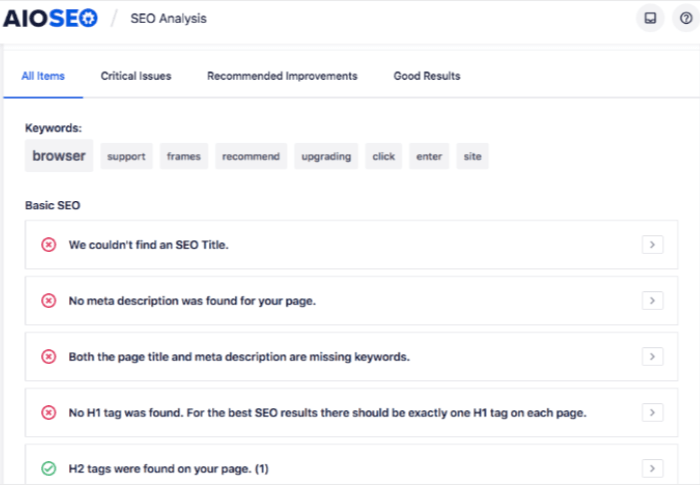
For example, from the above screenshot, it looks like this website is missing some critical areas of basic SEO. Now that we know these problems, we can fix them and raise our SEO score.
On another note, you can also analyze competitor sites. Click on Analyze competitor site and enter their URL.
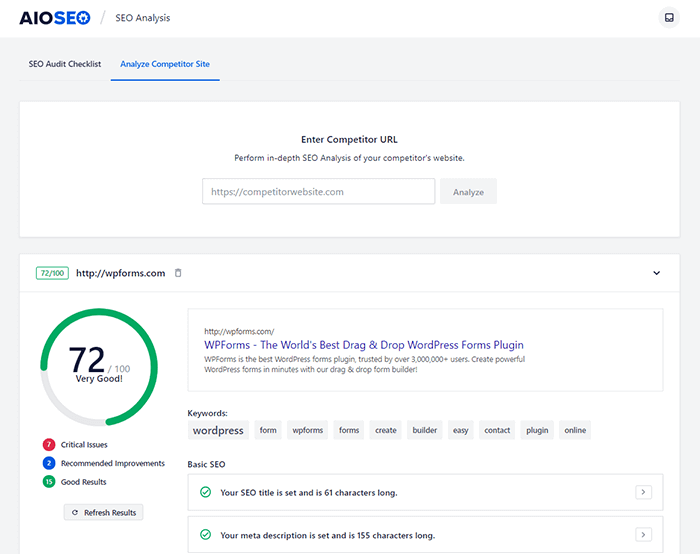
From here, you can compare important metrics, like keywords and site loading time.
Along with AIOSEO, you should also use Google Search Console and MonsterInsights to analyze organic traffic.
You can learn more about using MonsterInsights with this guide: How to add Google Analytics the right way.
19. Add Schema Markup
Schema markup is code that you put on your website to help search engines return more informative results for users. With schema markup, you can add rich snippets to your search results, which could improve your organic traffic.
For example… have you ever seen search results that look like this?

Or maybe this?

These are 2 examples of schema markup. Without a doubt, schema markup reveals more information about the page than a typical search snippet, which helps your business stand out from other search results and also boost organic traffic.
To add schema, click on Search Appearance under All in One SEO.
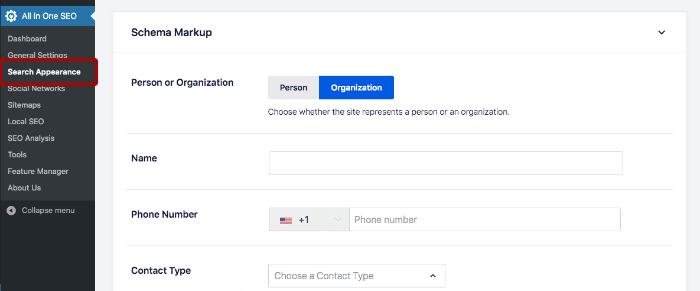
Then, scroll down to Schema Markup.
Enter your business information to add schema markup on Google. If you’re a local business, you can add local schema with our local SEO feature.
20. Optimize Your Social Sharing
You’ve probably shared a blog post on Twitter or Facebook at least once. When you share a blog post, something like the image below will be seen in your feed.

Notice how the headline, description, and featured image are ready to share? This didn’t happen by accident—Smash Balloon optimized its social settings.
Optimizing your social settings does 2 things:
It makes it easy to share – With everything ready to go, all users have to do is click “share.”
Keywords and alt text – You can add your keywords and alt text to the image, title, and description for extra optimization.
With AIOSEO, you can set up Facebook and Twitter sharing. On your blog post editing page, head back to AIOSEO settings and click on Social.
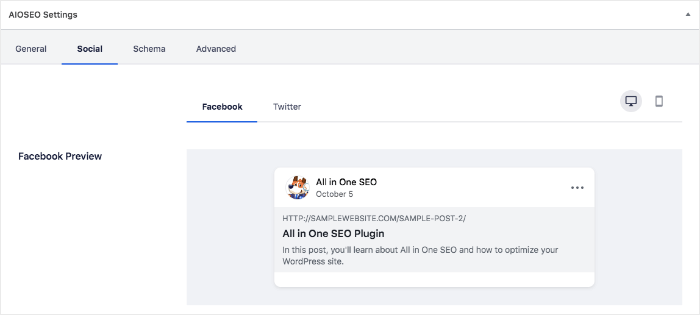
As you scroll down, edit your title, description, and media. We recommend using relevant keywords and alt text to optimize the post.
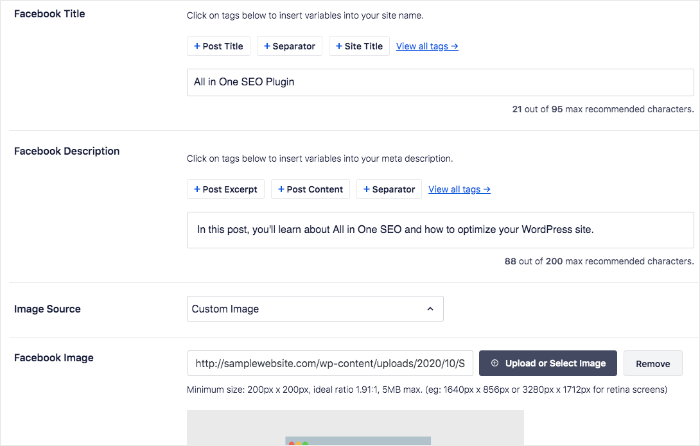
Now, your blog post is ready for social sharing. You can add social sharing buttons to your blog with this post: How to add social share buttons.
The Ultimate WordPress SEO Guide: Your FAQS Answered
What is WordPress SEO?
WordPress SEO refers to the process of optimizing a website or blog built on the WordPress platform for search engines like Google. The goal is to improve your site’s visibility in search engine results pages (SERPs) and drive organic traffic.
Why is SEO important for my WordPress site?
SEO is crucial because it helps your WordPress site rank higher in search results, leading to increased organic traffic, better user experience, and higher conversion rates.
What is the best WordPress SEO plugin?
The best WordPress SEO plugin is All In One SEO (AIOSEO). It has many features to help you optimize your site and content for better rankings.
We hope this article helped you understand WordPress SEO and how to get started. Make sure to follow every step, and your WordPress SEO will be optimized quickly! You may also want to check out our ultimate link building guide, or see our WordPress SEO tips for beginners. These are resources that will help further boost your WordPress SEO.
If you enjoyed this article, we recommend that you subscribe to our YouTube Channel. You’ll find many helpful tutorials there. You can also follow us on Twitter, LinkedIn, or Facebook to stay in the loop.
Disclosure: Our content is reader-supported. This means if you click on some of our links, then we may earn a commission. We only recommend products that we believe will add value to our readers.

I do agree with all the ideas you have presented in your post. They are really convincing and will definitely work. Still, the posts are too short for beginners. Could you please extend them a bit from next time? Thanks for the post.
Easy enough if I did this right.