Looking for a complete blog post SEO checklist to help you boost your rankings and drive more traffic to your blog?
Creating a blog post takes a lot of time and effort. It also costs a lot in terms of resources, whether you create them in-house or outsource. Because of this, you need each blog post to give you a good return on investment (ROI).
For instance, Google receives 3.5 billion searches every single day, and the first 5 results for a given search account for 67% of all clicks. This shows how important it is to optimize your blog posts to increase rankings and maximize traffic.
In this post, we’ll share our blog post SEO checklist to help you optimize your blog posts for SEO like a pro. Doing so will help you consistently get more traffic to your site.
Since this is a comprehensive post, you can use the quick links to jump to the sections you want:
- Plan Your Content with Keyword Research
- Understand Search Intent
- Optimize the Length of Your Blog Post
- Focus on Readability
- Write a Captivating Blog Post Title
- Add a Meta Description to Your Blog Post
- Link to Relevant Internal and External Resources
- Add Images and Videos to Your Blog Posts
- Use Categories and Tags to Organize Content
- Write the Best Piece of Content on the Topic
- Encourage Social Media Shares
- Optimize Your Older Blog Posts
Ready to get started with the blog post SEO checklist that will help you get results from your content marketing?
Then let’s get started.
1. Plan Your Content with Keyword Research
Before you start writing your blog post, you have to do keyword research. If you want to dominate the search results, you’ll have to make sure you write about topics that people are looking for. This is also a great way to find new blog post ideas.
Many bloggers just use their best guesses to write about topics they feel their users would be interested in. But you don’t need to rely on blind guesses, especially when you can do keyword research to find out exactly what your users are looking for.
Keyword Research Helps You Discover Data-Based Topics
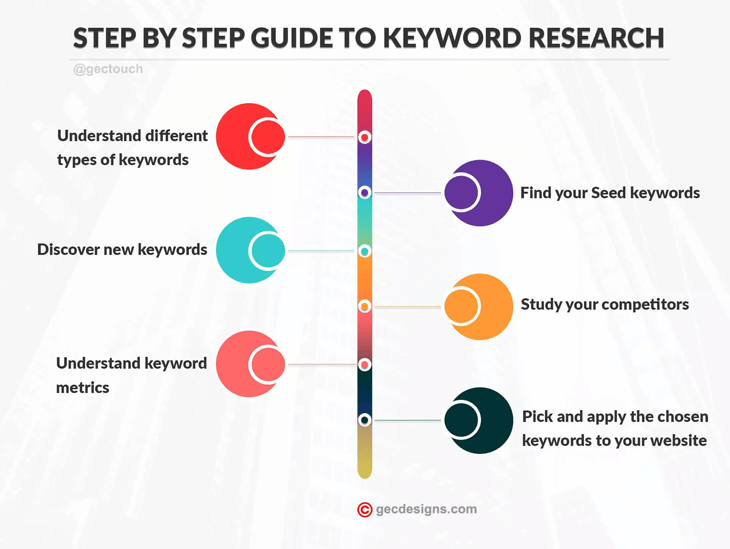
Keyword research is a technique used by content creators and SEO experts. It helps you discover topics your users are interested in based on data from search engines. You can then use these keywords to plan your content strategy.
We recommend using keyword research tools like Google Keyword Planner, SEMRush, or Ahrefs to check the search volume and get examples of related keywords.
For more details, please visit WPBeginner’s post on how to do keyword research for your blog posts.
Now that you know how to find keywords to plan your content strategy, let’s move on to deciding your focus keyphrase.
Decide Your Focus Keyphrase
After you’ve done your keyword research and discovered keyword ideas, it’s time to pick a phrase that has the highest search volume, as well as low competition.
This will be your focus keyphrase. It’s the search phrase that your users are most likely to look for.
Let’s show you how to add your focus keyphrase using the best WordPress SEO plugin in the market, All in One SEO (AIOSEO). AIOSEO is one of the best WordPress SEO plugins on the market. The over 100 million downloads are a perfect testament to that. That’s why smart website owners use the plugin to help them boost their rankings and drive qualified traffic to their sites.
Once you’ve installed and activated AIOSEO on your site, you have access to all the best SEO tools and features. Examples include Link Assistant for building strategic links and IndexNow for immediate indexing of your new and edited content. These and other AIOSEO features will make your blog post SEO an easy and quick process.
FYI, AIOSEO has a free version, as well as Pro and Elite versions with more advanced features.
To get started with your blog post SEO, you can set the Focus Keyphrase in your post’s SEO settings. Just scroll down to the AIOSEO Settings and click on the General tab.
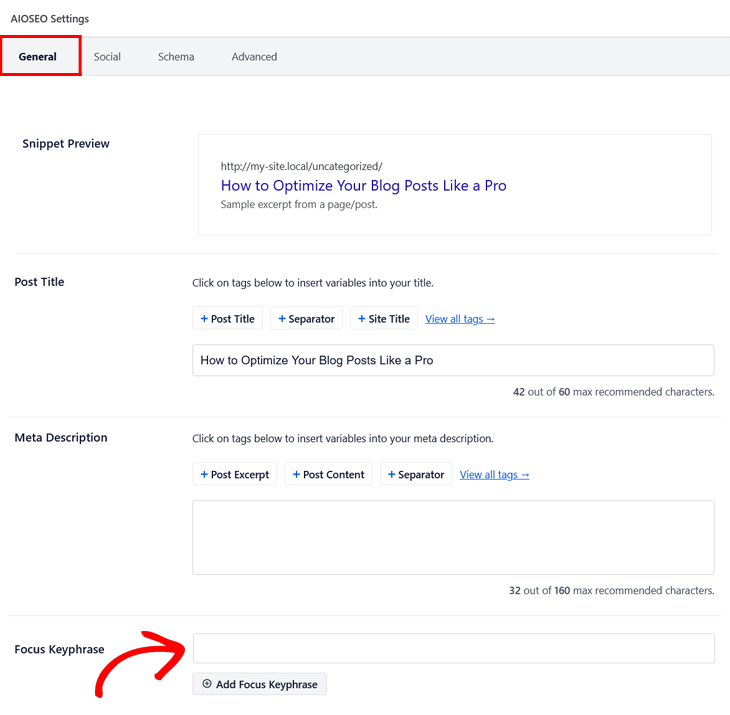
Here you can write your focus keyphrase and then click the Add Focus Keyphrase button. This allows you to see how effectively you’ve used your keyword in your blog post.
What’s great is that AIOSEO will give you a score of how well you’ve optimized for your focus keyphrase. Additionally, it will also give you suggestions on how to make improvements.
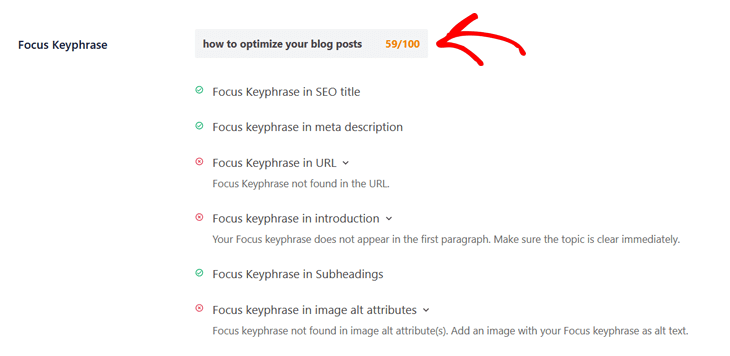
As you can see, there are a few improvements that need to be made, and by following these, you just can’t fail.
Overall, you should make sure that you use your target keyphrase at least once in the title, meta description, and URL. You should also use it pretty early on in your blog content, preferably the first paragraph.
But if it sounds unnatural, don’t force it. You should write for your readers first and Google second. We’ll tell you more about this a bit further down.
Find Related Keywords
The next thing you need to do is find your related keywords. Needless to mention, these are the searches related to your focus keyphrase.
The easiest way to find them is to simply enter your focus keyphrase in Google Search and scroll down to the bottom of the results. There you’ll find them listed as ‘related searches’.
These are related keywords for the keyphrase blog post SEO checklist:
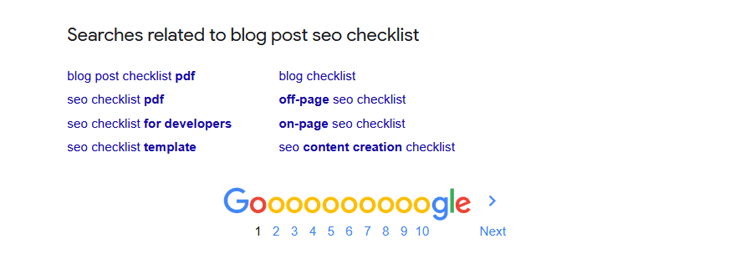
You need to incorporate as many of these keywords as you can in your content, so you can create the most complete content for users. You can also consider using tools like Clerascope and the Semrush Writing Assistant that give you suggestions on related words you can use in your blog post to make it more comprehensive and authoritative.
However, it’s important that you don’t stuff keywords and their alternatives in your content. This would look odd to your readers and search engines are pretty good at detecting keyword stuffing.
After that, you need to think about the purpose of your blog post and what questions you want to answer.
2. Understand Search Intent
Before you start writing, you should think carefully about the message of your blog post. What do you want to tell your readers or which central question do you want to answer?
You should also think about what search intent the reader may have. Search intent is basically the reason why someone conducts a specific search. Meeting a user’s search intent is important to consider as it will help you get readers to visit and stay on your page.
A good way to figure out the search intent is to look at the search results for the keyphrase you want to rank with and see what comes up.
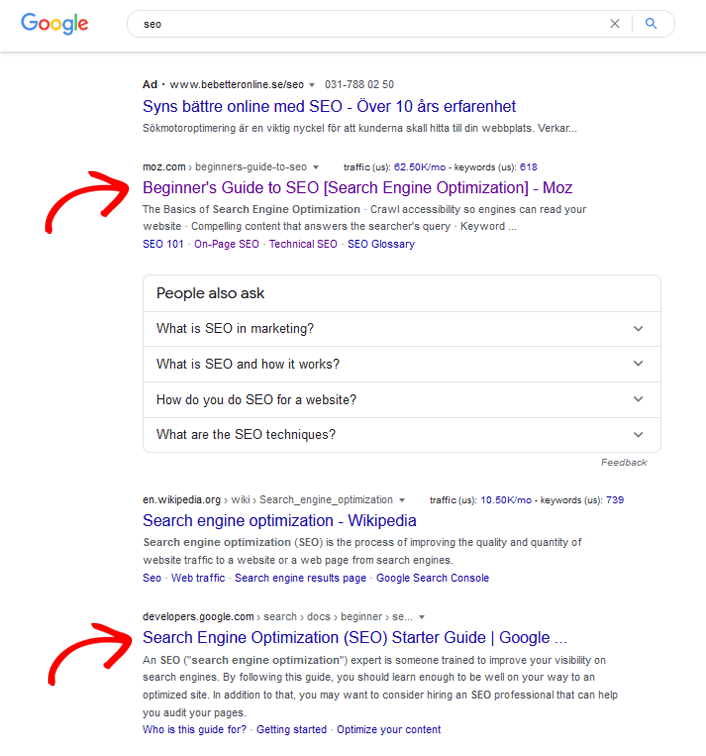
As you can see, Google tries to satisfy multiple intents for the search term: SEO. Both a beginner’s guide and a definition of what SEO is.
Although, a beginner or starter guide shows up 2 times, which tells us that most users are probably looking for a guide on SEO.
Besides Google, you can also use Semrush to help you determine the search intent of your keyword.
Now, let’s move on to what you need to focus on when creating content for your blog post.
3. Optimize the Length of Your Blog Post
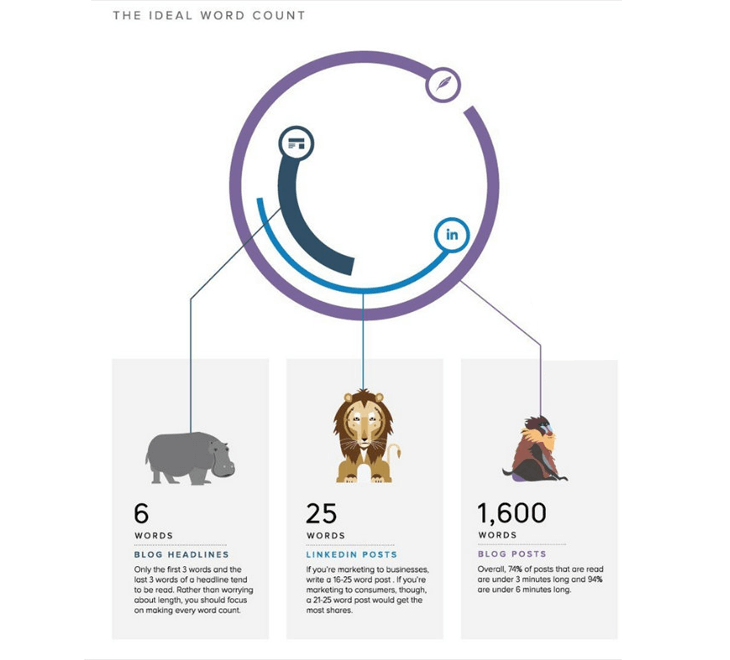
Image Source: Buffer Library
When optimizing the length of your blog post, you need to make sure it has a minimum of 300 words. However, keep the length of your post balanced. You don’t want it too long and you don’t want it too short.
Google likes long blog posts, but if they are too long, it can scare users away and they easily lose interest.
For blog SEO purposes, the ideal length is 2,100-2,400 words, according to HubSpot data.
However, we would recommend you only write long blog posts when you know you’re a skilled writer. Also, make sure every word adds value to your post, don’t add words just to increase the word count. Doing that will make your post less engaging and authoritative, resulting in higher bounce rates.
4. Focus on Readability
Did you know that users spend less than a second to decide whether they want to stay on a page or not?
This is why your blog post has to be interesting, engaging, and easy to read so that the readers want to stay on your site.
Readability is also an important factor for search engines. Blog posts that are easier to read often rank higher than posts that are difficult to read.
For this reason, your blog posts have to be both SEO-friendly and readable. For instance, nobody wants to read a big wall of text. That’s why you should always break up your content with shorter sentences, subheadings, images, quotes, and bullet lists—anything that will keep the reader glued to your blog post.
Analyze Readability and Improve Your Writing
AIOSEO automatically analyzes Readability issues and makes suggestions on how you can improve your writing in the Page Analysis section.
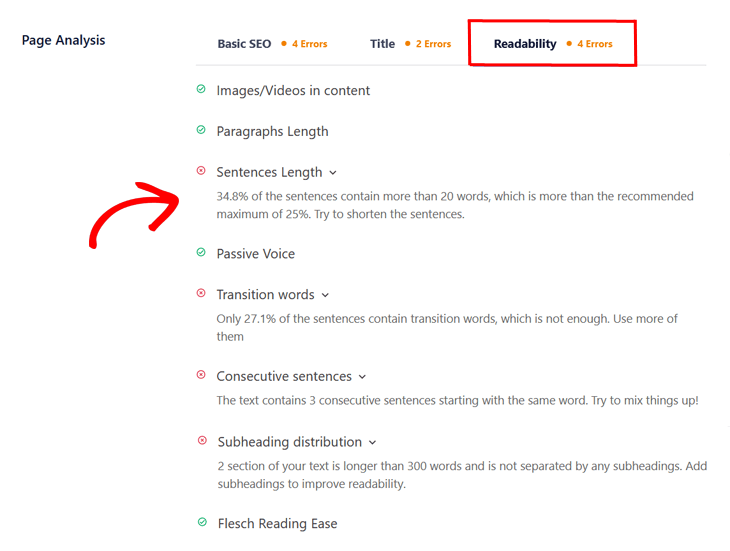
Here you can see that this blog post has 4 readability errors that need to be fixed, and AIOSEO makes recommendations on how to improve them.
You can also use tools like Grammarly, which allows you to check grammar, punctuation, and spelling on the fly.
For more on this topic, see WPBeginner’s post on how to improve the readability score of your blog posts.
Now, let’s move on to on-page SEO practices and one of the most important aspects of our SEO checklist, your blog post title.
5. Write a Captivating Blog Post Title
When users find your content in search results or RSS feeds, the first thing they see is your blog post or page title. Not only is that the first thing they’ll see, but it’s also extremely important for search engine rankings.
A good blog post title makes your post more relevant to the search query (the keyword combination users enter in search engines to find things they’re interested in).
More importantly, crafted well, it motivates users to actually click on your blog post when they see it in search results.
Use Your Keyphrase in the Title
The best way to make your blog post title more SEO-friendly is by using your focus keyphrase in the title.
In AIOSEO General Settings, you can type it directly in the Post Title field:
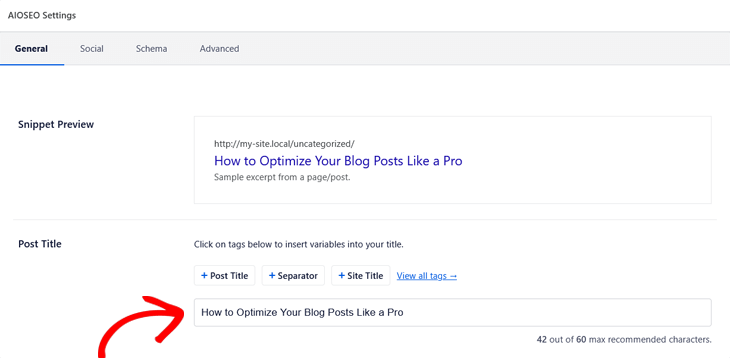
AIOSEO will even tell you the number of characters for your title. As you can see, it’s recommended to use a maximum of 60 characters for SEO purposes.
Aside from adding your focus keyphrase, we also recommend making your headline catchy and click-worthy. That’s because click-through rate (CTR) plays an important role in SEO as well.
Use Power Words in Your Title
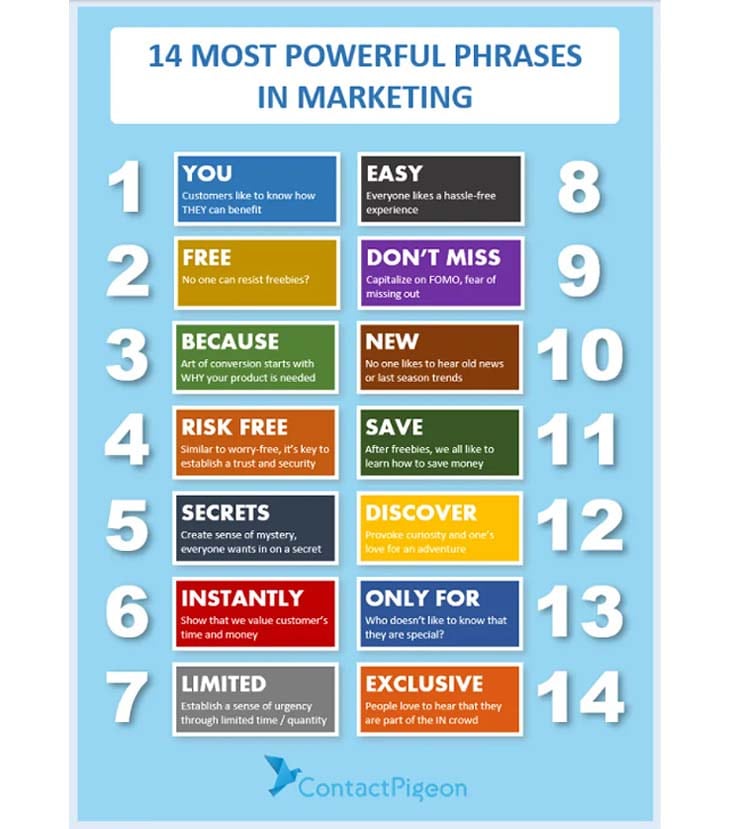
There are several formulas to write effective headlines, and the best is called EMV or Emotional Marketing Value. This formula recommends using power words that trigger specific emotional responses in your audience.
There are tools you can use that will help you write compelling titles. For example, AIOSEO comes with a powerful Headline Analyzer that helps you create optimized headlines.

You can find the Headline Analyzer in your AIOSEO dashboard by heading to SEO Analysis » Headline Analyzer. The Headline Analyzer gives you a score and suggests how you can improve your headline. Other headline analyzer tools you can consider include:
- MonsterInsights (the best Google Analytics plugin) comes with a built-in headline analyzer tool that gives you a headline score. It also includes real-time tips to improve your title for higher click-through rates.
- IsItWP Headline Analyzer, which helps you calculate your title’s EMV score.
We recommend that you write down a few potential titles, and then share them with your coworkers or friends to see what sort of reactions you get.
It’s also good to A/B test different types of headlines against each other. This will give you data-proven headlines that you know your audience likes.
With that said, let’s move on to adding a meta description to your blog post.
6. Add a Meta Description to Your Blog Post
A meta description is an HTML meta tag that you can add to any page. Its purpose is to provide a short description of your blog post for search engines and other crawlers. It’s also a good place to pitch your article to people as they scroll through search results pages (SERPs).
A good meta description can explain a lot about a blog post. To optimize yours, include your keyword and craft the description in such a way that it promises to meet search intent.
Another reason to invest time and effort in crafting your meta description is that social media websites like Twitter, Facebook, and LinkedIn also show it when your content is shared on those platforms. This encourages social media users to visit your site. In the screenshot below, you can see the title and description of one of Smash Balloon’s posts when shared on Twitter. This is set up using a Twitter Card. For more details, please check out how to add Twitter Cards in WordPress.
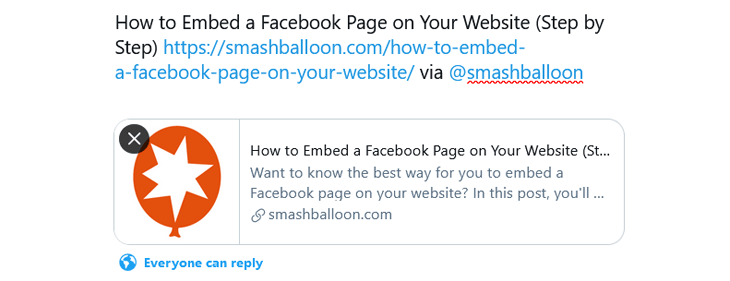
With AIOSEO, you can add your meta description to your blog post in seconds.
Just scroll down to the Meta Description field on your post edit screen and write it directly in the field or use the smart tags to add the different variables. For example, if you click on the + Post Excerpt tag, AIOSEO will use your post excerpt as the Meta Description.
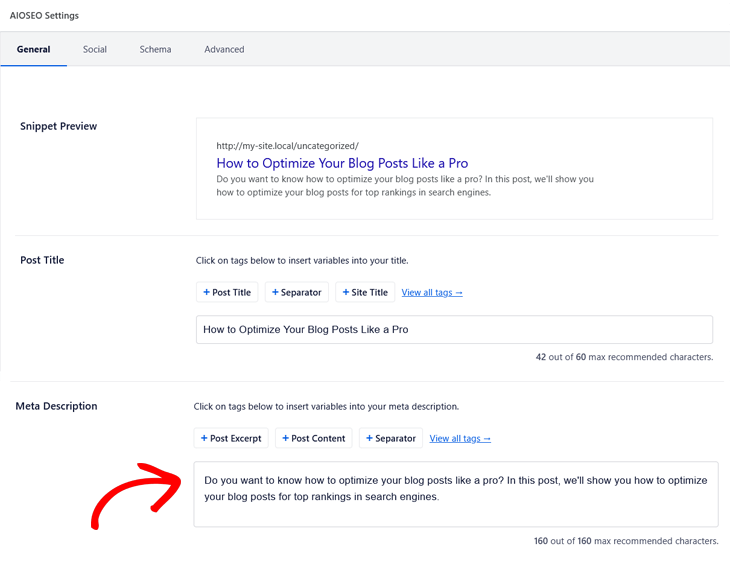
You want to make sure that you at least mention your focus keyphrase once in the meta description for search purposes. Also, use the focus keyphrase earlier in the meta description rather than later.
Additionally, the character limit for meta description is 160 characters. Try to stay within that limit or your meta description will be cut off after 160 characters.
Now that you know how to optimize the title and meta description, let’s have a look at the importance of internal and external linking.
7. Link to Relevant Internal and External Resources
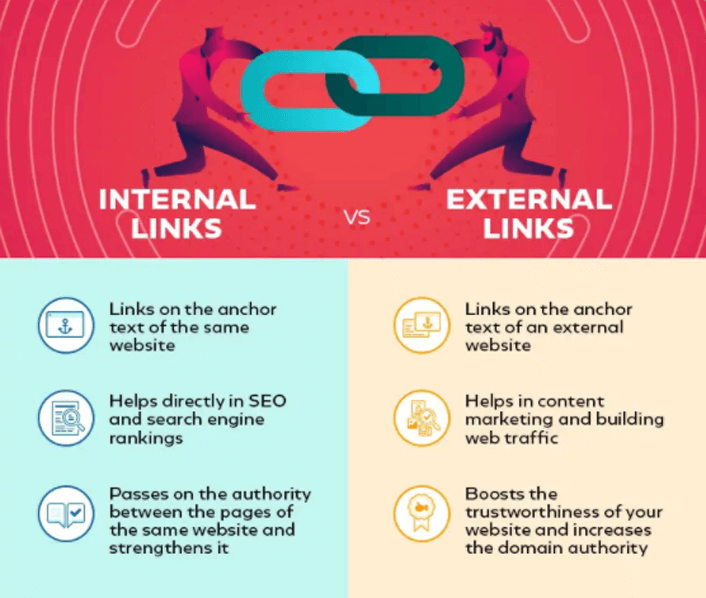
Image Source: Think Little Big
Statistics have shown that web pages that link out to high-DR (Domain Rating) resources rank higher than those that don’t. Domain Rating measures the strength of a site’s backlink profile, meaning how many pages link to that site.
It’s therefore good to link out to other sites. Just make sure you link to relevant, high-quality content.
Linking to another site should be done carefully though, as it will lead search engines to associate your site with those you’re linking to. This is why you must understand the difference between dofollow and nofollow links and when to use each.
Make Internal Linking a Habit
Internal links are also important. With internal linking, you can send new readers to check out your older relevant posts.
Moreover, internal linking is a great way to develop a relationship between your new and old posts. It also allows you to pass relevant link juice (link equity) to your older articles.
For this reason, making internal linking a habit will make sure that your on-page SEO is good, and that your older articles continue to get new links.
The Page Analysis feature in AIOSEO will let you know if you’ve forgotten to add Internal Links or if you need to add more of them to improve your SEO.

As you can see, this blog post hasn’t added any internal links yet.
Plus, AIOSEO has a powerful Link Assistant feature that will help you easily find new linking opportunities.
On your page or post’s AIOSEO Settings, you can click on the Link Assistant tab to see a list of relevant linking suggestions (including anchor text) that you can add to your content in 1-click.
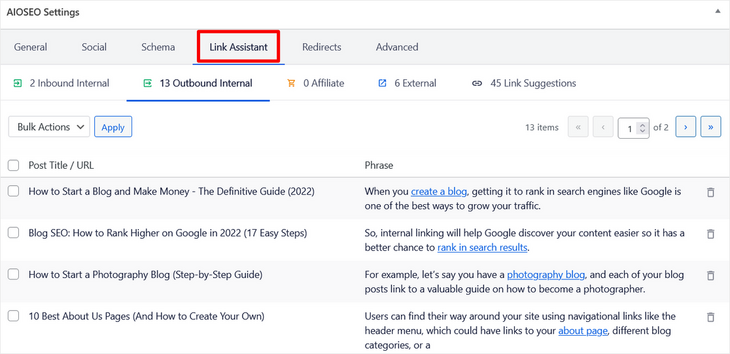
Many bloggers make the mistake of doing 1-way internal linking, where they link to older posts from new articles. You should also go back to edit older posts to link to your new articles for maximum benefits.
AIOSEO makes this easy too. The Link Assistant will crawl all of your site’s pages and automatically generate a Links Report that you can access by clicking on Link Assistant in the All in One SEO menu.
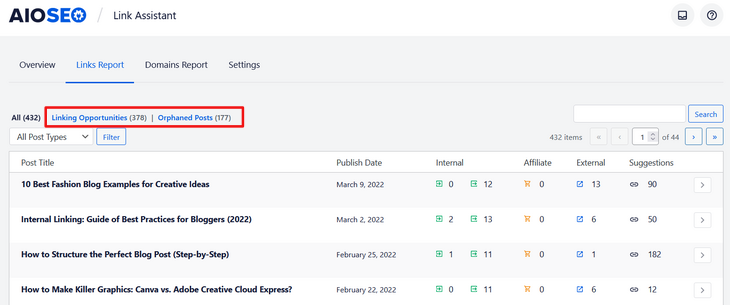
Here you can find linking opportunities for your old content. Again, you can select which linking suggestions you want to apply and add them to your content with the click of a button. No need to edit individual posts manually.
8. Add Images and Videos to Your Blog Posts

Image Source: Buffer Blog
Search engines often rank engaging content higher in search results. And images and videos are far more engaging than plain text.
You want to make sure that your blog post contains a featured image and images between paragraphs to make your content more eye-catching and interesting to read.
You can find royalty-free images to use on for example Canva or Pexels. But be wary of not using images with copyright.
Optimize Your Images and Videos
Image SEO is another important element to tick off your blog post SEO checklist. This is super easy when using the block editor in WordPress in conjunction with AIOSEO.
Let’s start with showing you how to optimize your images for your blog posts. But first, don’t forget to resize your images to fit the width of your post space and compress them for site speed purposes.
To compress PNG images, you can use TinyPNG, and for JPG images, you can use Compress JPEG. Believe us when we say it will make a huge difference for how fast your blog loads, and whether users will have the patience to wait.
Once you’ve uploaded an image in your blog content, the first step is to click on the image to make sure it’s marked. It will then display a blue frame around the image.
The next step is to add your Alt text in Image Settings to the right.
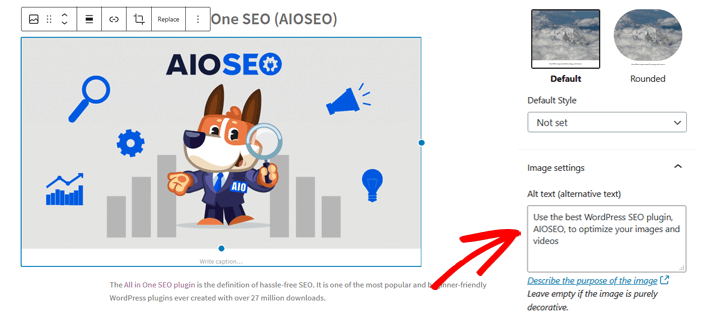
Don’t forget to check that you’ve chosen Block (for the block editor) in the settings of your post. You’ll find this setting in the top right corner of your page. If it’s set to Document, you won’t see the Image settings option.

Not less important, videos are even more engaging than images. You can convert your blog posts into videos by creating slideshows, vlogs, or experimenting with other formats.
However, you should never directly upload videos to your blog posts. WordPress is not optimized to serve videos, and your shared hosting service can’t handle them.
We recommend uploading your videos to YouTube and then embedding the video into your blog post. There are other video services you can use, but YouTube is the 2nd most popular search engine, and the second largest social media platform right after Facebook.
For more details, you can check out WPBeginner’s post on how to embed videos in WordPress.
9. Use Categories and Tags to Organize Content
Categories and tags help you sort your content not only for yourself but for the readers and search engines.
The problem is that many WordPress users often end up using them incorrectly. If you think about your site as a book, then categories would be the table of contents and tags will be the index part of the book.
Categories are used to divide your content into major topics discussed on your blog. Tags, on the other hand, are the topics discussed in an individual blog post.
To learn more, see WPBeginner’s guide on using categories and tags for maximum SEO benefit.
10. Write the Best Piece of Content on the Topic

Make sure to write the best piece of content on the topic. Search engines love articles that cover a topic in great detail.
You also want visitors to choose your blog post and link to it as a high-quality source. Backlinks are great for boosting rankings in search engines. And they show Google that your blog is publishing good content that other users recommend.
In fact, Google rewards sites with high-quality content and will give you more exposure.
So not only does great content make a better blog post, but it also improves your site’s rankings. This is also why we told you to gather related keywords as part of your content planning step.
These related keywords give you an idea of different variations of user searches regarding that particular topic. By covering those keywords in your article, you can make your content more comprehensive, informative, and useful.
Tips on How to Write the Best Content on a Topic
Here are some tips on how to write the best content on a topic:
- Create original content, not just copy other people’s content
- Write strong headlines that trigger specific emotional responses
- Make your content actionable, and give visitors a sense of how to apply the information
- Provide answers to questions
- Write engaging content and make readers want to reflect on your content
- Include videos and images to better illustrate your point and improve the overall user experience
- Be accurate when stating your sources, and don’t forget to set the appropriate authorship for the post — give credit where credit’s due!
- Optimize your site for speed and make sure you don’t lose your visitors before they even viewed your content
11. Encourage Social Media Shares
Content that’s shared more on social media ranks higher in search engines. More people will visit your site when they see something interesting you’ve shared on social media.
It also increases the likelihood that social media users will link to your content from their site or social media, which increases your rankings on Google.
To encourage social media shares you can:
- Include Social Media Icons on Your Blog – this is an easy way for readers to share your content with a few simple clicks.
- Encourage Users to Tweet a Link – with AIOSEO, you can add Twitter Cards that will make your Tweets stand out on Twitter and get more clicks and shares.
- Use a Lead Capture Plugin – a great option is to use a WordPress lead capture plugin like OptinMonster to create attention-grabbing popup campaigns that encourage users to share your content. You can also use it to grow your email list.
Finally, let’s take a look at the importance of optimizing your older blog posts.
12. Optimize Your Older Blog Posts

Many bloggers tend to forget about a blog post after they’ve published it. In fact, you’re far from finished optimizing your blog post for SEO once it’s published.
Here are a few things that you need to do after publishing your blog post:
- Review Your Older Blog Posts – go back and review your older blog posts. Did you write the best piece of content you could on the topic? You can always improve your writing and add more visual content.
- Add More Internal Links – after you’ve published a post, you can go back to relevant old articles and add a link to your new blog post. This gives your new articles link juice while also allowing users to discover them more easily.
- Track Search Rankings – after you’ve optimized a post for SEO, you need to keep track of your search engine rankings. This so you’ll know what to improve. For more details, check out WPBeginner’s guide on how to track search rankings for your blog posts.
- Update stats and sources: Don’t forget to check if the stats and sources you used and linked to are still relevant. Go through them all and update any that are outdated or replace broken links.
For this reason, we recommend that you optimize your old posts on a regular basis, so you can continue to improve your rankings.
Rank Your Content With This Blog Post SEO Checklist
To summarize this complete blog post SEO checklist, we want to share our final thoughts and remind you about a few things.
First of all, don’t forget to preview your blog post. After all, it’s the best way of ensuring that you see it the same way everyone else sees it when it’s live. This also helps you recognize any errors you haven’t seen from the back end.
Second of all, ask yourself: Have I done everything in my power to give my blog post the attention it deserves?
We hope this checklist helped you optimize your blog posts for SEO like a pro. If you follow these SEO practices, you’ll boost your rankings and drive more traffic to your website in no time.
And if you want to learn more about SEO, please visit our ultimate WordPress SEO guide. You may also want to check out our guide on how to do an SEO competitor analysis so that you can find out where you stand in relation to other bloggers and see what keywords they’re using.
Disclosure: Our content is reader-supported. This means if you click on some of our links, then we may earn a commission. We only recommend products that we believe will add value to our readers.

Thank you for sharing this post. It is very informative. So much information to take in.
Hey Namrata, we’re glad you found this post useful. Thanks for the encouraging comment.
Thanks alot, I am currently working on becoming an SEO Experts.
I have a blog I just setup
I am going to follow up all you have explained here to watch and see how my ranking will improve.
How can I know the accurate position of my current ranking?
Thank you so much!
I can say that it is the most detailed and useful SEO article I have ever read. Thank you.
Thank you for sharing this insight on SEO.This article was very helpful.
Benim için oldukça faydalı bir makale oldu. önerilerinizi volbiex.com sitemde uygulayacağım
Great information, thank you for sharing. I do wonder how if when targeting a keyword/keyphrase in the title, which is more important? The length, or getting the whole phrase in the title to optimize traffic? AIOSEO does suggest limiting title length to 60 characters, but a keyphrase may be well beyond that.
Thank you for your excellent posts. Really helpful for new and existing websites.
Our brand ‘The Connoisseur’ has been using AIOSEO for our own editorial page.
Thanks
I found this blog very informative, Keep up the good work.
Your viewpoint on topic is insightful. I appreciate the way you approached the subject and the useful insights you provided.
Extremely helpful. Keep them coming. Great info
Very useful SEO information for ranking website. Thanks for this information
will try as much as i can , good luck to me
Thank you for the information. I found this blog post so useful.
I set up a blog and I’ve been struggling to get visibility for it so this blog post is so helpful.
Fantastic checklist! This post covers all the essential SEO aspects comprehensively. Clear explanations make it a go-to guide for both beginners and experts. Ready to implement these tips for a solid ranking boost!
I appreciate it, free is better to test
Very helpful for beginners like us
Great tips! I will definitely review and update my older blog posts.
How much blog traffic will affect to my blog if I convert my blog name with different domain name?
Excellent post. Excellent tools too. Glad I’ve found your website
Great checklist! Your detailed SEO tips are incredibly helpful for both beginners and seasoned bloggers. Implementing these strategies will surely enhance search engine rankings. Thanks for sharing!