Wondering how to add event schema to a WordPress page? When event schema markup is added to a web page, that event can be showcased in Google Search.
This can create greater awareness of your events and more ticket sales.
In this step-by-step tutorial, we'll show you the easy way to add event schema to your WordPress web pages.
What you'll need: The All-in-One SEO (AIOSEO) plugin (Pro version).
In This Article
- What is Event Schema Markup?
- Why is Event Schema Markup Good for SEO?
- Step 1: Download the All-in-One SEO (AIOSEO) Plugin
- Step 2: Find and Click the Event Schema Button
- Step 3: Fill out the Event Schema Form
- Step 4: (Optional) Test Your Schema
- How to Edit Your Event Schema
- For Advanced Users
- Resources on Schema Markup
What is Event Schema Markup?
Event schema markup is a code added to a web page to help Google understand that page better.
The markup communicates “structured data” to Google. You can think of structured data as “tags” that only Google reads.
These tags give Google event details, like:
- Is it online or offline?
- Who's the organizer?
- Where can people buy tickets?
Why is Event Schema Markup Good for SEO?
Once this schema markup is added, your event page(s) will be eligible to be displayed in Google's “event experience.” This is an interactive event calendar that displays at the top of search results.
Here's an example, taken from a search for “Boston events.”
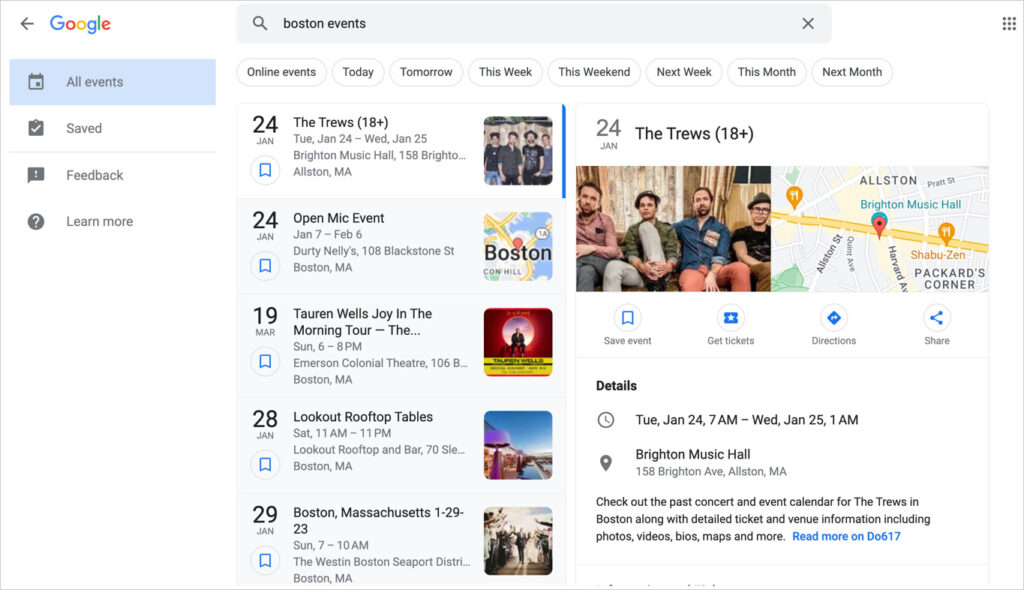
Each event includes information about the location (if it's an in-person event), a map, and a link for purchasing tickets.
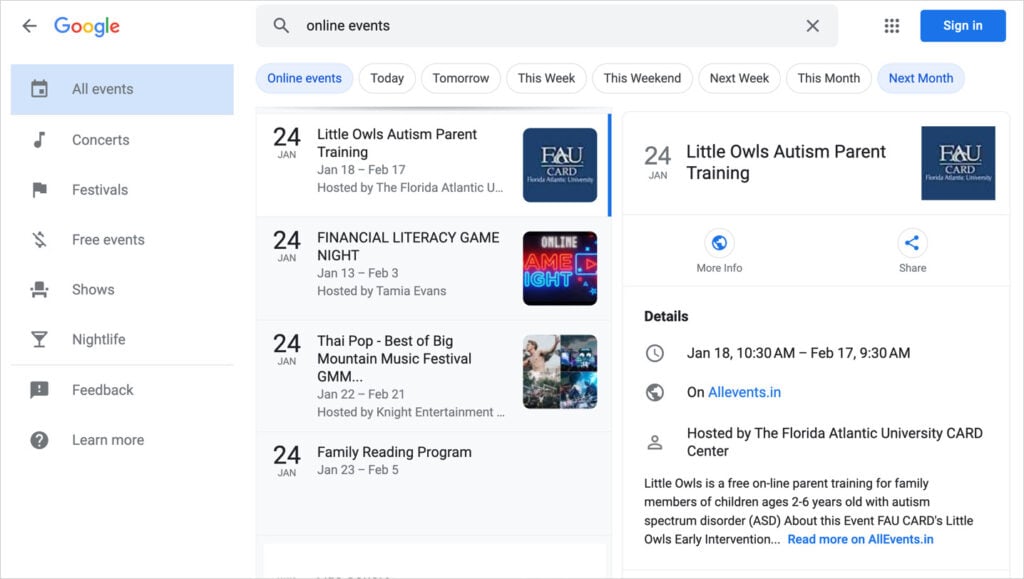
Searchers can also filter results by “online events.”
By adding event schema markup to your online or offline event, you can reach a larger audience, get more clicks, and sell more tickets.
Case study: When the 3rd-party event listing platform Eventbrite added event schema to their pages, they saw a 100% increase in traffic.
Adding event schema is easy. Let's get to it!
Step 1: Download the All-in-One SEO (AIOSEO) Plugin
We recommend that you download and install the All-in-One SEO (AIOSEO) plugin. This WordPress plugin makes adding event schema simple.
This plugin is currently used on over 3 million WordPress sites. And it has a strong profile on WordPress.org with thousands of 5-star ratings.

To get the plugin go to this page. (The plugin will download as a zip file).
Next, open your WordPress editor. In the left-hand navigation column go to Plugins » Add New. (Once you hover your mouse over “Plugins” you'll see the “Add New” option. Click on that.)

Now, click the Upload Plugin button at the top of the WordPress dashboard.

The plugin will open a wizard that will walk you through a few easy steps for adding your site information.
Now that you have the All-in-One SEO (AIOSEO) plugin installed, you're ready to add event schema.
Step 2: Find and Click the Event Schema Button
Navigate to a WordPress page that you want to add the event schema to.
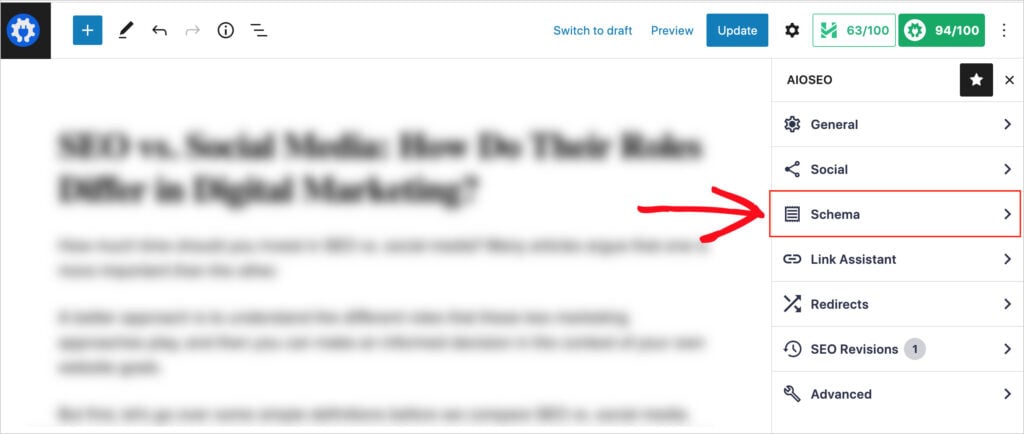
In the upper right-hand corner, click the AIOSEO button. (That will open AIOSEO settings.)

Then click Schema.
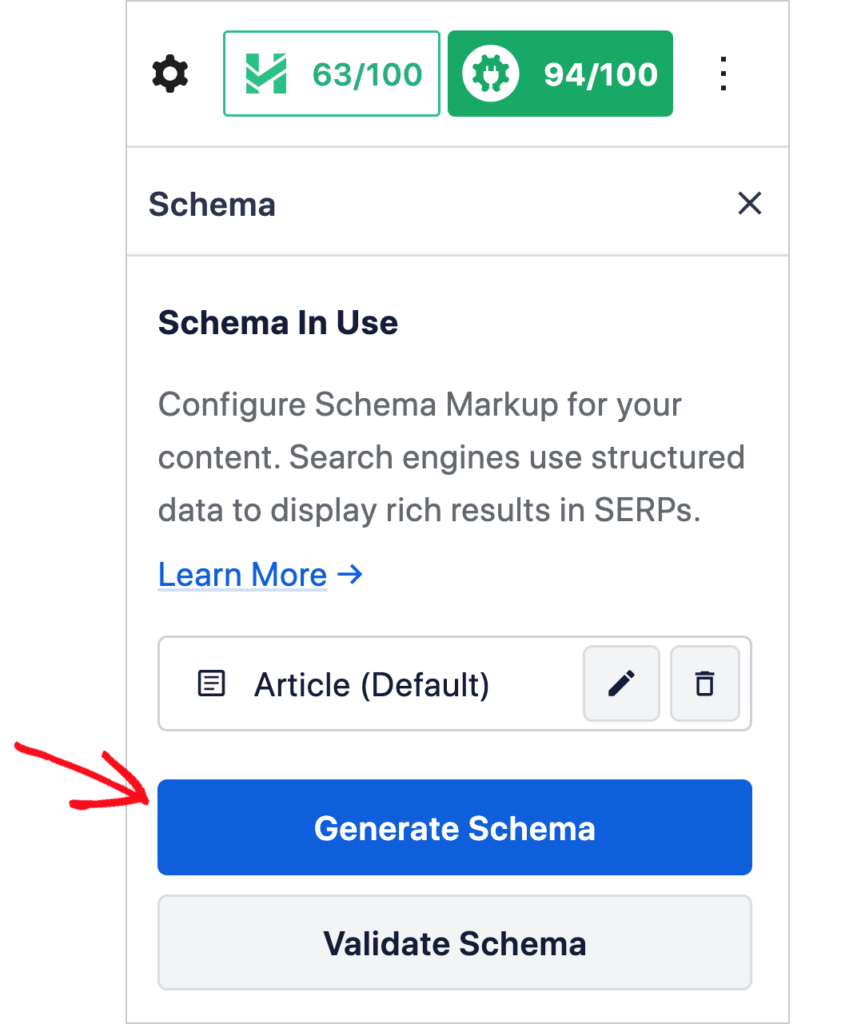
Now you can see a box called Schema in Use. This shows that the “Article” schema type has already been applied to your post. (By default, AIOSEO applies the Article type to all posts.)
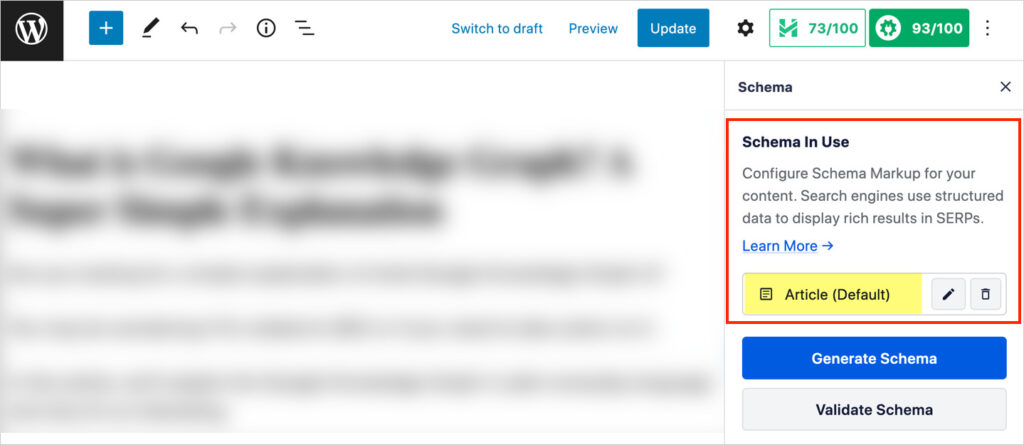
To add the event schema type, click the big blue Generate Schema button.
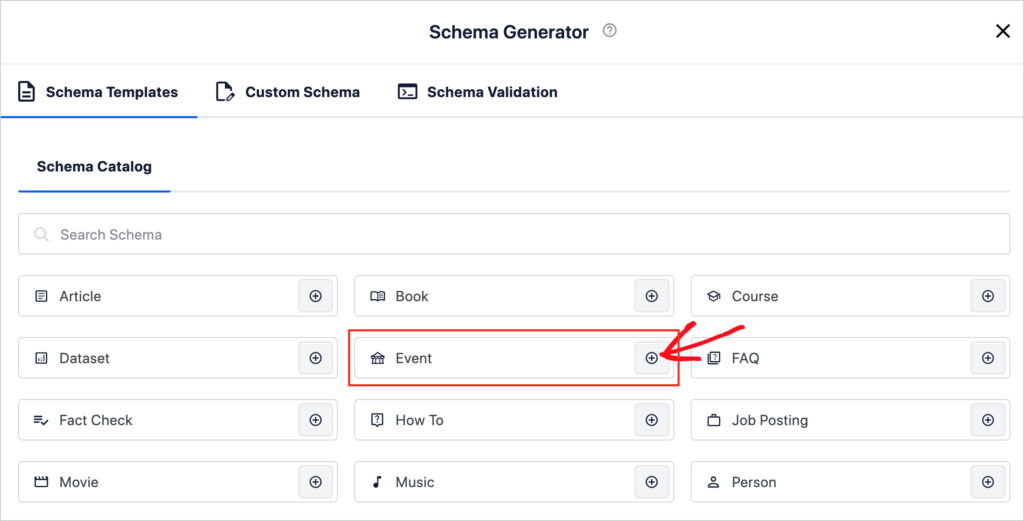
Now the Schema Catalog is visible.
You can see a list of buttons for adding different schema types to your post.
Find the Event button and click the plus icon on the right side of that button.
Step 3: Fill out the Event Schema Form
Now you'll see a pop-up window with an event form to fill out. (As you scroll down the window you'll see more items to fill in.)
First, fill in the Name and Description.
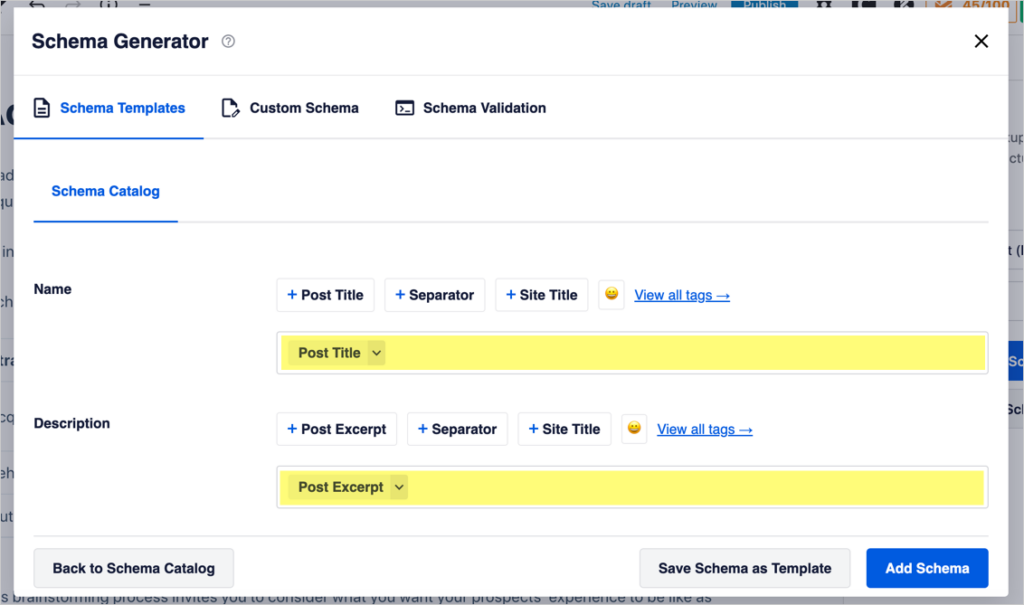
Name: This is the event name. The “Post Title” (or page title) is the default name. If you'd like a different name, then delete the “Post Title” placeholder and type in your event name.
Description: The default placeholder here is “Post Excerpt.” (This is an excerpt Google will pull from your page.) It's better to delete this placeholder and type in your description of the event.
Now, scroll down the pop-up window to fill in the remaining items.
- Type: This field has a drop-down menu you can select from. Choose the event type that most closely matches yours.
- Status: This field refers to scheduling. You have 5 options to choose from: Scheduled, Canceled, Postponed, Rescheduled, or Moved Online.
- Attendance Mode: Select 3 radio button options: Offline, Online, and Offline and Online (combination).
- Start Date and End Date: Click on the calendar icons at the right of each date field to select the date from a pop-up calendar.

Location
In this section, you'll fill in information about the venue (for offline events).
- Name: Leave this empty if the event is online.
- URL: This URL is for the physical location of the offline event. For example, if the event is being held in a hotel, you can add a link to the hotel website here.
- Street Address
- Locality: This is the city.
- Postal Code
- Region: In the U.S., this would be the state. In Canada, a province. And so on.
- Country
Offer
- Price: Add the ticket price. (Enter “0” if it's free.)
- Currency: Select from the dropdown the currency that your ticket price is in.
- Sale Start Date: This is the date on which ticket sales will begin.
- URL: This is the link where people can purchase tickets or register for free events.
Organizer
- Type: Person or Organization.
- Name: Add the name of the organizer.
- URL: Add the URL of the organizer's website or their social media profile.
Performer
If your event is a performance, then fill in this section.
- Type: Is the performer a Person or Organization (group)?
- Name: Add the performer's name.
- URL: Add a link to the performer's website.
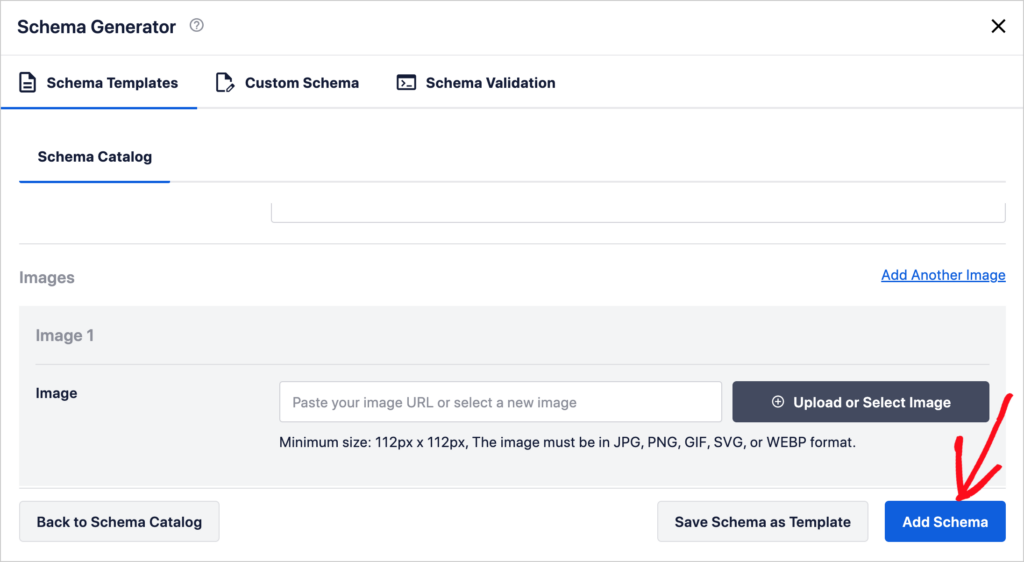
Images
Here you can add multiple images for the event.
These can be in JPG, PNG, GIF, SVG, or WEBP format.
Save Your Event Schema
Now that you've filled out the event schema form, click the blue Update Schema button to add it to your event page.
Step 4: (Optional) Test Your Schema
You can test your event schema right in the WordPress dashboard.
The All-in-One SEO plugin will enable you to run a test using Google's Rich Results Test tool. This tool validates the code (which has been added by AIOSEO) and can provide a visual preview of your page in Google search results.
Read more at How to Run a Rich Results Test.
How to Edit Your Event Schema
After you’ve saved your event schema you can edit it at any time.
To edit your event schema:
- Navigate to the page in the WordPress editor.
- Click on the AIOSEO button and then on Schema (see Step 2 above).
- Now, under Schema in Use, you'll see your Event schema button. Click the pencil icon to edit your event schema.

Nonprofits can benefit from using event schema too. Learn more about nonprofit SEO.
Google Requirements for Events Schema
It’s helpful to know that Google has some requirements for use of event schema. Here are some of the most important ones.
- Event schema is to be added to a page promoting a single event. (Not a page listing multiple events.)
- Each event “must have a unique URL.”
So you can add event schema markup to multiple event pages on your site, but each page needs to represent one single event.
Otherwise Google may prevent your event from displaying in its “events experience” display.
Read more about Google's events schema requirements.
Home activities can be listed as events too. These are activities you teach others (online) to do at home.
Additional Schema Types
AIOSEO users can choose from 18 types of schema supported by Google. These include schema for books, courses, authors, datasets, and software. And you can add more than one type to a page.
Here are two types of schema that may pair well with your event.
FAQ Schema
FAQ schema can be added to any web page that has FAQs on it. (The page doesn't need to be dedicated to FAQs only.)
So if your event page has FAQs on it, add this schema type. Doing so will make your page eligible to be displayed as a rich snippet.
Local SEO
If you're a business or nonprofit, then make sure you've set up your local SEO. This is easy with the All-in-One SEO (AIOSEO) plugin.
As you probably guessed, it just takes some button clicks and forms to fill out.
For Advanced Users
If you're learning code and would like to take a deeper dive into schema, consider these resources.
- Schema.org: This organization develops and maintains a library of schema types and vocabularies. Currently it houses over 800 types, but it's helpful to know that Google only uses 31.
- Learn more about structured data.
- Google recommends that schema markup be written in JSON-LD format. But it can also read schema markup in Microdata or RDFa.
- If you’re just starting out in coding, we recommend you try Codecademy’s HTML course. It’s free and will give you a foundation before tackling schema markup.
Q&A on Event Schema
Do I need to know code to add event schema markup to WordPress?
No, you do not need to know code to add event schema markup to WordPress. The easiest way to add schema markup is by using a plugin. You'll click some buttons and fill out some form fields. It's that simple.
Can I add more than one schema type to a web page?
Yes, you can add multiple schema types to a web page. For example, if a web page is promoting an event and has related FAQs, you could add event schema and FAQ schema.
Resources on Schema Markup
- What is Structured Data and How Does it Impact SEO
- How to Run a Rich Results Test in WordPress
- How to Implement Structured Data in WordPress
- How to Add Rich Snippets to Google the Easy Way
- How to Add Product Rich Snippets
- How to Add Shipping Information to Google Search Snippets
- Breadcrumb SEO: What Are Breadcrumbs and How Do They Affect SEO?
- How to Add Local Business Schema in WordPress
- How to Add Author Schema in WordPress
- What is Google Knowledge Graph?
- How to Create Custom Schema Markup in WordPress
What’s Next?
We hope this article helped you learn how to add event schema markup to your web pages.
You may also want to check out our introduction on how to add rich snippets. And small businesses will be interested in adding product rich snippets.
Also explore effective ways to capture leads with all that new traffic you'll get from your schema markup.
If you found this article helpful, then please subscribe to our YouTube Channel. You’ll find lots of helpful tutorials there. You can also follow us on Twitter, LinkedIn, or Facebook to stay in the loop.
Disclosure: Our content is reader-supported. This means if you click on some of our links, then we may earn a commission. We only recommend products that we believe will add value to our readers.
Want to Try AIOSEO for Free?
Enter the URL of your WordPress website to install AIOSEO Lite.