You've been publishing blog posts for months, but your organic traffic has flatlined. Or worse, it's dropping.
If your site is cluttered with old, thin, or duplicate content, those pages can drag down the performance of your entire site. No matter how great your new content is.
The fix? Content pruning.
But here's what most guides won't tell you: the hardest part isn't the deleting; it's the deciding. Which pages stay? Which ones go? What about a post that gets traffic for the completely wrong keyword?
In this guide, I'll cover what content pruning is, why it matters, and how to make those judgment calls step by step. (Not a WordPress user? No problem. The same framework applies.)
In This Article
Why You Should Trust Me
I've managed SEO content for WordPress sites that serve millions of users. I've planned and executed content audits and pruning sessions that led to measurable ranking improvements. The strategies in this guide are the same ones I use in my own workflow—not theory, but tested processes that work.
What Is Content Pruning?
Content pruning is the process of reviewing your existing content and removing, updating, or consolidating pages that no longer serve your site.
Think of it like trimming a tree. You don't cut down the whole tree—you remove the dead branches so the healthy ones can grow stronger. The same principle applies to your website.
By cutting away underperforming content, you give your best pages more room to rank.

Here's an important clarification: content pruning doesn't mean deleting everything that's more than a year old. It's a strategic, data-driven process. Some older posts are still driving traffic and earning backlinks—those stay.
The goal is to identify the pages that are actively hurting your site (or simply doing nothing) and take action on them.
5 Reasons Why Content Pruning Matters for SEO
If you've never pruned your content before, you're probably wondering whether it's worth the effort. Here are the top 5 content pruning SEO benefits:
1. It Improves Your Site's Overall Quality
Google doesn't evaluate your pages in isolation. It considers the overall quality of your entire site when determining rankings. If a large portion of your content is thin, outdated, or irrelevant, it sends a signal that your site isn't a reliable resource.
Think of it this way: if you have 200 pages and 80 of them are low-quality, Google sees a site where 40% of the content isn't worth showing to users. That drags down the other 60%, even if those pages are well-written and well-optimized.
When you prune that low-quality content, you raise the average quality of what's left. Google starts viewing your site as more authoritative, and your remaining pages have a better chance of ranking.
2. It Frees Up Your Crawl Budget
Your crawl budget is the number of pages search engine bots will crawl on your site within a given time frame. If your site has hundreds of low-value pages, Googlebot wastes time crawling content that doesn't deserve to rank, and your important pages get crawled less frequently.
Pruning removes those low-value pages from the equation. The result is faster crawling and indexing of the content that actually matters.
A quick caveat: crawl budget is mostly a concern for larger sites (1,000+ pages). If you have a small blog with 30 posts, crawl budget isn't your bottleneck. But quality and cannibalization still are, so don't skip pruning just because your site is small.
3. It Fixes Keyword Cannibalization
This is one of the sneakiest SEO problems, and I see it all the time. Keyword cannibalization occurs when you have multiple posts targeting the same (or very similar) keyword. Because of this, they end up competing each other in search results.
And when Google can't figure out which page to rank, neither one ranks well.
I've run into this problem even at AIOSEO. We had 3 different blog posts all targeting “best WordPress SEO plugins” (or some close variation). Each was slightly different, but none were ranking above page 3. After consolidating them into a single, comprehensive post, the merged page jumped to page 1 within 6 weeks.
Ultimately, content pruning helps you consolidate competing pages into a single, stronger post that Google can rank with confidence.
4. It Creates a Better User Experience
Imagine clicking on a search result and landing on a blog post with outdated statistics, broken links, and advice that no longer applies. That's frustrating. And it destroys trust.
This is especially dangerous for small businesses. If a potential customer lands on a page with wrong pricing, discontinued features, or advice from 4 years ago, they're not just leaving your site. They're forming an opinion about your brand.
Pruning ensures your visitors only find accurate, helpful, up-to-date content on your site. This improves engagement metrics like time on page and bounce rate, both of which are signals Google pays attention to.
5. It Strengthens Your Internal Link Structure
Every time you link from one page to another on your site, you're passing link equity. But when you're linking to low-quality or irrelevant pages, that equity gets wasted.
After pruning, your internal links only point to high-quality, relevant pages. That concentrated link equity helps your best content rank even higher.
When Should You Prune Your Content?
Content pruning isn't a one-time project. It should be a regular part of your content maintenance strategy.
Here's when to consider it:
- Your site has at least 6–12 months of published content. Newer posts need time to gain traction, so don't prune too early. Give your content a fair chance to perform before making decisions. I've seen people panic-delete posts after 3 months when the content just hadn't been indexed long enough. Be patient.
- Every 6–12 months as routine maintenance. If you publish multiple posts per week, aim for every 3–6 months. For sites that publish less frequently, an annual audit works.
- After a Google core update causes traffic drops. Algorithm updates often penalize sites with too much low-quality content. A pruning session can help you recover.
- When you're shifting your content strategy or business focus. If your business has evolved, older content might no longer align with what you want to rank for. I've worked with sites that pivoted their niche and were still carrying dozens of posts from the old focus. Those pages were confusing Google about what the site was about.
How to Prune Content on Your WordPress Site
Here's the step-by-step process I follow for content pruning. I'll be using All in One SEO (AIOSEO) to walk through this process since it keeps everything inside WordPress, but the same 6-step framework applies regardless of what platform or tools you're using.

AIOSEO is a WordPress SEO plugin used by over 3 million websites. It includes built-in tools for optimizing your content, tracking its performance, running site audits, and more—all from your WordPress dashboard. That makes it a natural fit for content pruning because every step of the process can happen in one place.
Step 1: Run a Content Audit
Before you prune anything, you need a clear picture of how your content is performing.
The best place to start is Google Search Console (GSC). It tracks clicks, impressions, average position, and click-through rate (CTR) for every page on your site.
You can find this data in the Performance Report.

If you don't already have GSC set up, do that first. (This GSC verification tutorial shows you how.) It's free, and you'll need this data to make informed pruning decisions.
You can export your performance report to a spreadsheet and start analyzing from there.
If you're on WordPress, AIOSEO's Search Statistics feature pulls all this GSC data directly into your dashboard so you don't have to switch between tools.

Its Content Rankings report also adds something GSC doesn't offer on its own: content decay insights for every post and page. These metrics show you which pages are dropping in performance over time. In other words, your top candidates for pruning.
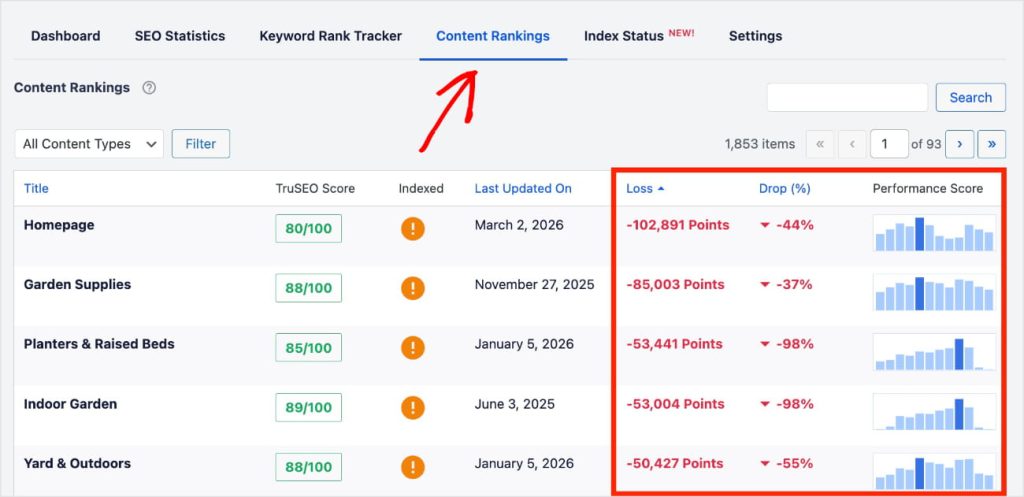
Content decay is the natural decline of a page performance over time. It's a normal part of SEO, which is why monitoring your most important pages and making updates is so critical.
I like how the default view shows your biggest losses first because it makes it easier to prioritize which pages need your attention. You can always change this view, though, by clicking the “Loss” column header to see your winners first.
Now, it's time to dive into the data.
Pro Tip: If you're working directly in GSC, I recommend exporting your performance report to a spreadsheet. This will help you perform the analysis in our next step.
If you're using AIOSEO, you can just analyze the data in your dashboard.
Step 2: Evaluate Each Page
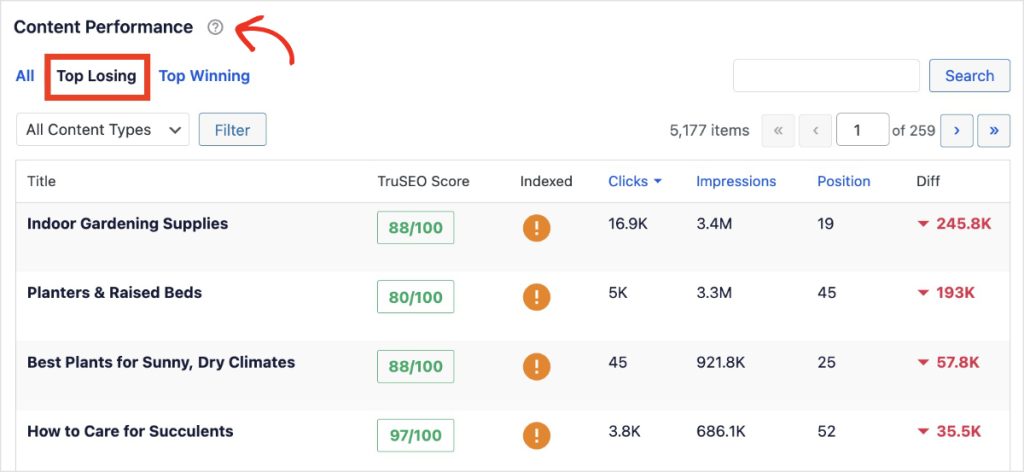
Now, return to the SEO Statistics tab from earlier and scroll down until you see the Content Performance report. Similarly to the Content Rankings report, I like to view my pages in descending order of SEO performance. To do this, click the Top Losing tab.
Here's the part where most people get stuck, and where most pruning guides give you vague advice like “evaluate your content.”
Let me be more specific.
Go through your Content Performance report (or your spreadsheet) and evaluate each page. But don't just look at a single metric and make a snap decision. Context matters.
Here's what I look at and how I think about it:
Clicks
How many clicks has this page received in the past 12 months? Pages with fewer than 100 clicks over a full year are worth reviewing closely. But don't auto-delete based on clicks alone. A page targeting a low-volume, high-intent keyword might only get 50 clicks a year and still be worth keeping if those clicks lead to conversions.
Impressions vs. Clicks
This is where it gets interesting. High impressions but low clicks usually means one of two things:
- Your page is ranking on page 2 (visible but not clicked) or…
- It's ranking on page 1 but the title and meta description aren't compelling enough to earn the click.
These are often your best refresh candidates, not removal candidates. A better title and meta description could unlock traffic that's already there.
TruSEO Score
AIOSEO's TruSEO On-Page Analysis gives each page a score based on how well it's optimized. Low scores signal thin or poorly optimized content. But I use this more as a tiebreaker than a primary metric. A page with a low TruSEO score but strong traffic is doing something right. Figure out what that is before you touch it.
Position
Is the page buried at position 50+ with no hope, or is it sitting at position 12 where a content refresh could push it to page 1? Pages in the 8–15 range are often your highest-ROI pruning targets because they're close to visibility. A consolidation or refresh could be all it takes.
Backlinks
Check whether the page has earned any backlinks. You can find this data in Google Search Console's Links report or a tool like Semrush. Even a low-traffic page with strong backlinks has value. Don't delete it without redirecting. I've seen people nuke pages with 15+ referring domains and watch their site authority drop, all because they only looked at traffic numbers.
Pro Tip: In addition to Search Statistics, use the SEO Audit Checklist to run a site-wide scan. It flags missing meta descriptions, thin content, broken links, and other technical issues that help you identify problematic pages faster.

Step 3: Label Each Page With an Action
Based on your evaluation, assign one of 4 labels to each page:
| Metric Signals | Action | AIOSEO Tool |
|---|---|---|
| Good traffic, strong TruSEO score, earning backlinks | Keep — no changes needed | Search Statistics (to monitor) |
| Relevant topic, but outdated info or low TruSEO score | Update/Refresh — rewrite and re-optimize | TruSEO On-Page Analysis |
| Multiple pages targeting the same keyword | Consolidate — merge into one stronger post | Search Statistics + Redirection Manager |
| No traffic, no backlinks, irrelevant topic | Remove — delete and redirect | Redirection Manager |
Now, the table makes this look clean and simple. In reality, there are gray areas. Here are the judgment calls I run into most often:
🔷 Scenario 1: The page gets traffic, but for the wrong keyword.
This happens more than you'd think. You wrote a post about “WordPress backup plugins” but it's ranking for “how to back up WordPress manually.” The traffic looks decent, but it's attracting the wrong audience and probably has a high bounce rate. In this case, I'd either rewrite the post to match the keyword it's actually ranking for (if that keyword is valuable to us), or consolidate it with a page that's a better fit.
🔷 Scenario 2: The page has backlinks but zero traffic and an irrelevant topic.
Don't delete it. Redirect it to your most relevant page. Those backlinks are passing authority to your site, and a redirect preserves that value. I've seen people lose noticeable authority by deleting pages with strong link profiles.
🔷 Scenario 3: The page is decent but overlaps with another page.
This is the most common scenario, and it's where consolidation shines. Pick the stronger URL, merge the best content from both, and redirect the weaker one. In my experience, the biggest wins come from consolidating cannibalized posts. Merging 2–3 weak articles into 1 comprehensive guide almost always produces a noticeable ranking boost.
🔷 Scenario 4: You're not sure.
When in doubt, don't delete. Refresh instead. You can always come back and prune more aggressively later. It's much harder to recover from deleting something you shouldn't have.
Step 4: Execute Your Pruning Decisions
Now it's time to prune! Here's how to handle each action:
Updating/Refreshing
Open the post in your WordPress editor and refresh outdated statistics, examples, and screenshots. Use TruSEO to re-optimize for your focus keyword. Make sure the SEO title and meta description are compelling; this alone can dramatically improve CTR for pages that are already ranking.
Re-read the entire post as if you're a first-time visitor. Does the intro still hook you? Does the advice still hold? Are there sections that feel thin or dated? A real refresh means treating the post like a new piece of content that happens to live on an existing URL.
For a deeper dive, check out our guide on how to optimize existing content.
Consolidating
Pick the strongest URL (the one with the most traffic or backlinks) as your “winner.” Merge the best content from the other pages into it. This isn't just copy-pasting. You need to create a cohesive, well-structured post that's better than either original.
Then, set up 301 redirects from the old URLs to the consolidated page using the Redirection Manager. This preserves the link equity from the old pages and prevents 404 errors.
One mistake I see often: People consolidate the content but forget to update the internal links pointing to the old URLs. Those links still work (they redirect), but a chain of redirects is never as clean as a direct link. Update them.
Removing
For pages with no traffic, no backlinks, and no relevance, delete them. Use the Redirection Manager to add a permanent (301) redirect to the most relevant remaining page on your site. If no closely related page exists, use a 410 status code instead, which tells search engines the page is permanently gone.
You should also check for backlinks before deleting. If a page has earned links from other websites, redirect it rather than hard-deleting. Those backlinks are valuable, and a redirect preserves that SEO value.
A 301 redirect tells search engines “this page has moved permanently to a new location” and passes most of the original page's link equity.
A 410 status code tells search engines “this page is gone for good.” Use it when there's no logical redirect target.
Never just delete a page and leave a 404 error behind.
Not on WordPress? Most CMS platforms and hosting providers offer their own redirect tools, or you can set up 301 redirects manually via your .htaccess file or server configuration.
Step 5: Clean Up Internal Links
This is the step everybody skips. Don't.
After pruning, your internal link structure will have gaps. Pages you deleted or redirected might have been linked from other posts on your site.
Use Broken Link Checker (BLC) to audit your internal links. It scans your entire site and shows you which pages have broken links, so you don't have to look for them one by one.

But finding broken links is only half the job. The bigger opportunity is rebuilding.
After pruning, you have a cleaner, more focused site. Take 30 minutes to add new internal links between your remaining posts. Your consolidated pages are especially good link targets. They're comprehensive, cover a topic in depth, deserve to receive link equity from related content.
(If you're using a different CMS, tools like Screaming Frog or Ahrefs can run a similar internal link audit across your site.)
Step 6: Monitor the Results
Content pruning isn't a “set it and forget it” task. After you've made your changes, you need to track what happens.
Go back to your Search Statistics Dashboard and watch for changes in your performance over the next 4–12 weeks. You should see improvements in ranking positions, CTRs, and impressions for the pages you kept and refreshed.

You can also use the Keyword Rank Tracker (also located in Search Statistics) to monitor specific keywords you're targeting. If you notice an increase in total keywords, that signals you're headed in the right direction.
What to watch for specifically:
- Consolidated pages climbing in rankings: This is the clearest signal that your pruning worked. If a page that was stuck at position 15 moves to position 7 after you merged competing content into it, cannibalization was the problem and you solved it.
- Impressions increasing across remaining pages: This means Google is crawling and serving your content more often, a sign that your overall site quality improved.
- No change after 8–12 weeks: Don't panic, but do revisit. You might need to refresh the content further, build more internal links, or address technical issues flagged in the SEO Audit Checklist. Sometimes pruning just reveals the next problem to solve.
And there you have it. Now you know how to prune content in WordPress.
Content Pruning Mistakes to Avoid
Even experienced site owners make mistakes when pruning. Here are the most common ones:
- Deleting pages with valuable backlinks without redirecting. This is the #1 mistake. Those backlinks are sending authority to your site. If you delete the page without a 301 redirect, that authority disappears.
- Pruning too aggressively all at once. Don't delete 50 pages in one day. Prune in batches so you can monitor the impact of each round. If something goes wrong, you'll know exactly which changes caused the problem.
- Removing pages based on age alone. An old page isn't automatically a bad page. If it's still driving traffic, earning backlinks, or serving a useful purpose, keep it (and refresh it if needed).
- Forgetting to update your XML sitemap. After pruning, make sure your sitemap no longer includes deleted pages. AIOSEO handles this automatically when you delete or redirect content, but it's worth double-checking.
- Skipping the redirect step entirely. Leaving 404 errors behind hurts your SEO and your user experience. Always redirect deleted pages to the most relevant alternative.
- Only pruning once and calling it done. Content pruning is a practice, not a project. Your site is always changing, and content that performs well today can decay tomorrow. Build pruning into your regular workflow.
How Often Should You Prune Your Content?
There's no one-size-fits-all answer, but here's a general framework:
- Most WordPress sites: Every 6–12 months. This keeps your content library lean and your SEO healthy without overwhelming you.
- High-volume publishers (multiple posts per week): Every 3–6 months. When you're publishing frequently, low-quality pages accumulate faster.
- After major Google core updates: Run a quick audit to see if any of your pages were affected. Pruning can help you recover from algorithm-related traffic drops.
The good news is that your first pruning session is always the hardest. Once you've done the initial cleanup, future sessions are faster because you're only reviewing the content published since your last audit.
Pro Tip: Keep a simple log of every pruning decision you make (what you deleted, what you redirected where, what you consolidated, and the date). It makes future audits faster, and it gives you a paper trail if you ever need to troubleshoot a traffic change.
Start Pruning Your WordPress Content
Content pruning is one of the most effective SEO strategies you can use. By removing the deadweight from your site, you help Google (and your visitors) focus on the content that actually matters.
Here's a quick recap of the process:
- Run a content audit with Search Statistics.
- Evaluate each page on traffic, backlinks, and quality.
- Label every page: keep, refresh, consolidate, or remove.
- Execute your decisions (with redirects for anything you delete or merge).
- Clean up internal links with Broken Link Checker.
- Monitor the impact over the following weeks.
If you're running a WordPress site, AIOSEO makes this entire workflow easy to manage without leaving your dashboard. From identifying decaying content with Search Statistics to setting up 301 redirects with Redirection Manager, every step happens right inside WordPress.
Ready to clean up your content and boost your rankings?
For more strategies to keep your content performing at its best, check out our SEO audit guide and our WordPress SEO guide.
And for even more WordPress tutorials, subscribe to our YouTube Channel. You can also follow us on X (Twitter), LinkedIn, or Facebook to stay in the loop.
Content Pruning FAQs
What is content pruning in SEO?
Content pruning is the process of auditing your existing content and removing, updating, or consolidating underperforming pages to improve your site's overall SEO performance. The goal is to keep only high-quality, relevant content that serves your audience and ranks well in search.
Does deleting old content help SEO?
It can, but only when done strategically. Deleting thin, outdated, or irrelevant content that gets no traffic and has no backlinks can improve your site's overall quality in Google's eyes. But you should never delete content blindly—always check performance data and backlinks first, and use 301 redirects to preserve any existing link equity.
How do you decide which content to prune?
Look at key metrics: organic traffic, impressions, backlinks, and how recently the content was updated. Pages with minimal traffic, no backlinks, and outdated information are strong candidates for removal or consolidation. Pages with a relevant topic but weak execution are better candidates for a refresh.
What's the difference between content pruning and content refreshing?
Content refreshing means updating an existing page—adding new information, fixing outdated stats, and re-optimizing for SEO. Content pruning is the broader process of deciding what to keep, refresh, consolidate, or remove. Refreshing is one action within the pruning process.
Can content pruning hurt your rankings?
It can if done carelessly—for example, deleting pages that have strong backlinks without redirecting them, or removing too many pages at once. That's why it's important to prune in batches, always use redirects, and monitor the results. When done correctly, content pruning consistently improves rankings.
How long does it take to see results from content pruning?
Most sites start seeing improvements in rankings, impressions, and traffic within 4–12 weeks. The timeline depends on your site's size, how much you pruned, and how frequently Google recrawls your pages. Larger pruning sessions may take longer to show full results.
Disclosure: Our content is reader-supported. This means if you click on some of our links, then we may earn a commission. We only recommend products that we believe will add value to our readers.
Want to Try AIOSEO for Free?
Enter the URL of your WordPress website to install AIOSEO Lite.