
Do you want to know how to index your website on Google so it’ll show up in search results?
Google uses its index to look for the most relevant content to match users' search queries. This means if your website isn’t indexed, it doesn’t exist in Google’s database, and it won't rank for relevant search terms. And that would be bad news if you want to drive organic traffic to your site.
In this article, we’ll show you some quick and easy ways to index your website on Google. We’ll also explain what Google’s index is and how to check if Google has indexed your site.
In This Article
- What Is Google’s Index?
- How to Index Your Website on Google
- 1. Check WordPress Settings for Search Engine Visibility
- 2. Submit Your Website to Google Search Console
- 3. Create an XML Sitemap
- AIOSEO's Use Cases for Indexing Your Website on Google
- 4. Submit Your Sitemap to Google Search Console
- 5. Leverage the IndexNow Protocol
- 6. Optimize Your Robots.txt File
- 7. Check Your Noindex Tags
- 8. Remove Nofollow Links
- 9. Create Internal Links on Your Website
- 10. Build High-Quality Backlinks
- Indexing Troubleshooting Matrix
- How to Check If Google Has Indexed Your Website
- How to Get Indexed on Google: Your FAQs Answered
What Is Google’s Index?
Google’s index is simply a list of all the web pages that Google has crawled and knows about. If Google doesn’t index your website, it won't appear in search results.
No one would find your site, which wouldn’t be good for business… Now, you probably understand why indexing is crucial to rank on Google.
Since there are a lot of complicated words in this post, we'll start by defining a few key terms so you know what we’re talking about:
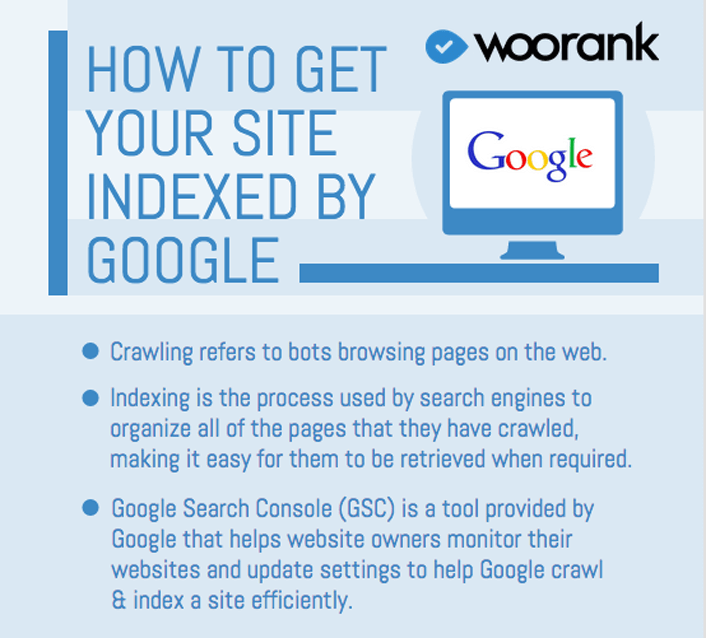
- Crawling – the process of following hyperlinks on the web to discover new content
- Indexing – the process of storing web pages in a Google index (database)
- Googlebot/web spider – Google's software that systematically searches the web for new content by following links
You can easily use AIOSEO to check the index status of your posts and pages.

This will help you easily keep tabs on the index status of your pages.
You can also consider other Google index checker tools to check your page's index status.
Now that you know what these key terms mean, let’s take a look at how to index your website on Google next.
TLDR
This section contains all the important things you need to know about indexing your website on Google.
Before you can rank, Google needs to crawl and index your pages. Proper sitemaps, clean links, and structured content help search engines discover your site faster, ensuring your pages appear in search results quickly.
Indexing is how Google finds your website.
AI tools generate content rapidly but often forget essentials such as internal links, schema, metadata, and sitemaps. This leads to slow or incomplete indexing. Adding structured data and a proper crawl path ensures Google recognizes pages as valuable.
Structured data using Schema Markup tells Google what your page contains—articles, FAQs, products, or reviews. This additional clarity improves crawling accuracy and increases your chance of getting indexed faster and more completely.
If Google isn’t finding your pages, you’ll need to generate and submit XML sitemaps manually or automatically. You can also force indexing by submitting URLs through Search Console’s URL Inspection tool.
Google indexes pages faster when your site structure is organized. Good internal linking, optimized metadata, and proper canonical tags eliminate confusion and improve crawl efficiency, especially for large or AI-generated sites.
Running a free SEO audit, seo checker, or website audit regularly helps identify pages that aren’t indexed, have crawl issues, contain broken schema, or lack critical signals. Consistent monitoring = better indexing.
Using the AIOSEO Schema Markup plugin ensures thatevery page has valid, high-quality structured data that search engines rely on for indexing and rich results. This prevents manual errors and boosts indexing consistency across your site.
Submit your sitemap, fix crawl blockers, add internal links, add schema, and request indexing in Google Search Console.
Google has seen the URL but did not store it due to weak signals such as thin content, duplicate content, missing internal links, or slow performance. Sometimes the indexing queue is long, so it might take Google longer to index the page.
How to Index Your Website on Google
As mentioned, Google uses its index to look for and show the most relevant content when users are performing a search. This means that Google needs to be able to find your website to index and show it in search results.
Luckily, you can do a few things to ensure the search giant will index your site. It all starts with having a powerful WordPress SEO plugin like All In One SEO (AIOSEO) installed on your site.

AIOSEO is the best WordPress SEO plugin on the market, boasting over 3 million active installs. Millions of savvy website owners and marketers trust the plugin to help them dominate SERPs and drive relevant site traffic.
It also has many powerful SEO features and modules to help you optimize your website for crawlability and indexability.
Here's how to install AIOSEO on your site if you haven't already.
Let's dive into the ways you can improve your indexing so you see AIOSEO's features in action.
1. Check WordPress Settings for Search Engine Visibility
First, you should ensure your WordPress site is visible to search engines.
You can easily check this by going to the Settings » Reading page and scrolling down to the Search Engine Visibility option.
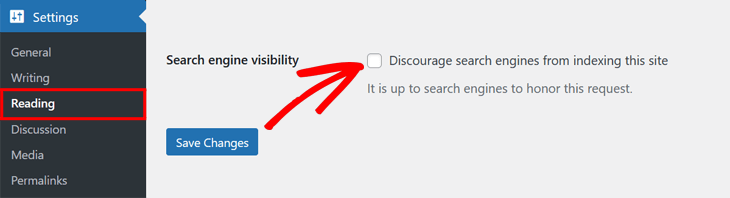
Make sure to remove the check mark from this option so search engines can index and crawl your website.
Now, let’s move on to how to submit your website to Google next.
2. Submit Your Website to Google Search Console
Google Search Console (GSC), formerly “Google Webmaster Tools,” is a free service available to all website owners.
It shows you how Google indexes and adds your site to Google search results so that you can make sure the right people are seeing your website.
You can easily submit your website to Google Search Console and check if your web pages are indexed using AIOSEO's Webmaster Tools.
To get started, go to General Settings in the All in One SEO menu, then click the Webmaster Tools tab.
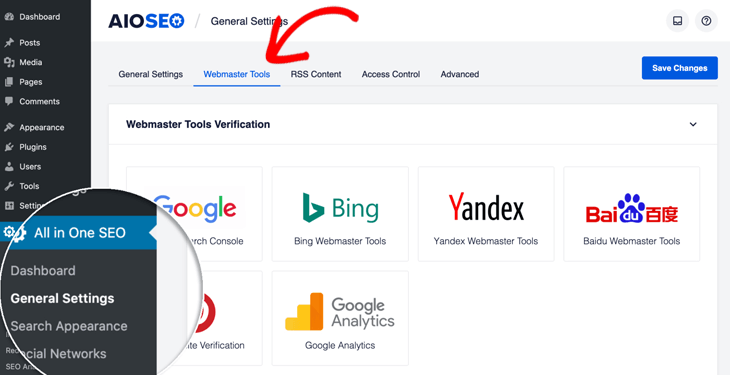
Now, navigate to Google Search Console and copy the HTML verification tag. If you haven’t added your site yet, you can check out our guide on how to add Google Search Console to your WordPress website.
Next, click on the Google Search Console block and paste the HTML tag into the Google Verification Code field.

Then, go back to Google Search Console and click the Verify button.
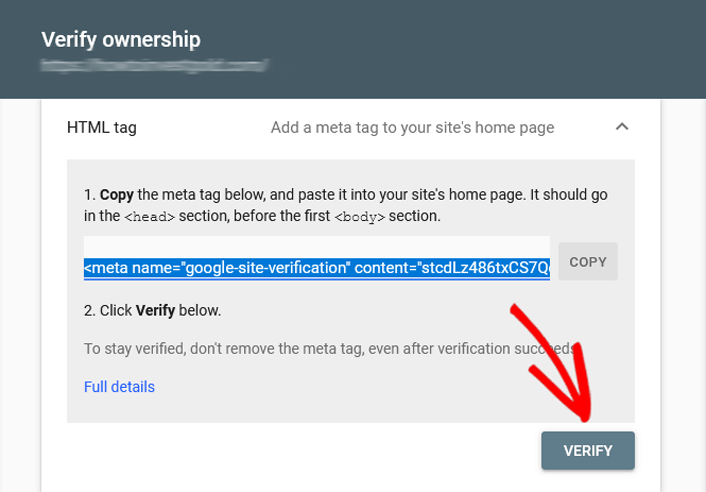
Google Search Console will look for the HTML tag in your site’s code and show you an Ownership verified message.
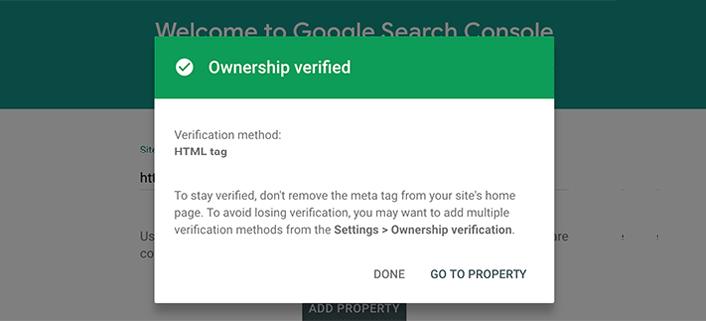
You have verified your website with Google Search Control and ensured your content will get indexed.
Note: If you don’t see this message, then you need to clear your WordPress cache. It’ll ensure that Google can get to the latest version of your site.
Now, all you need is a bit of patience since your site won’t get indexed overnight. It’ll take a little while, but there are ways to speed up the indexing process.
Check out our tutorial on adding Google Search Console to your website for more information.
3. Create an XML Sitemap
A sitemap helps search engines easily navigate through your website content. It gives them a list of all your content in a machine-readable format.
It also tells search engines which links on your site are more important than others and how frequently you update your site.
Sitemaps are extremely useful when you first start a blog or create a new website because most new websites don’t have that many internal links or backlinks yet.
By creating an XML sitemap, you can ensure that search engines index your new content and all your important posts and pages.
The easiest way to create an XML sitemap is by using AIOSEO, which we'll show you how to do next. Best of all, it automatically notifies search engines whenever you publish, update, or delete content on your website.
Enable XML Sitemap in AIOSEO
To get started, go to Sitemaps in the All in One SEO menu. Next, click on General Sitemap in the top main navigation menu.

This will open the General Sitemap window, where you can see that Enable Sitemap is set to on.

After that, you can click on the Open Sitemap button to view your XML sitemap.

Once you’ve opened the sitemap, you’ll see an index page for your XML sitemap that looks like this:

That’s it!
Now, you can rest assured that Google will know about all your web pages and can show them in search results.
AIOSEO's Use Cases for Indexing Your Website on Google
E-commerce Stores
Large catalogs often have new or updated products that Google misses. Submitting sitemaps and adding product schema help accelerate discovery, improve product visibility, and drive higher conversions.
Blogs & Publishers
Frequent publishing can overwhelm crawlers. Structured sitemaps and article schema help Google quickly understand and index each post, leading to better topical visibility and higher organic reach.
SaaS Companies
New feature pages and documentation updates often don’t get indexed promptly. Using schema and URL submission ensures that fresh content appears in search results sooner, offering better customer education and higher-quality leads.
Agencies & Freelancers
Managing multiple client websites means that indexing issues frequently arise. Automated tools help ensure fast discovery, delivering quicker results and improved client satisfaction.
Local Businesses
Service pages and location pages sometimes never index properly. Local Business schema and sitemap submissions improve visibility, leading to more calls, leads, and higher map pack rankings.
Affiliate Marketers
New reviews or comparison pages may take weeks to index. Adding review schema and proper linking helps Google crawl them faster, resulting in faster ranking and higher affiliate revenue.
AI Content Websites
High-volume content stumps Google. Structured data, internal links, and fresh sitemaps make AI-heavy sites indexable at scale, creating a stable crawl foundation and faster ranking cycles.
For more details on how to customize your sitemap, you can check out our post on how to create a sitemap in WordPress.
4. Submit Your Sitemap to Google Search Console
The next step is to submit your XML sitemap to Google Search Console.
Simply log in to your Google Search Console account and select your website.
Then, go to Sitemaps on the left side of the screen and add the last part of your sitemap URL (sitemap.xml) under the Add new sitemap section, and click on the Submit button.
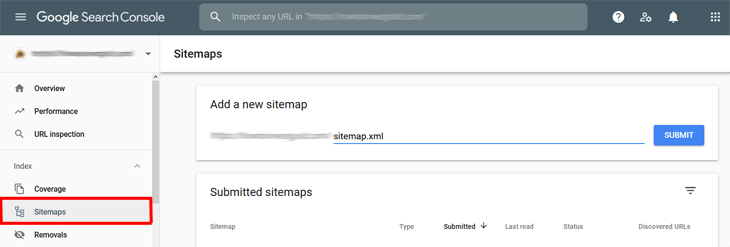
As simple as that!
Once Google has crawled and indexed your site, you will start seeing reports in the search console.
5. Leverage the IndexNow Protocol
The IndexNow protocol makes the internet more efficient by instantly alerting participating search engines of any changes you make on your website.

For example, if you change your content or add a new post or page, the IndexNow protocol will ping search engines about those changes.
Doing so will result in the search engines crawling and indexing your changes faster.
This means IndexNow is a powerful tool to help you get your content indexed faster, resulting in better chances of ranking.
The IndexNow protocol is a powerful tool that can help you get your content indexed fast.
Another significant advantage of IndexNow is that if one search engine participating in the IndexNow initiative is pinged, all other search engines will be alerted when new content is published. As a result, your content will quickly appear in search results for relevant searches.
The best part is that adding IndexNow to your site is easy. Just follow these simple steps.
6. Optimize Your Robots.txt File
A robots.txt file is a powerful SEO tool since it works as a website guide for search engine crawl bots or robots. As you may have guessed, it’s important that your robots.txt gives Google permission to crawl the site.
On the other hand, it’s common to disallow wp-admin pages since they aren’t useful to your visitors and necessary for Google to crawl. Telling Google not to crawl unnecessary pages can help boost rankings in search engines and increase page speed.
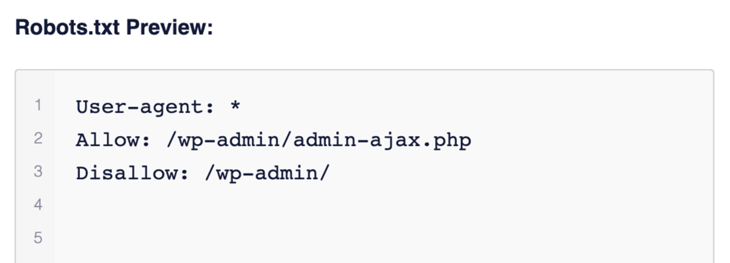
But when it comes to indexing, you need to make sure your pages are crawlable and that you haven’t disallowed any important URLs. Instead, you can tell Google bots to allow crawling them to prioritize these URLs. This is super easy to do with AIOSEO's Robots.txt Editor.

This powerful tool makes optimizing your robots.txt file easy as it comes with many useful directives such as Allow, Disallow, Clean-param, and Crawl-delay.

You also have the option to import a robots.txt file from another site, saving you a lot of time optimizing yours.

For more details, please visit our post on how to edit a robots.txt file in WordPress.
AIOSEO's Robots.txt Editor also allows you to block unwanted bots and makes it easy to manage internal site search URLs.
7. Check Your Noindex Tags
If certain pages on your site aren’t being indexed, it may be that they have noindex tags.
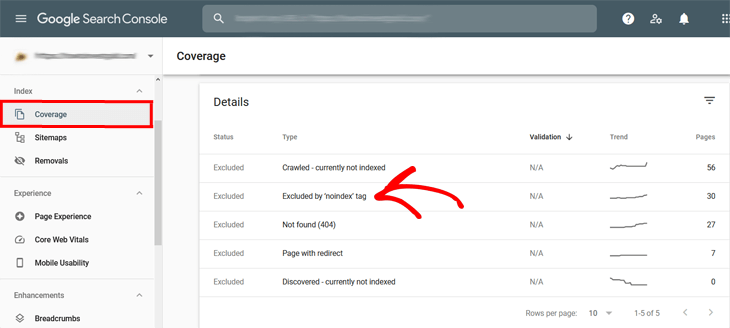
The easiest way to check this is by using Google Search Console. Once you've logged in to your account, go to the Coverage tab in the left menu and look for the message: Excluded by ‘noindex' tag.
If you see this message, you need to go back to your WordPress Settings » Reading (like we showed you earlier) and check so the Discourage search engines from indexing this site setting is unchecked.
If this option is checked, uncheck it and click the Save Changes button.
But if that isn't the case, the next step is to see if your URLs are nofollow. We'll explain why next.
8. Remove Nofollow Links
When Googlebot comes across nofollow links, it flags Google that it should remove these links from its index. So, you need to make sure to remove nofollow internal links.
Simply look for the rel=“nofollow” link attribute and remove it. You can do this straight from the HTML code or by using the WordPress block editor.
To learn more, please check our tutorial on how to add nofollow links in WordPress.
9. Create Internal Links on Your Website
Internal linking is one of the most effective ways to encourage crawling and boost your website’s indexation.
The paths the crawling spiders take through the web are formed by links. When a page links to another page, the spider follows that path.
To improve your indexing, you should create links to and from your most important pages. This tells Google, as well as your website visitors, about your new and important content.
To make internal linking super easy, you can use AIOSEO’s powerful Link Assistant feature.
Go to Link Assistant in the All in One SEO menu and click on the Links Report. In this report, you can discover new linking opportunities and see which posts don't have any internal links at all (orphan posts).

You can add the suggested internal links to your content automatically by clicking the Add Link button.

No need to manually edit posts one by one. With the Link Assistant, you can build both outbound internal links and inbound internal links in minutes. The best part is you don't even have to leave the page.
You can find more details in our post on how to save time on internal link building.
10. Build High-Quality Backlinks
Google recognizes that pages are trustworthy if they’re regularly linked to from authoritative websites. In other words, backlinks also tell Google that a page should be indexed.
Backlinks can also help with indexing as they make your content more discoverable. If a reputable website with high traffic links to your website, search engine crawlers are likely to follow that link to your site. This can lead to the discovery of new pages and content on your site that need to be indexed.
You can check out our link building guide if you want to know how to build backlinks.
Indexing Troubleshooting Matrix
| Issue | What It Means | Likely Cause | Recommended Fix | AIOSEO Tool |
| Discovered – Not Indexed | Google knows the URL but hasn’t crawled it | Weak internal links, low priority | Add internal links, submit sitemap | Link Assistant, Sitemap |
| Crawled – Currently Not Indexed | Google saw the page but didn’t store it | Thin/duplicate content, slow load, no schema | Improve content, add schema, add links | Schema Generator, SEO Analyzer |
| Excluded by Noindex | Page is intentionally blocked | Settings error | Remove noindex tag | Search Appearance Settings |
| Blocked by robots.txt | Google thinks the page lacks value | Misconfigured robots rule | Allow page in robots.txt | Robots.txt Editor |
| Alternate Page with Canonical | Google thinks another page is the primary version | Incorrect canonical tags | Fix canonical URLs | Canonical Settings |
| Soft 404 | Google thinks page lacks value | Thin/AI content | Improve content, add links | SEO Analyzer |
How to Check If Google Has Indexed Your Website
We're almost finished, but first, we’ll show you 2 quick and easy ways to check if Google has indexed your site:
1. Use AIOSEO's Index Status Report
One of the easiest ways to check if Google has indexed your content is to use AIOSEO's Index Status Report.

This report shows you a visual breakdown of your entire site's indexing status across five key categories:
- Indexed
- Crawled, Not Indexed
- Discovered, Not Indexed
- Other, Not Indexed
- No Results Yet
With AIOSEO's Index Status report, you can also diagnose indexing issues for your posts or pages. Click the Expand button on any post to view a detailed report.

This report explains why the post wasn't successfully indexed and provides information on its robots.txt, crawl status, and canonical URL.
2. Inspect Your URLs Using Google Search Console
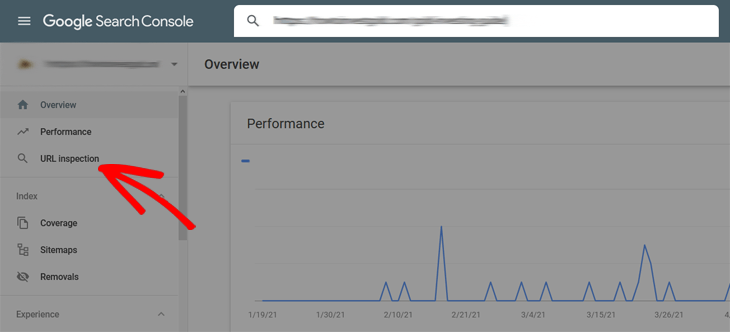
To begin, you can inspect your web pages using Google Search Console’s URL Inspection Tool.
To do this, go to the URL Inspection tool.
Next, paste the URL you want indexed into the search bar and wait for Google to check the URL. If it’s indexed, you’ll see a green checkmark followed by the text “URL is on Google.”
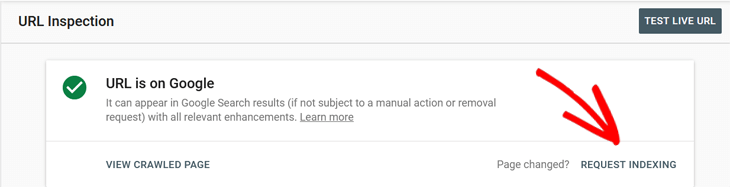
If the URL isn’t indexed, click on the Request Indexing button, and that’s it.
3. Use Google to See If Your Site Is Indexed
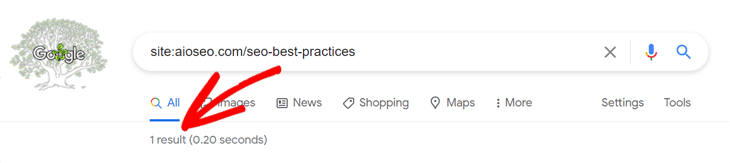
You can also use Google to see if your site is indexed. Simply go to Google and type in a search for site:yourwebsite.com.
Here's an example:

The number right below the search shows roughly how many of your pages Google has indexed.
If you want to check the index status of a specific URL, use the same process but use the full URL instead.
For example, site:yourwebsite.com/web-page-slug.
If the URL isn't indexed, no results will show up, and you can request indexing in Google Search Console.
Indexing Optimization Checklist
- Ensure robots.txt and noindex tags are correct to avoid accidentally blocking important pages from being indexed.
- Submit your XML sitemap in Google Search Console to help Google discover all pages without relying on manual crawling.
- Use URL Inspection to force-index new or updated pages, ensuring important content appears in search faster.
- Add Schema Markup using a Schema tool within AIOSEO to help Google understand your content type and improve indexing clarity.
- Fix crawl errors and broken links found using your SEO Audit or seo checker to eliminate indexing blockers.
- Improve metadata and internal linking to help Google navigate your website efficiently.
- Remove duplicate or thin AI-generated content and replace it with structured, unique pages for better indexing.
- Monitor indexing performance using a seo report generator to track which pages are discovered or ignored.
- Run a monthly website audit to catch blocked URLs, missing schema, or slow-loading pages that delay indexing.
- Use the AIOSEO Schema Markup tool to automate structured data creation and maintain consistency site-wide.
For more tools, check out our list of the best Google index checker tools.
How to Get Indexed on Google: Your FAQs Answered
What does it mean to be indexed on Google?
Being indexed on Google means that your website's pages or content have been discovered and added to Google's database. This leads to your website appearing in Google's search results when users search for relevant keywords.
Do I need to submit my site to Google for indexing?
While it's not necessary to manually submit your site for indexing, it can expedite the process. You can submit your sitemap through Google Search Console to help Google discover your pages faster.
How long does it take for Google to index my site?
The time it takes for Google to index your site can vary widely, from a few hours to several weeks. It depends on factors like the website's quality, its existing backlinks, and how often Google's crawlers visit your site.
We hope this post helped you learn how to index your website on Google. Use these tips to help speed up the indexing process of your site, and it’ll show up in search results faster.
We hope this post helped you understand what crawling and indexing are and why they’re important for your SEO. You may also want to check out other articles on our blog, like our tutorial on using the primary category to customize breadcrumbs or our guide on IndexNow and its impact on SEO.
If you found this article helpful, then please subscribe to our YouTube Channel. You’ll find many more helpful tutorials there. You can also follow us on Twitter, LinkedIn, or Facebook to stay in the loop.
Disclosure: Our content is reader-supported. This means if you click on some of our links, then we may earn a commission. We only recommend products that we believe will add value to our readers.
Want to Try AIOSEO for Free?
Enter the URL of your WordPress website to install AIOSEO Lite.

Gratitude for your insightful blog – your words resonate deeply and spark new perspectives. Thank you for sharing your wisdom and enriching our minds.
Amazing I will have to do the same for my website travellers Galore
I had alot of fears for my website travellers Galore but I appreciate the information alot. Thanks